Light Blonde And Dark Brunette Two-Tone Pixie Haircut


Added: 23 Apr 2018
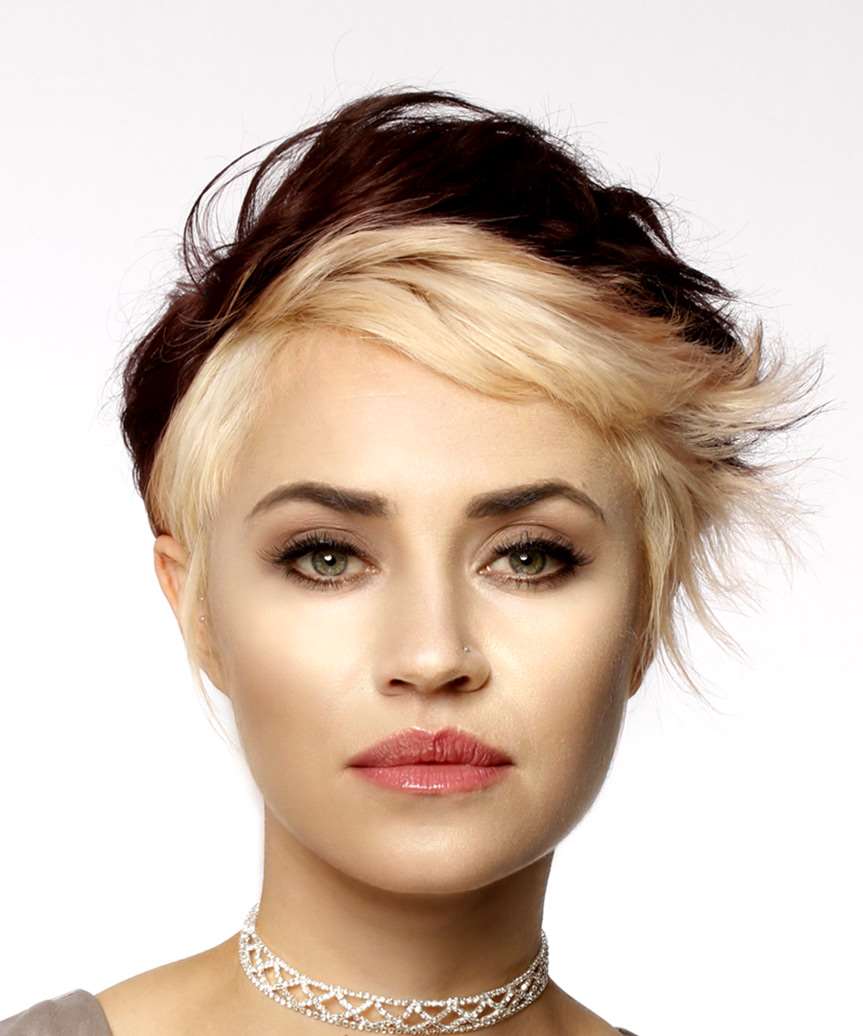
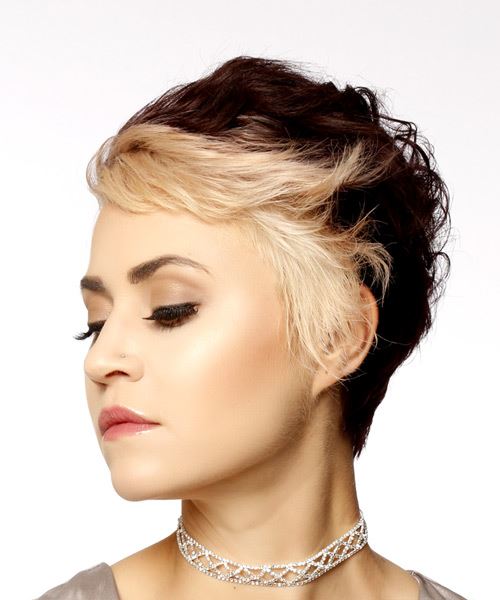
Our model is flaunting a chic two-tone Pixie haircut here with an asymmetrical effect. This side is blow-waved and flicked out and pinched with product to achieve a textured look and feel for a brilliant finish. A two-tone hairstyle is a great way to add dimension to the face. The illusion of depth is created by having one side of your hair bright and standing out from the other side, and can be achieved on both straight and curly hair. Light blonde and dark brunette two-tone pixie haircuts are trendy nowadays. Achieving an asymmetrical effect, this lovely hairstyle will make you look years younger than your actual age.

The back and sides of this hairstyle are tapered into the head with long layers cut around the sides and top, with the left side long layered. The bangs are layered straight across and along the forehead. You can wear this multi-tasking style in any way you want. The top half is blow-waved and flicked out for a textured look, while the bottom is pinched with a product to achieve a brilliant finish. A light blonde and dark brunette two-tone pixie cut look is one of the most popular and stylish options for women. If you have a heart or diamond face shape, oval face shape, round face shape, triangular face shape, or an oblong face shape then this style should work for you. Product is needed for hold and shine. The color is another standout feature here, with a light cream blonde on the bottom and a rich auburn brunette on top. So the regular trims will help you maintain this shape and provide added shine and volume to the hair.


Visual Story

Light Blonde And Dark Brunette Two-Tone Pixie Haircut- Visual Story


Hairstyle Suitability Rating: ★★★★★
Hairstyle Popularity Rating: ★★★★★

Hairstyle Type

Category
Casual
Length
Short
Elasticity
Wavy
Hair Color
Light Blonde and Dark Brunette Two-Tone

Haircut Technique

Type
Scissor Cut

Suitability

Gender
Women
Face Shape
round,oval,oblong,square,heart,diamond,triangular
Hair Density
Medium
Hair Texture
Fine

Age
Under 21, 21 - 30, 31 - 40, and 41 - 50
Height
Any
Weight
Thin/Average/Large

Forehead Height
Short/Average
Glasses
Yes

Styling

Time
10 minutes
Tip
Twist the ends out with wax for hold and shape.
Products
mousse, wax
Tools
blow dry


Similar hairstyles you may be interested in...


step 1

Apply styling mousse to damp hair, using your palm as a measuring guide, and evenly distribute it along the hair shaft. Styling mousse will add hold and can help achieve better results.


step 2

Using the corner of your comb and standing in front of a mirror find the middle of your right eye and then drag the comb straight up slowly until you reach your hairline and then continue back in a straight manner to achieve an even right part. A side part is great for longer face shapes because it creates the illusion of width.


step 3

A small radial brush is used on shorter hair types to add more body or in longer hair types to create curl. When selecting a radial brush, always use one with a pure bristle as this will not tear or damage the hair.


step 4

Starting at the nape/back of the hair, place your brush on top of the section and blow-dryer down starting from the roots and using tension as you go. Next, place the blow-dryer underneath the hair and continue to blow-dry the ends out. Make sure to follow the brush with the blow-dryer in an outwards direction. If you like fuller flicks, hold the ends out and roll them up into the brush and apply the heat for longer.


step 5

To blow-dry the crown/top sections, take a section of hair no bigger than the diameter of the brush and blow-dry the hair placing the brush under the section of hair. With your blow-dryer in front of the brush, follow the brush in an upwards direction at the roots and an outwards position at the ends for volume and softness. Continue until the section is dry.


step 6

To blow-dry the sides, take out your first sections from the front and clip the rest of the hair up. Place your brush on top of the section, and starting from the roots, blow-dry down using tension as you go. Next, place the blow-dryer underneath the hair and continue to blow-dry the ends out. Continue this step until the hair is dry.


step 7

Take a section of your hair no wider than the diameter of your brush. Place your brush under and at the roots of your section. Then with your blow-dryer above, drag the brush up through the mid-lengths and ends of the hair following with your blow-dryer and pulling the hair to the left. Repeat until your hair is completely dry.


step 8

Take a section of your hair from your ear to your temple that is the same diameter as the brush. Place your brush on top of the hair starting at the roots and pull the hair slowly in an outwards direction with your blow-dryer following in front. Repeat this step and then once the roots are dry, drag the brush to the mid-lengths and then slowly turn the brush in an inwards direction, flicking it through the ends.


step 9

To get your sides to sit out, apply a small amount of wax to your fingertips and then working mainly on the ends, pinch them while dragging the hair in an out and upwards motion. Be careful not to overdo that wax or your result will be a flat and limp style.


step 10

To finish the look, apply wax to your fingertips, making sure to smooth the wax over all of your fingers, then simply pinch the wax onto the ends of your hair, applying as much or as little as needed.


step 11

Apply some hard wax to your fingertips and then rub it into your roots while lifting your strands for soft volume.


step 12

Apply a small amount of wax then starting at your roots, apply the wax as you drag your hair in an upwards, to the left, motion.


Recommended Hairstyles...