Mackenzie Westmore Medium Straight Hairstyle
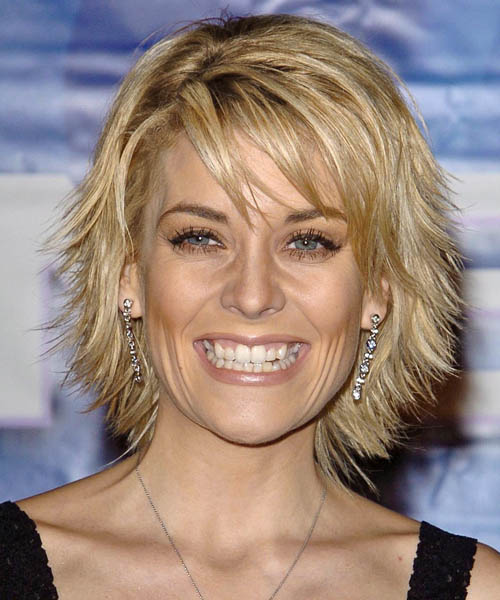

Added: 10 Nov 2010
This is a fabulous and funky short crop for Mackenzie. The back of Mackenzie's hair has been razored through the ends to add texture and help create her great flicked effect. The front of Mackenzie's hair has been jagged layered to create a flat but messy look. This style is very fresh and will be easy to maintain with regular trims.

Hairstyle Suitability Rating: ★★★★★
Hairstyle Popularity Rating: ★★★★★

Hairstyle Type

Category
Casual
Length
Medium
Elasticity
Straight

Haircut Technique

Type

Suitability

Gender
Women
Face Shape
oval,oblong,square,diamond,triangular
Hair Density
Thin/Medium
Hair Texture
Fine/Medium

Age
Under 21, 21 - 30, 31 - 40, 41 - 50, and 51 - 60
Height
Any
Weight
Thin/Average/Large

Forehead Height
Short/Average
Neck Length
Short/Average
Ears
Small/Average
Nose
Small/Average
Glasses
Yes

Styling

Time
10 minutes
Tip
Flick out the ends of your hair using your moulding cream to piece out the strands and add texture.
Products
mousse, moulding cream, lacquer
Tools
blow dry


Similar hairstyles you may be interested in...


step 1

Apply styling mousse to damp hair, using your palm as a measuring guide, and evenly distribute it along the hair shaft. Styling mousse will add hold and can help achieve better results.


step 2

Using the corner of your comb and standing in front of a mirror find the middle of your right eye and then drag the comb straight up slowly until you reach your hairline and then continue back in a straight manner to achieve an even right part. A side part is great for longer face shapes because it creates the illusion of width.


step 3

A medium radial brush is used on medium to long hair types to smooth out wavy or curly hair textures or to add body to straight hair. When selecting a radial brush, always use one with a pure bristle as this will not tear or damage the hair.


step 4

Starting at the nape/back of the hair, place your brush on top of the section and blow-dryer down starting from the roots and using tension as you go. Next, place the blow-dryer underneath the hair and continue to blow-dry the ends out. Make sure to follow the brush with the blow-dryer in an outwards direction. If you like fuller flicks, hold the ends out and roll them up into the brush and apply the heat for longer.


step 5

To blow-dry the sides, take out your first sections from the front and clip the rest of the hair up. Place your brush on top of the section, and starting from the roots, blow-dry down using tension as you go. Next, place the blow-dryer underneath the hair and continue to blow-dry the ends out. Continue this step until the hair is dry.


step 6

Working in sections, place your brush at the roots of your hair and then using a blow-dryer on low heat, drag your brush through to the ends styling towards the left.


step 7

Working in sections, place your brush at the roots of your hair and then using a blow-dryer on low heat, drag your brush through to the ends styling towards the right.


step 8

To blow-dry your bangs to the side, clip the back and side sections up, leaving just your bangs out. Place your brush beneath your bangs, holding your hair to the side and remembering to hold the tension between your hair and brush. With your blow-dryer on a low setting, apply heat by starting at the roots and make sure to stretch your hair out to the ends. Repeat until your hair is dry.


step 9

Using moulding cream and your fingers grab the mid-lengths of your hair and then drag it out and upwards for a full and messy result.


step 10

To get your sides to sit out, apply a small amount of moulding cream to your fingertips and then working mainly on the ends, pinch them while dragging the hair in an out and upwards motion. The more moulding cream and the more pinching that you apply, the more textured and pasty the result.


step 11

Apply moulding cream to your fingertips then gently rake through your bangs, sweeping the hair to the left as you go. Be careful not to use too much product as it can become sticky and clumpy.


step 12

Lacquer is great for strong hold. A small amount is all that is required to finish and should be applied from an arms length distance to the entire style.


Recommended Hairstyles...