Kat Von D Long Wavy Dark Burgundy Red Hairstyle
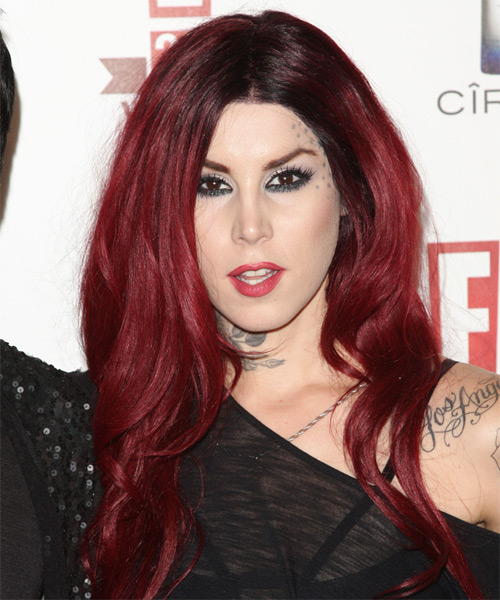

Added: 09 Aug 2012
If you're a certified rock chick and love your tattoos, leather and piercings, Kat Von D is definitely one to watch for style inspiration. The tattoo artist turned reality TV star loves to turn heads with her gothic meets biker chick style, and you too can get this look. Here's how:

The Hair
Kat loves her long hair but natural, it's not. She uses hair extension to add length and volume and the color is (obviously) modified from her natural black-brown hue. To get this hair color, ask your hairstylist to use a deep red high-lift color (for brunette and raven-haired ladies). If you are naturally blonde and want to get this deep red hair color, be prepared to be in the chair for a while! This rich shade will take a while to achieve on light hair. This ruby red hairdo is layered through the sides and back to lighten the length and encourages shape and style. This look is easy to maintain with regular trims and color will need to be touched up every 4-6 weeks to maintain brightness and shine.

The Makeup
Kat maintains her fair skin well and doesn't cover it up with tanning cream or bronzer in any way. She focuses on her eyes, which are usually done dark and smokey. She also chooses pink and red shades to match her berry–toned hair. Kat has cool skin and hair tones so black, charcoal grey and pink makeup works the best for her.

The Body Art
This one is completely up to you. Add tattoos and piercings to complete the look at your own discretion!

Hairstyle Suitability Rating: ★★★★★
Hairstyle Popularity Rating: ★★★★★

Hairstyle Type

Category
Casual
Length
Long
Elasticity
Wavy
Hair Color
Dark Burgundy Red

Haircut Technique

Type
Scissor Cut

Suitability

Gender
Women
Face Shape
round,oval,heart,triangular
Hair Density
Medium/Thick
Hair Texture
Medium/Coarse

Age
Under 21, 21 - 30, and 31 - 40
Height
Any
Weight
Thin/Average/Large

Forehead Height
Short/Average
Neck Length
Short/Average
Ears
Small/Average
Nose
Small/Average
Glasses
Yes

Styling

Time
30 minutes
Tip
Use your smoothing shine to add a small amount of gloss and to reduce fly-aways.
Products
moisturizer, wax, smoothing shine, hair spray
Tools
blow dry, curling iron


Similar hairstyles you may be interested in...


step 1

Apply a small amount of hair moisturizer to the palm of your hand and distribute it evenly through the mid-lengths and the ends. Moisturizer will help your hair to maintain good condition and protect your strands from heat as you style.


step 2

Using the corner of your comb and standing in front of a mirror find the middle of your nose and then drag the comb straight up slowly until you reach your hairline and then continue back in a straight manner to achieve an even middle part. A middle part is a great way to make small, round face shapes appear longer and thinner.


step 3

A large radial brush is usually used on long straight hair types or to smooth out wavy or curly hair textures. When selecting a radial brush, always use one with a pure bristle as this will not tear or damage the hair.


step 4

To blow-dry under, start at the nape/back and place your brush under the section of hair close to the nape. With the dryer held up over the hair, pull the brush from the roots and continue to the mid length's, keeping the blow-dryer following over the top. Once you reach the ends, curve them under. Repeat this step until the section is completely dry.


step 5

To blow-dry the sides, take out a small section of hair from the front and clip the rest of the hair away. Next, place the brush under the section and then pull the brush and hair forward around your face (this curving motion creates body). Place the hair-dryer on top of the brush until you reach the ends and then turn the ends under. Repeat until dry.


step 6

A large curling iron is used to create large soft curls and can be used to add body.


step 7

Take a small section of hair and place the ends at the base of your curling iron barrel and then wrap the hair up around the barrel until you reach your mid-lengths. Hold the hair for 5 to 10 seconds and then release the hair by unwinding the strands backwards.


step 8

Apply a small amount of wax to your fingertips and then lightly piece and pinch the ends of your hair.


step 9

Apply a very small amount of smoothing shine to the palms of your hands and then run it through the mid-lengths and ends of your hair. Be careful not to add any to the roots or a large amount to any section of the hair as smoothing shine can be very heavy on the hair, weighing it down and making it appear oily.


step 10

To finish, apply a minimal amount of hairspray from an arms length distance to the top, sides and back. Take care not to use too much or you will end up with a white, flaky residue which looks like dandruff.


Recommended Hairstyles...