Jane Fonda's Short Sassy Flicked Hairstyle

Images © MediaPunch / TheHairStyler.com
1 View
Added: 11 Nov 2010
Hairstyle Suitability Rating: ★★★★★
Hairstyle Popularity Rating: ★★★★★

Description

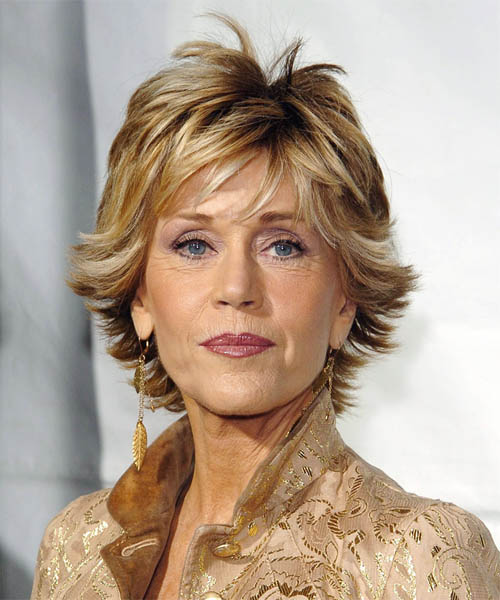
Jane looked great at the "Monster-In-Law" L.A Premiere thanks to the help of this sassy short razored flicked style. This style has the right amount of height though the top and texture throughout the sides to create a great look, and the wispy swept bangs add just the right amount of shape to Jane's face perfectly. Her length was jagged cut at chin level and her top and sides were angle layered and razor cut to create this full, flicked 'do. The color is right for her features and the highlights show off her beautiful complexion perfectly. This style will be easy to maintain with regular trims.


Hairstyle Type

Category
Formal
Length
Short
Elasticity
Straight
Hair Color
Dark Golden Blonde

Haircut Technique

Type

Suitability

Gender
Women
Face Shape
oval,oblong,square,heart,diamond
Hair Density
Thin/Medium
Hair Texture
Fine/Medium

Age
Under 21, 21 - 30, 31 - 40, 41 - 50, 51 - 60, and Over 60
Height
Any
Weight
Thin/Average/Large

Forehead Height
Short/Average
Neck Length
Short/Average
Ears
Small/Average
Nose
Small/Average
Glasses
No

Styling

Time
30 minutes
Tip
To create a fuller flick, drag your fingers through the mid-lengths and the ends of your hair, twisting the ends out as you go.
Products
moisturizer, mousse, wax, smoothing shine, hair spray
Tools
blow dry


Similar hairstyles you may be interested in...


Try On This Hairstyle


Visual Story

Jane Fonda's Short Sassy Flicked Hairstyle- Visual Story


Styling Steps


step 1

Apply a small amount of hair moisturizer to the palm of your hand and distribute it evenly through the mid-lengths and the ends. Moisturizer will help your hair to maintain good condition and protect your strands from heat as you style.


step 2

Apply styling mousse to damp hair, using your palm as a measuring guide, and evenly distribute it along the hair shaft. Styling mousse will add hold and can help achieve better results.


step 3

Using the corner of your comb and standing in front of a mirror find the middle of your left eye and then drag the comb straight up slowly until you reach your hairline and then continue back in a straight manner to achieve an even left part. A side part is great for longer face shapes because it creates the illusion of width.


step 4

It is always a good idea to work in sections. This will help to make your hair styling quicker, easier to follow and more orderly. Comb your hair out and place your hair up into four equal sections, two in front and two in back, starting from ear to ear.


step 5

A small radial brush is used on shorter hair types to add more body or in longer hair types to create curl. When selecting a radial brush, always use one with a pure bristle as this will not tear or damage the hair.


step 6

Starting at the nape/back of the hair, place your brush on top of the section and blow-dryer down starting from the roots and using tension as you go. Next, place the blow-dryer underneath the hair and continue to blow-dry the ends out. Make sure to follow the brush with the blow-dryer in an outwards direction. If you like fuller flicks, hold the ends out and roll them up into the brush and apply the heat for longer.


step 7

To blow-dry the sides, take out your first sections from the front and clip the rest of the hair up. Place your brush on top of the section, and starting from the roots, blow-dry down using tension as you go. Next, place the blow-dryer underneath the hair and continue to blow-dry the ends out. Continue this step until the hair is dry.


step 8

Working in sections, place your brush at the roots of your hair and then using a blow-dryer on low heat, drag your brush through to the ends styling towards the left.


step 9

Working in sections, place your brush at the roots of your hair and then using a blow-dryer on low heat, drag your brush through to the ends styling towards the right.


step 10

To blow-dry the crown/top sections, take a section of hair no bigger than the diameter of the brush and blow-dry the hair placing the brush under the section of hair. With your blow-dryer in front of the brush, follow the brush in an upwards direction at the roots and an outwards position at the ends for volume and softness. Continue until the section is dry.


step 11

When blow-drying your bangs to the side, section your hair up and clip your hair back to leave only your bangs out. Remember to make sure that your bangs are damp to make blow-drying more effective. Next, take your brush and place it underneath the hair and then blow-dry starting from the roots, adding tension to the hair as you go. Slowly pull your section down to the ends and continue until dry.


step 12

Using wax and your fingers grab the mid-lengths of your hair and then drag it out and upwards for a full and messy result. Remember not to overdo the wax or your result will be a flat and greasy style.


step 13

Apply a small amount of wax to your fingertips, and then starting about halfway down the hair shaft, pinch and drag the hair in a downward motion before flicking the ends out. Remember not to apply too much wax as it will weigh your hair down.


step 14

To finish the look, apply wax to your fingertips, making sure to smooth the wax over all of your fingers, then simply pinch the wax onto the ends of your hair, applying as much or as little as needed.


step 15

Apply wax to your fingertips then drag through your bangs, sweeping the hair to the right as you go. Pinching the ends will create soft texture.


step 16

Apply a very small amount of smoothing shine to the palms of your hands and then run it through the mid-lengths and ends of your hair. Be careful not to add any to the roots or a large amount to any section of the hair as smoothing shine can be very heavy on the hair, weighing it down and making it appear oily.


step 17

To finish, apply a minimal amount of hairspray from an arms length distance to the top, sides and back. Take care not to use too much or you will end up with a white, flaky residue which looks like dandruff.


Recommended Hairstyles...