Lady Gaga Medium Wavy Light Platinum Blonde Bob Haircut


Added: 05 Mar 2016
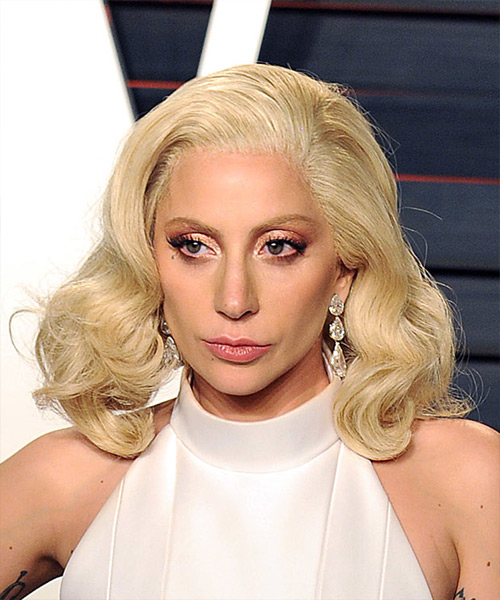
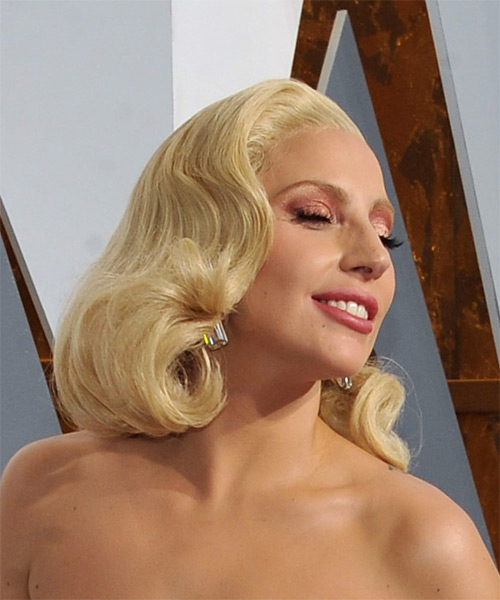
This formal hairstyle is perfect for a night out. Large curls give this 'do a voluminous finish. This style will best be re-created in naturally wavy or curly hair and will need a strong hold hairspray to keep it in place.

Lady Gaga knows how to turn heads at every event she attends, and this one is no exception. Here she channels a vintage Hollywood look with sculpted large Marilyn Monroe-style curls. Lady Gaga has an oval face shape with large distinctive features, so she can pull off bold hairstyles better than most. This curly ‘do flatters her face by softening up her angles. The flipped over fringe adds height to her hairstyle and balances out her face shape. Gaga looks best in ‘dos that are shoulder length or shorter where the focus is kept on her expressive features.

Like many creative musicians, Lay Gaga is known for experimenting with a multitude of hair colors. She is a natural brunette and has an olive complexion and brown eyes to match. While she does look best in darker hair, she can also pull off blonde too as long as it has a golden base. This buttery blonde tone is just right for her as it gives her skin a sun-kissed finish and brings out her eyes.

Lady Gaga is an American singer, songwriter, and actress. She is known for her self-empowering messages, fashion, and live performances.

Hairstyle Suitability Rating: ★★★★★
Hairstyle Popularity Rating: ★★★★★

Hairstyle Type

Category
Formal
Length
Medium
Elasticity
Wavy
Hair Color
Light Platinum Blonde

Haircut Technique

Type
Scissor Cut

Suitability

Gender
Women
Face Shape
round,oval,oblong,diamond
Hair Density
Thick
Hair Texture
Medium

Age
21 - 30, 31 - 40, 41 - 50, 51 - 60, and Over 60
Height
Tall
Weight
Thin/Average/Large

Forehead Height
Long
Neck Length
Short/Average
Ears
Small/Average
Nose
Small/Average
Glasses
Yes

Styling

Time
30 minutes
Tip
Tease the hair at the roots to achieve a lot of body.
Products
mousse, moulding cream, hair spray
Tools
blow dry, hot rollers


Similar hairstyles you may be interested in...


step 1

Apply styling mousse to damp hair, using your palm as a measuring guide, and evenly distribute it along the hair shaft. Styling mousse will add hold and can help achieve better results.


step 2

It is always a good idea to work in sections. This will help to make your hair styling quicker, easier to follow and more orderly. Comb your hair out and place your hair up into four equal sections, two in front and two in back, starting from ear to ear.


step 3

A medium radial brush is used on medium to long hair types to smooth out wavy or curly hair textures or to add body to straight hair. When selecting a radial brush, always use one with a pure bristle as this will not tear or damage the hair.


step 4

To blow-dry under, start at the nape/back and place your brush under the section of hair close to the nape. With the dryer held up over the hair, pull the brush from the roots and continue to the mid length's, keeping the blow-dryer following over the top. Once you reach the ends, curve them under. Repeat this step until the section is completely dry.


step 5

To blow-dry the sides, take out a small section of hair from the front and clip the rest of the hair away. Next, place the brush under the section and then pull the brush and hair forward around your face (this curving motion creates body). Place the hair-dryer on top of the brush until you reach the ends and then turn the ends under. Repeat until dry.


step 6

Starting just above the crown take a section of your hair that is the same diameter as the brush. Place your brush underneath and at the roots of your section and then with your blow-dryer in front, drag the brush up and then turn it under when you reach the ends.


step 7

A large hot roller is used to give your hair a larger curl and to add lots of body.


step 8

Take the entire back section of your hair, and then starting from the crown, take a smaller section of hair no wider than the diameter of the hot roller and comb it through to ensure there are no knots. Place the roller at the ends of the section of hair, being sure to smooth the ends under, and then twist the roller down the hair shaft until it meets your head and then secure it in place with a pin or clip. Repeat this step until you have reached the nape of your neck and the entire back section of your hair is completed. Keep the rollers in your hair until they cool.


step 9

Take a section of hair no wider than the diameter of the hot roller and comb it through to ensure there are no knots. Place the roller at the ends of the section of hair, being sure to smooth the ends under, and then twist the roller vertically, making sure to roll it backwards, along the hair shaft to the roots and secure it with a pin or clip. Keep the rollers in your hair until they cool.


step 10

Take your front bang section and roll it up into your hot roller in a forward direction so that the hair curls under. Continue applying hot rollers along the top of your head in the opposite direction, going backwards. Keep the rollers in your hair until they cool.


step 11

Apply a small amount of moulding cream to your fingers, then starting at your roots, apply the moulding cream as you drag your hair in an upwards, to the right, motion. Use moulding cream sparingly as too much will make your hair sticky and hard to work with.


step 12

To get your sides to sit out, apply a small amount of moulding cream to your fingertips and then working mainly on the ends, pinch them while dragging the hair in an out and upwards motion. The more moulding cream and the more pinching that you apply, the more textured and pasty the result.


step 13

Apply moulding cream to your fingertips and then tilt your head forward and scrunch your hair.


step 14

To finish, apply a minimal amount of hairspray from an arms length distance to the top, sides and back. Take care not to use too much or you will end up with a white, flaky residue which looks like dandruff.


Recommended Hairstyles...