Medium Light Honey Blonde Smooth Hairstyle

Added: 21 May 2018
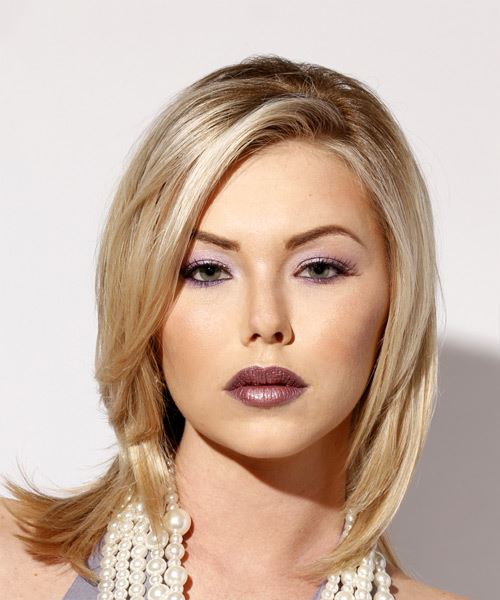
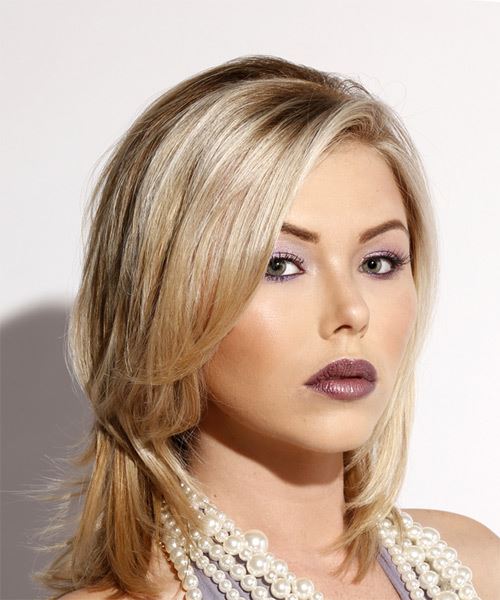
If you are looking for a new hairstyle to try, then this medium light honey blonde straight hairstyle with side swept bangs would be a good choice. Our model flaunts a layered style that is loose and casual, and shows off her light honey blonde tresses beautifully. This hairstyle is best suited for women with medium hair length and face shapes with a delicate complexion who prefer having their hair styled with a side-swept bang.

This unique hairstyle suits women with thin to medium-length straight hair. The side-swept bangs add beautiful sophistication to your hair and make you look more attractive. You can wear it on face shapes like round, oval, oblong, square, and heart. The bangs are long enough to be long at the back of your head but short enough to lay comfortably with combed or styled sides. It is a classic look that works well with various hair textures. You will notice that the ends have been heavily layered for a smooth and sculpted shape. This hairstyle looks great on both straight and wavy hair textures. Keep this hairstyle looking fresh with regular trims and toning treatments - keeping the ends blunt and clean, while your color will benefit from common toning treatments to keep it looking great. You should get a trim or color for your hair every six weeks, depending on how often you shampoo and condition your hair. Check with your stylist about what is best for maintaining this hairdo.


Visual Story

Medium Light Honey Blonde Smooth Hairstyle- Visual Story
Hairstyle Suitability Rating: ★★★★★
Hairstyle Popularity Rating: ★★★★★

Hairstyle Type

Category
Formal
Length
Medium
Elasticity
Straight
Hair Color
Light Blonde

Haircut Technique

Type
Scissor Cut

Suitability

Gender
Women
Face Shape
round,oval,oblong,square,heart,diamond,triangular
Hair Density
Medium
Hair Texture
Medium

Age
21 - 30, 31 - 40, 41 - 50, 51 - 60, and Over 60
Height
Any
Weight
Thin/Average/Large

Forehead Height
Short/Average
Glasses
Yes

Styling

Time
20 minutes
Products
mousse, moulding cream, hair spray
Tools
blow dry


Similar hairstyles you may be interested in...


Recommended Hairstyles...


step 1

Apply styling mousse to damp hair, using your palm as a measuring guide, and evenly distribute it along the hair shaft. Styling mousse will add hold and can help achieve better results.


step 2

Using the corner of your comb, create a straight part and then place your comb at the hairline and drag it through your hair, crisscrossing from left to right as you go. When you reach your crown, lift the comb up and then split the hair to each side, pulling it down to reveal your zigzag part.


step 3

A medium radial brush is used on medium to long hair types to smooth out wavy or curly hair textures or to add body to straight hair. When selecting a radial brush, always use one with a pure bristle as this will not tear or damage the hair.


step 4

Starting at the nape/back of the hair, place your brush on top of the section and blow-dryer down starting from the roots and using tension as you go. Next, place the blow-dryer underneath the hair and continue to blow-dry the ends out. Make sure to follow the brush with the blow-dryer in an outwards direction. If you like fuller flicks, hold the ends out and roll them up into the brush and apply the heat for longer.


step 5

To blow-dry the sides, take out your first sections from the front and clip the rest of the hair up. Place your brush on top of the section, and starting from the roots, blow-dry down using tension as you go. Next, place the blow-dryer underneath the hair and continue to blow-dry the ends out. Continue this step until the hair is dry.


step 6

To blow-dry the crown/top sections, take a section of hair no bigger than the diameter of the brush and blow-dry the hair placing the brush under the section of hair. With your blow-dryer in front of the brush, follow the brush in an upwards direction at the roots and an outwards position at the ends for volume and softness. Continue until the section is dry.


step 7

Take a section of your hair no wider than the diameter of your brush. Place your brush under and at the roots of your section. Then with your blow-dryer above, drag the brush up through the mid-lengths and ends of the hair following with your blow-dryer and pulling the hair to the right. Repeat until your hair is completely dry.


step 8

Take a section of your hair no wider than the diameter of your brush. Place your brush under and at the roots of your section. Then with your blow-dryer above, drag the brush up through the mid-lengths and ends of the hair following with your blow-dryer and pulling the hair to the left. Repeat until your hair is completely dry.


step 9

Take a section of your hair from your ear to your temple the same diameter as the brush. Place your brush underneath the hair starting at the roots and pull the hair slowly in a forward and downward direction with your blow-dryer above. Be sure the section is dry and then repeat the step on a new section of hair directly above.


step 10

Take a section of your hair from your ear to your temple that is the same diameter as the brush. Place your brush underneath the hair starting at the roots and pull the hair slowly in a forward and downward direction with your blow-dryer above. Be sure the section is dry and then repeat the step on a new section of hair directly above.


step 11

To blow-dry your bangs you will need to take your brush and firstly make sure the section is no wider than the diameter of the brush. Next, place your brush on top of your head and under your section. Using your blow-dryer on a medium setting, blow-dry your hair from the roots, slowly working your way to the ends. Make sure to keep the blow-dryer in front of the brush at all times. Continue this step until the bangs are completely dry.


step 12

To get your sides to sit out, apply a small amount of moulding cream to your fingertips and then working mainly on the ends, pinch them while dragging the hair in an out and upwards motion. The more moulding cream and the more pinching that you apply, the more textured and pasty the result.


step 13

Using moulding cream and your fingers grab the mid-lengths of your hair and then drag it out and upwards for a full and messy result.


step 14

Apply a small amount of moulding cream to your fingers, then starting at your roots, apply the moulding cream as you drag your hair in an upwards, to the right, motion. Use moulding cream sparingly as too much will make your hair sticky and hard to work with.


step 15

To finish, apply a minimal amount of hairspray from an arms length distance to the top, sides and back. Take care not to use too much or you will end up with a white, flaky residue which looks like dandruff.