Andrea Andrews Long Straight Hairstyle
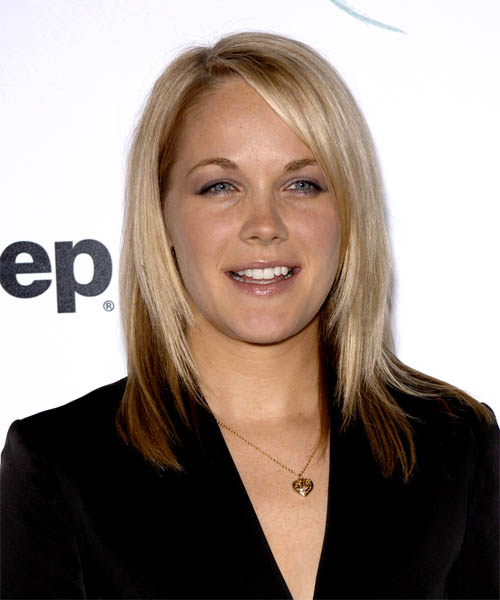

Added: 12 Aug 2009
Andrea looked great at the 8th Annual Lili Claire Foundation Benefit with this simple and soft style. Her length was left below shoulder level and long face framing layers were cut to add definition around her face. This style is perfect for long face shapes and naturally straight hair types.

Hairstyle Suitability Rating: ★★★★★
Hairstyle Popularity Rating: ★★★★★

Hairstyle Type

Category
Formal
Length
Long
Elasticity
Straight

Haircut Technique

Type

Suitability

Gender
Women
Face Shape
round,oval,heart,triangular
Hair Density
Thin/Medium
Hair Texture
Fine/Medium

Age
Under 21, 21 - 30, 31 - 40, and 41 - 50
Height
Any
Weight
Thin/Average/Large

Forehead Height
Short/Average
Neck Length
Short/Average
Ears
Small/Average
Nose
Small/Average
Glasses
Yes

Styling

Time
30 minutes
Tip
Pinch the ends with your wax for a wispy finish.
Products
gel spray, mousse, wax, hair spray
Tools
blow dry


Similar hairstyles you may be interested in...


step 1

Hold the gel spray no closer than 3 inches from your hair and then evenly mist the gel spray into the roots to create a stronger hold style. Gel spray will hold well and will not look wet or weigh the hair down. Using your gel spray in this fashion will create added hold and a longer lasting style.


step 2

Apply styling mousse to damp hair, using your palm as a measuring guide, and evenly distribute it along the hair shaft. Styling mousse will add hold and can help achieve better results.


step 3

Using the corner of your comb and standing in front of a mirror find the middle of your right eye and then drag the comb straight up slowly until you reach your hairline and then continue back in a straight manner to achieve an even right part. A side part is great for longer face shapes because it creates the illusion of width.


step 4

It is always a good idea to work in sections. This will help to make your hair styling quicker, easier to follow and more orderly. Comb your hair out and place your hair up into four equal sections, two in front and two in back, starting from ear to ear.


step 5

A medium radial brush is used on medium to long hair types to smooth out wavy or curly hair textures or to add body to straight hair. When selecting a radial brush, always use one with a pure bristle as this will not tear or damage the hair.


step 6

To blow-dry under, start at the nape/back and place your brush under the section of hair close to the nape. With the dryer held up over the hair, pull the brush from the roots and continue to the mid length's, keeping the blow-dryer following over the top. Once you reach the ends, curve them under. Repeat this step until the section is completely dry.


step 7

Take a section of your hair from your ear to your temple that is the same diameter as the brush. Place your brush underneath the hair starting at the roots and pull the hair slowly in a forward and downward direction with your blow-dryer above. Be sure the section is dry and then repeat the step on a new section of hair directly above.


step 8

Take a section of your hair from your ear to your temple the same diameter as the brush. Place your brush underneath the hair starting at the roots and pull the hair slowly in a forward and downward direction with your blow-dryer above. Be sure the section is dry and then repeat the step on a new section of hair directly above.


step 9

To blow-dry the crown/top sections, take a section of hair no bigger than the diameter of the brush and blow-dry the hair placing the brush under the section of hair. With your blow-dryer in front of the brush, follow the brush in an upwards direction at the roots and an outwards position at the ends for volume and softness. Continue until the section is dry.


step 10

To blow-dry your bangs to the side, clip the back and side sections up, leaving just your bangs out. Place your brush beneath your bangs, holding your hair to the side and remembering to hold the tension between your hair and brush. With your blow-dryer on a low setting, apply heat by starting at the roots and make sure to stretch your hair out to the ends. Repeat until your hair is dry.


step 11

Apply some wax to your fingertips and then pull through the ends of your hair in a downward motion to achieve a sculptured look. Pinch clumps of hair in different directions for a messier result.


step 12

Apply wax to your fingertips and then grip the left section of your hair from the mid-lengths and drag it in a forward and down direction for a wispy and textured result.


step 13

Apply wax to your fingertips and then grip the right section of your hair from the mid-lengths and drag it in a forward and down direction for a wispy and textured result.


step 14

Apply wax to your fingertips then drag through your bangs, sweeping the hair to the left as you go. Pinching the ends will create soft texture.


step 15

Apply some hard wax to your fingertips and then rub it into your roots while lifting your strands for soft volume.


step 16

To finish, apply a minimal amount of hairspray from an arms length distance to the top, sides and back. Take care not to use too much or you will end up with a white, flaky residue which looks like dandruff.


Recommended Hairstyles...