Andrea Riseborough Short Straight Layered Light Ash Blonde Bob Haircut with Layered Bangs
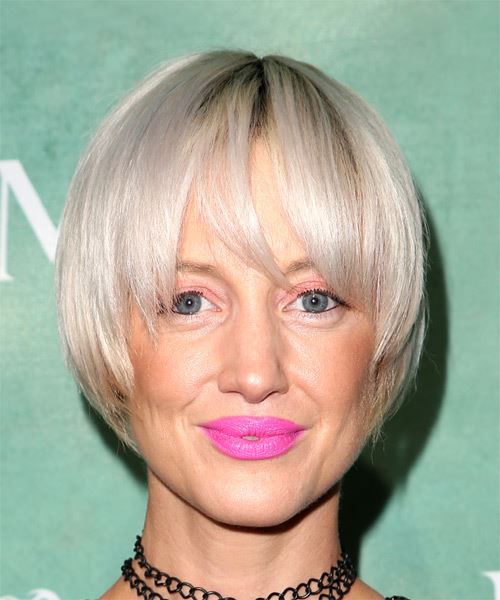
Added: 09 Apr 2018
Short and chic is the main idea for Andrea Riseborough's 'do. In between a long pixie cut and a bob, this 'do has a layered, rounded shape that is ultra flattering to long or angular face shapes. The layers around the face bring out her cheekbones while the long fringe dusts the eyes and creates a sexy peek-a-boo effect. As for her color, the light ash blonde tone looks great with her peachy complexion and light blue eyes.

Andrea Riseborough is an English stage and film actress. Her film appearances include Birdman or, Oblivion, Welcome to the Punch, Disconnect, Shadow Dancer and more.


Hairstyle Suitability Rating: ★★★★★
Hairstyle Popularity Rating: ★★★★★

Hairstyle Type

Category
Casual
Length
Short
Elasticity
Straight
Hair Color
Light Ash Blonde

Haircut Technique

Type
Scissor Cut

Suitability

Gender
Women
Face Shape
oval,oblong,diamond,triangular
Hair Density
Medium
Hair Texture
Medium

Age
21 - 30, 31 - 40, 41 - 50, 51 - 60, and Over 60
Height
Any
Weight
Thin/Average

Forehead Height
Long
Glasses
Yes

Styling

Time
10 minutes
Tip
Use a small round brush to blow dry this style into place.
Products
gel spray, moulding cream, hair spray
Tools
blow dry


Similar hairstyles you may be interested in...


Recommended Hairstyles...


step 1

Hold the gel spray no closer than 3 inches from your hair and then evenly mist the gel spray into the roots to create a stronger hold style. Gel spray will hold well and will not look wet or weigh the hair down. Using your gel spray in this fashion will create added hold and a longer lasting style.


step 2

Using the corner of your comb and standing in front of a mirror find the middle of your nose and then drag the comb straight up slowly until you reach your hairline and then continue back in a straight manner to achieve an even middle part. A middle part is a great way to make small, round face shapes appear longer and thinner.


step 3

A small radial brush is used on shorter hair types to add more body or in longer hair types to create curl. When selecting a radial brush, always use one with a pure bristle as this will not tear or damage the hair.


step 4

To blow-dry under, start at the nape/back and place your brush under the section of hair close to the nape. With the dryer held up over the hair, pull the brush from the roots and continue to the mid length's, keeping the blow-dryer following over the top. Once you reach the ends, curve them under. Repeat this step until the section is completely dry.


step 5

To blow-dry the sides, take out a small section of hair from the front and clip the rest of the hair away. Next, place the brush under the section and then pull the brush and hair forward around your face (this curving motion creates body). Place the hair-dryer on top of the brush until you reach the ends and then turn the ends under. Repeat until dry.


step 6

To blow-dry the crown/top sections, take a section of hair no bigger than the diameter of the brush and blow-dry the hair placing the brush under the section of hair. With your blow-dryer in front of the brush, follow the brush in an upwards direction at the roots and an outwards position at the ends for volume and softness. Continue until the section is dry.


step 7

Take a section of your hair no wider than the diameter of your brush. Place your brush under and at the roots of your section. Then with your blow-dryer above, drag the brush up through the mid-lengths and ends of the hair following with your blow-dryer and pulling the hair to the left. Repeat until your hair is completely dry.


step 8

Take a section of your hair no wider than the diameter of your brush. Place your brush under and at the roots of your section. Then with your blow-dryer above, drag the brush up through the mid-lengths and ends of the hair following with your blow-dryer and pulling the hair to the right. Repeat until your hair is completely dry.


step 9

Take a section of your hair from your ear to your temple the same diameter as the brush. Place your brush underneath the hair starting at the roots and pull the hair slowly in a forward and downward direction with your blow-dryer above. Be sure the section is dry and then repeat the step on a new section of hair directly above.


step 10

Take a section of your hair from your ear to your temple that is the same diameter as the brush. Place your brush underneath the hair starting at the roots and pull the hair slowly in a forward and downward direction with your blow-dryer above. Be sure the section is dry and then repeat the step on a new section of hair directly above.


step 11

When blow-drying your bangs forward, clip your hair back leaving only your bangs out. Position your bangs evenly in your brush, taking the hair in a forward direction. Blow-dry from roots to ends, keeping the tension consistent, and evenly distribute heat over the whole section of hair that you are working on. Repeat until the hair is dry. This will stop any frizz that may occur.


step 12

Apply a small amount of moulding cream to your fingertips and then using your fingers, rake through your bangs to the ends for hold and texture.


step 13

Using a small amount of moulding cream, work it through the mid-lengths and ends in a downward motion. For added texture, pinch the ends as you go sparingly.


step 14

Apply some moulding cream to your fingertips and then pull it through the ends of your hair in a downward motion to achieve a textured look.


step 15

To finish, apply a minimal amount of hairspray from an arms length distance to the top, sides and back. Take care not to use too much or you will end up with a white, flaky residue which looks like dandruff.