Curly Shoulder-Length Black Hairstyle With Layered Bangs


Added: 11 Nov 2010
Looking for a stylish hairstyle that's easy to maintain? Check out this medium-length curly black hairstyle with layered bangs. It's a great way to keep your hair long while adding some edge to your look. This lovely 'do can be dressed up or down for any occasion.

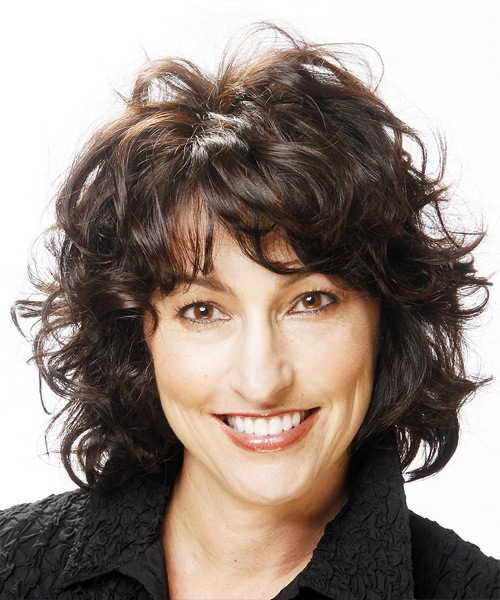
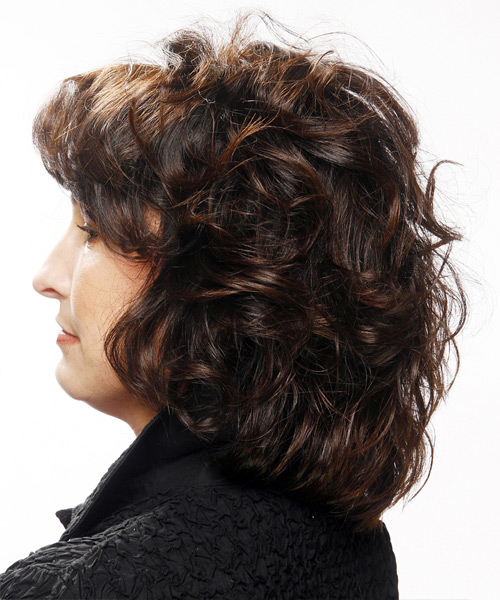
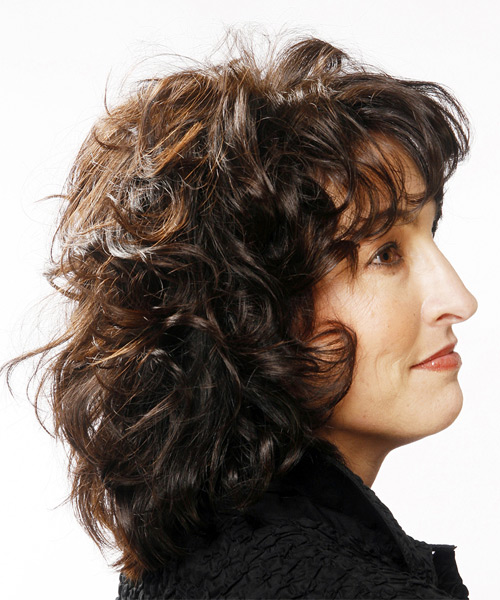
Our model highlights this medium hairstyle with a collared top, which compliments her overall alluring appearance. This stunning 'do has been layered to create a full, round wave with full bangs that have also been jagged cut and left to fall with the waves to make a soft look around the face. The sides have been cut up to the neck and layered to hug the neck and face and to give the top all the attention. The back is also cut to the neck and layered nicely for an even look. By using a curling iron, you can add some texture and playfulness to your overall appearance. A smooth hair texture can enhance your facial features while adding volume can create a more defined jawline and chin. This hairstyle is an excellent way to add some edge to your look without sacrificing elegance and sophistication. It suits women with a fine or medium hair texture that sports most face shapes, especially oval and heart-shaped faces. The sleek and contemporary cut allows for a versatile style worn any day of the week or evening out with your favorite heels. This outstanding wavy style is ideal for people who adore extra volume in their hair.

To enhance your attractiveness and style, maintaining this elegant 'do with consistent trims every 4-6 weeks is essential to keep your hair looking fresh and healthy. Furthermore, incorporating soft waves into the mid-sections and ends with a curling iron will provide your hair with the necessary dimension and texture.


Visual Story

Curly Shoulder-Length Black Hairstyle With Layered Bangs- Visual Story


Hairstyle Suitability Rating: ★★★★★
Hairstyle Popularity Rating: ★★★★★

Hairstyle Type

Category
Casual
Length
Medium
Elasticity
Curly
Hair Color
Black

Haircut Technique

Type
Scissor Cut

Suitability

Gender
Women
Face Shape
oval,oblong,square,heart
Hair Density
Thin
Hair Texture
Fine/Medium

Age
Under 21, 21 - 30, 31 - 40, and 41 - 50
Height
Any
Weight
Thin/Average/Large

Forehead Height
Short/Average
Neck Length
Long
Ears
Small/Average
Nose
Small/Average
Glasses
Yes

Styling

Time
30 minutes
Tip
Use the curling iron to add waves into the mid-lengths and the ends of your hair.
Products
moisturizer, mousse, wax, smoothing shine, hair spray
Tools
blow dry, curling iron


Similar hairstyles you may be interested in...


step 1

Apply a small amount of hair moisturizer to the palm of your hand and distribute it evenly through the mid-lengths and the ends. Moisturizer will help your hair to maintain good condition and protect your strands from heat as you style.


step 2

Apply styling mousse to damp hair, using your palm as a measuring guide, and evenly distribute it along the hair shaft. Styling mousse will add hold and can help achieve better results.


step 3

Using the corner of your comb and standing in front of a mirror find the middle of your right eye and then drag the comb straight up slowly until you reach your hairline and then continue back in a straight manner to achieve an even right part. A side part is great for longer face shapes because it creates the illusion of width.


step 4

A large radial brush is usually used on long straight hair types or to smooth out wavy or curly hair textures. When selecting a radial brush, always use one with a pure bristle as this will not tear or damage the hair.


step 5

To blow-dry under, start at the nape/back and place your brush under the section of hair close to the nape. With the dryer held up over the hair, pull the brush from the roots and continue to the mid length's, keeping the blow-dryer following over the top. Once you reach the ends, curve them under. Repeat this step until the section is completely dry.


step 6

To blow-dry the sides, take out a small section of hair from the front and clip the rest of the hair away. Next, place the brush under the section and then pull the brush and hair forward around your face (this curving motion creates body). Place the hair-dryer on top of the brush until you reach the ends and then turn the ends under. Repeat until dry.


step 7

To blow-dry the crown/top sections, take a section of hair no bigger than the diameter of the brush and blow-dry the hair placing the brush under the section of hair. With your blow-dryer in front of the brush, follow the brush in an upwards direction at the roots and an outwards position at the ends for volume and softness. Continue until the section is dry.


step 8

To blow-dry your bangs to the side, clip the back and side sections up, leaving just your bangs out. Place your brush beneath your bangs, holding your hair to the side and remembering to hold the tension between your hair and brush. With your blow-dryer on a low setting, apply heat by starting at the roots and make sure to stretch your hair out to the ends. Repeat until your hair is dry.


step 9

A medium curling iron is used to create medium sized curls.


step 10

Starting from the back, take a small section of hair and place the ends at the base of your curling iron barrel and then wrap the hair up around the barrel until you reach your roots. Hold the hair for 5 to 10 seconds and then release the hair by unwinding the strands backwards. Continue this step until the entire back section of your hair is completed.


step 11

Take a small section of hair and place the ends at the base of your curling iron barrel and then wrap the hair up around the barrel until you reach your mid-lengths. Hold the hair for 5 to 10 seconds and then release the hair by unwinding the strands backwards.


step 12

Apply a small amount of wax to your fingertips and then lightly piece and pinch the ends of your hair.


step 13

Apply wax to your fingertips then drag through your bangs, sweeping the hair to the left as you go. Pinching the ends will create soft texture.


step 14

Apply some hard wax to your fingertips and then rub it into your roots while lifting your strands for soft volume.


step 15

Apply a very small amount of smoothing shine to the palms of your hands and then run it through the mid-lengths and ends of your hair. Be careful not to add any to the roots or a large amount to any section of the hair as smoothing shine can be very heavy on the hair, weighing it down and making it appear oily.


step 16

To finish, apply a minimal amount of hairspray from an arms length distance to the top, sides and back. Take care not to use too much or you will end up with a white, flaky residue which looks like dandruff.


Recommended Hairstyles...