Long Tousled Wavy Hairstyle
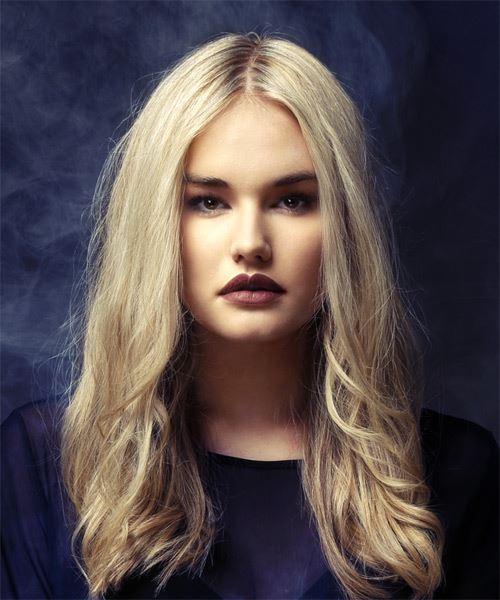

Added: 09 Apr 2018
Long hairstyles are popular because they can be simple, elegant and still look fantastic on most women. It is both an elegant and classic look that can easily be worn without much maintenance. Light pieces of hair on top of your head gives a lovely bounce. It's not hard to achieve a different look with a long hairstyle. You can do this by tying your hair up or parting it differently to give your face an attractive effect. Long tousled waves are the main attraction with this 'do. This wavy hairstyle is ideal for straight or wavy hair textures. It is the best hairstyle choice for women with a round, oval, or heart face shape, and it also looks great on women with oval or oblong faces. The best thing about this wavy hairstyle is that it frames your face perfectly. Layers have been cut throughout the ends to add movement to our model's long locks.

Regular trims and color toning treatments are needed to keep these ash-blonde locks with the gorgeous beige-blonde tone shiny and healthy. If you have thick hair, we recommend cutting it into two-inch layers instead of chopping it off. If your hair tends to be dry from too much sun exposure, use a deep conditioning treatment once a week at home to keep your hair healthy.

Hairstyle Suitability Rating: ★★★★★
Hairstyle Popularity Rating: ★★★★★

Hairstyle Type

Category
Casual
Length
Long
Elasticity
Wavy
Hair Color
Light Blonde

Haircut Technique

Type
Scissor Cut

Suitability

Gender
Women
Face Shape
round,oval,oblong,square,heart,diamond,triangular
Hair Density
Medium
Hair Texture
Medium

Age
Under 21, 21 - 30, 31 - 40, and 41 - 50
Height
Any
Weight
Thin/Average/Large

Forehead Height
Short/Average
Glasses
Yes

Styling

Time
20 minutes
Tip
Use a round brush to flick the ends out slightly while blow-drying.
Products
mousse, wax, hair spray
Tools
blow dry


Similar hairstyles you may be interested in...


step 1

Apply styling mousse to damp hair, using your palm as a measuring guide, and evenly distribute it along the hair shaft. Styling mousse will add hold and can help achieve better results.


step 2

Using the corner of your comb and standing in front of a mirror find the middle of your nose and then drag the comb straight up slowly until you reach your hairline and then continue back in a straight manner to achieve an even middle part. A middle part is a great way to make small, round face shapes appear longer and thinner.


step 3

A medium radial brush is used on medium to long hair types to smooth out wavy or curly hair textures or to add body to straight hair. When selecting a radial brush, always use one with a pure bristle as this will not tear or damage the hair.


step 4

To blow-dry under, start at the nape/back and place your brush under the section of hair close to the nape. With the dryer held up over the hair, pull the brush from the roots and continue to the mid length's, keeping the blow-dryer following over the top. Once you reach the ends, curve them under. Repeat this step until the section is completely dry.


step 5

To blow-dry the sides, take out a small section of hair from the front and clip the rest of the hair away. Next, place the brush under the section and then pull the brush and hair forward around your face (this curving motion creates body). Place the hair-dryer on top of the brush until you reach the ends and then turn the ends under. Repeat until dry.


step 6

To blow-dry the crown/top sections, take a section of hair no bigger than the diameter of the brush and blow-dry the hair placing the brush under the section of hair. With your blow-dryer in front of the brush, follow the brush in an upwards direction at the roots and an outwards position at the ends for volume and softness. Continue until the section is dry.


step 7

Take a section of your hair from your ear to your temple that is the same diameter as the brush. Place your brush on top of the hair starting at the roots and pull the hair slowly in an outwards direction with your blow-dryer following in front. Repeat this step and then once the roots are dry, drag the brush to the mid-lengths and then slowly turn the brush in an inwards direction, flicking it through the ends.


step 8

Take a section of your hair from your ear to your temple that is the same diameter as the brush. Place your brush on top of the hair starting at the roots and pull the hair slowly in an outwards direction with your blow-dryer following in front. Repeat this step and then once the roots are dry, drag the brush to the mid-lengths and then slowly turn the brush in an inwards direction, flicking it through the ends.


step 9

To get your sides to sit out, apply a small amount of wax to your fingertips and then working mainly on the ends, pinch them while dragging the hair in an out and upwards motion. Be careful not to overdo that wax or your result will be a flat and limp style.


step 10

To finish, apply a minimal amount of hairspray from an arms length distance to the top, sides and back. Take care not to use too much or you will end up with a white, flaky residue which looks like dandruff.


Recommended Hairstyles...