Futuristic And Spiky Pixie Haircut
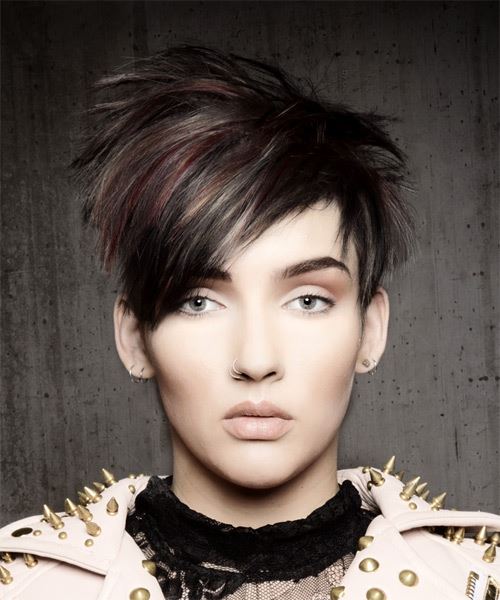

Added: 30 Jul 2018
Our model is absolutely rocking this futuristic pixie punk haircut here with a multi-color effect. This hairstyle has been tapered into the head and the top of the head has many long, fine layers to frame her face. The sharp, straight cuts allows the styling of the hair to be a bit easier. The back and sides of this short and edgy style are tapered into the head, with the front and top having many long, fine layers to frame the face. The shape of this hairstyle is perfect to complement a triangular face shape and needs some extra strength wax for hold and shine. To finish off the look the back of the hairstyle has been combed at the roots to achieve height and volume.

Darker hair colors will suit this Pixie cut more as darker hair gives you more of an edgy look and feel. If you have a triangular face shape, this hairstyle is ideal for you as the layers will shape your face and create an oval effect. If will look nice if you add some deep purple color streaks to this look or even some platinum colors to stick with the color trends at the moments. You need to touch you're your roots to keep this hairstyle looking clean and trendy.

Natural make-up application is the best for this look because you do not want to take away the star of the show which is this hairstyle. Glasses will look gorgeous with this hairstyle. Styling this hairstyle in the morning may take a bit longer than usual. You will need some hairspray and mousse to keep it all in place but we promise you, it is all worth it!

Hairstyle Suitability Rating: ★★★★★
Hairstyle Popularity Rating: ★★★★★

Hairstyle Type

Category
Casual
Length
Short
Elasticity
Straight
Hair Color
Dark Burgundy Brunette

Haircut Technique

Type
Clipper Cut

Suitability

Gender
Women
Face Shape
oval,diamond,triangular
Hair Density
Medium
Hair Texture
Medium

Age
21 - 30, 31 - 40, and 41 - 50
Height
Any
Weight
Thin/Average/Large

Forehead Height
Short/Average
Glasses
Yes

Styling

Time
10 to 20 minutes
Products
mousse, wax, hair spray
Tools
finger dry, blow dry


Similar hairstyles you may be interested in...


step 1

Apply styling mousse to damp hair, using your palm as a measuring guide, and evenly distribute it along the hair shaft. Styling mousse will add hold and can help achieve better results.


step 2

Using the corner of your comb and standing in front of a mirror find the middle of your left eye and then drag the comb straight up slowly until you reach your hairline and then continue back in a straight manner to achieve an even left part. A side part is great for longer face shapes because it creates the illusion of width.


step 3

Use your blow-dryer and your fingers to dry the back of your hair by moving your hair around to allow the heat to pass through it.


step 4

A small radial brush is used on shorter hair types to add more body or in longer hair types to create curl. When selecting a radial brush, always use one with a pure bristle as this will not tear or damage the hair.


step 5

To blow-dry the crown/top sections, take a section of hair no bigger than the diameter of the brush and blow-dry the hair placing the brush under the section of hair. With your blow-dryer in front of the brush, follow the brush in an upwards direction at the roots and an outwards position at the ends for volume and softness. Continue until the section is dry.


step 6

Take a section of your hair no wider than the diameter of your brush. Place your brush under and at the roots of your section. Then with your blow-dryer above, drag the brush up through the mid-lengths and ends of the hair following with your blow-dryer and pulling the hair to the right. Repeat until your hair is completely dry.


step 7

Take a section of your hair from your ear to your temple the same diameter as the brush. Place your brush underneath the hair starting at the roots and pull the hair slowly in a forward and downward direction with your blow-dryer above. Be sure the section is dry and then repeat the step on a new section of hair directly above.


step 8

Take a section of your hair from your ear to your temple that is the same diameter as the brush. Place your brush underneath the hair starting at the roots and pull the hair slowly in a forward and downward direction with your blow-dryer above. Be sure the section is dry and then repeat the step on a new section of hair directly above.


step 9

When blow-drying your bangs to the side, section your hair up and clip your hair back to leave only your bangs out. Remember to make sure that your bangs are damp to make blow-drying more effective. Next, take your brush and place it underneath the hair and then blow-dry starting from the roots, adding tension to the hair as you go. Slowly pull your section down to the ends and continue until dry.


step 10

Pick up a small selection of hair from your mid section no bigger than your tail comb. Place your comb at the roots and then comb up and down until the hair is standing up by itself. Continue to the crown and finish at the sides. Repeat this step if you require more volume.


step 11

To finish the look, apply wax to your fingertips, making sure to smooth the wax over all of your fingers, then simply pinch the wax onto the ends of your hair, applying as much or as little as needed.


step 12

To finish, apply a minimal amount of hairspray from an arms length distance to the top, sides and back. Take care not to use too much or you will end up with a white, flaky residue which looks like dandruff.


Recommended Hairstyles...