Roseanne Barr Medium Wavy Brunette Hairstyle with Side Swept Bangs
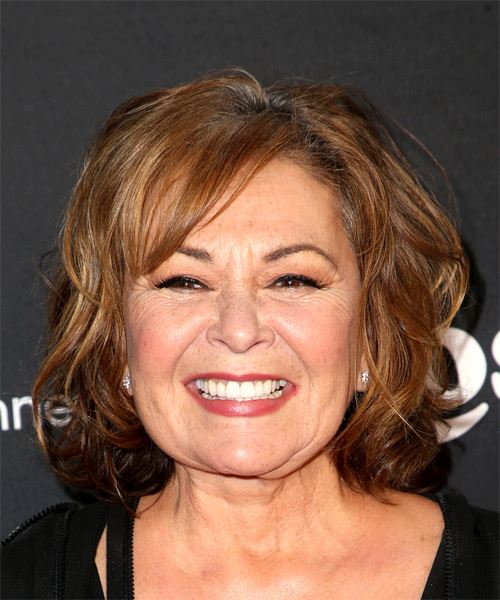
Added: 18 May 2018
Roseanne Barr flaunts a layered bob that is just right for her hair type and face shape. Layered ends and waves encourage movement and body in this chic shoulder-length bob that is ideal for fine to medium hair. This classic 'do is perfect to compliment an round or oblong face and needs product throughout -especially at the sides- to create this voluminous look and feel. The side-swept fringe is ideal for creating a soft finish to Roseanne's look.

Roseanne Cherrie Barr is an American actress, comedian, writer, and television producer. Barr began her career in stand-up comedy at clubs before gaining fame for her role in the hit television sitcom Roseanne.


Hairstyle Suitability Rating: ★★★★★
Hairstyle Popularity Rating: ★★★★★

Hairstyle Type

Category
Casual
Length
Medium
Elasticity
Wavy
Hair Color
Brunette

Haircut Technique

Type
Scissor Cut

Suitability

Gender
Women
Face Shape
round,oval,oblong,diamond,triangular
Hair Density
Medium
Hair Texture
Medium

Age
21 - 30, 31 - 40, 41 - 50, 51 - 60, and Over 60
Height
Any
Weight
Thin/Average/Large

Forehead Height
Short/Average
Glasses
Yes

Styling

Time
20 minutes
Products
mousse, moulding cream, hair spray
Tools
blow dry, hot rollers


Similar hairstyles you may be interested in...


Recommended Hairstyles...


step 1

Apply styling mousse to damp hair, using your palm as a measuring guide, and evenly distribute it along the hair shaft. Styling mousse will add hold and can help achieve better results.


step 2

Using the corner of your comb and standing in front of a mirror find the middle of your left eye and then drag the comb straight up slowly until you reach your hairline and then continue back in a straight manner to achieve an even left part. A side part is great for longer face shapes because it creates the illusion of width.


step 3

A medium radial brush is used on medium to long hair types to smooth out wavy or curly hair textures or to add body to straight hair. When selecting a radial brush, always use one with a pure bristle as this will not tear or damage the hair.


step 4

To blow-dry under, start at the nape/back and place your brush under the section of hair close to the nape. With the dryer held up over the hair, pull the brush from the roots and continue to the mid length's, keeping the blow-dryer following over the top. Once you reach the ends, curve them under. Repeat this step until the section is completely dry.


step 5

To blow-dry the crown/top sections, take a section of hair no bigger than the diameter of the brush and blow-dry the hair placing the brush under the section of hair. With your blow-dryer in front of the brush, follow the brush in an upwards direction at the roots and an outwards position at the ends for volume and softness. Continue until the section is dry.


step 6

To blow-dry the sides, take out a small section of hair from the front and clip the rest of the hair away. Next, place the brush under the section and then pull the brush and hair forward around your face (this curving motion creates body). Place the hair-dryer on top of the brush until you reach the ends and then turn the ends under. Repeat until dry.


step 7

When blow-drying your bangs to the side, section your hair up and clip your hair back to leave only your bangs out. Remember to make sure that your bangs are damp to make blow-drying more effective. Next, take your brush and place it underneath the hair and then blow-dry starting from the roots, adding tension to the hair as you go. Slowly pull your section down to the ends and continue until dry.


step 8

A large hot roller is used to give your hair a larger curl and to add lots of body.


step 9

Take a section of hair no wider than the diameter of the hot roller and comb it through to ensure there are no knots. Place the roller at the ends of the section of hair, being sure to smooth the ends under, and then twist the roller vertically, making sure to roll it backwards, along the hair shaft to the roots and secure it with a pin or clip. Keep the rollers in your hair until they cool.


step 10

Take a section of hair from the nape no wider than the diameter of the hot roller and comb it through to ensure there are no knots. Place the roller at the ends of the section of hair, being sure to smooth the ends under, and then twist the roller vertically down the hair shaft to the roots and secure it with a pin or clip. Continue this step until the entire back section of your hair is completed. Keep the rollers in your hair until they cool.


step 11

Take your front bang section and roll it up into your hot roller in a forward direction so that the hair curls under. Continue applying hot rollers along the top of your head in the opposite direction, going backwards. Keep the rollers in your hair until they cool.


step 12

Pick up a small selection of hair from your mid section no bigger than your tail comb. Place your comb at the roots and then comb up and down until the hair is standing up by itself. Continue to the crown and finish at the sides. Repeat this step if you require more volume.


step 13

Apply moulding cream to your fingertips and then tilt your head forward and scrunch your hair.


step 14

Apply some moulding cream to your fingertips and then rub it into your roots while lifting your strands for added body. Be sure not to use too much moulding cream at the roots as this can result in a glugy and thick uncomfortable feel.


step 15

To get your sides to sit out, apply a small amount of moulding cream to your fingertips and then working mainly on the ends, pinch them while dragging the hair in an out and upwards motion. The more moulding cream and the more pinching that you apply, the more textured and pasty the result.


step 16

Apply moulding cream to your fingertips then gently rake through your bangs, sweeping the hair to the right as you go. Be careful not to use too much product as it can become sticky and clumpy.


step 17

To finish, apply a minimal amount of hairspray from an arms length distance to the top, sides and back. Take care not to use too much or you will end up with a white, flaky residue which looks like dandruff.