Kaitlin Olson Medium Straight Dark Blonde Bob Haircut
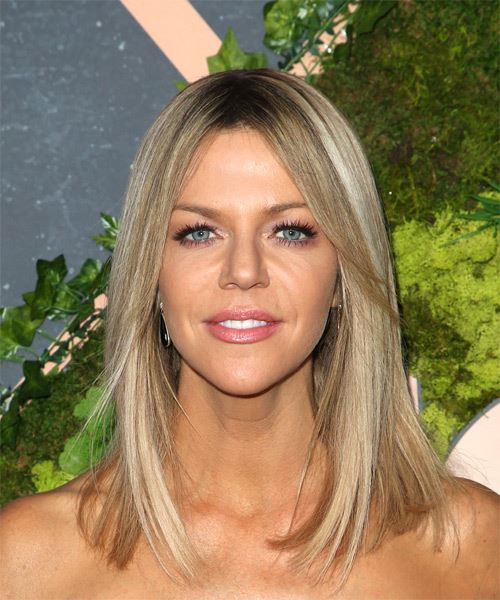

Added: 03 Dec 2017
This bob is blow-straightened perfectly to smooth down the top while turning the ends slightly under for a fabulous finish. The grown out bangs are worn down to frame the sides of the face and complete the overall look brilliantly. Regular trims are needed to maintain this hairstyle.

Kaitlin Olson looks flawless here in a chic and timeless shoulder-skimming bob. This cut is ideal for showing off her expressive facial features, especially her eyes and mouth, as well as her oval face shape. The grown out bangs provides her face with a nice frame while the rest of her hair maintains a smooth, sculpted shape that dusts her shoulders. The blunt ends give her locks a healthy looking appearance and keeps her hair looking thick. This ‘do has lots of movement to it and works with both casual and formal attire.

Kaitlin looks fabulous here in a sleek, chic bob that has a gorgeous highlighted effect going on. Her base color is a dark beige blonde tone that matches her eyebrows while highlights are added in a light sandy blonde. This is a natural looking color for Kaitlin that flatters her cool complexion and bright blue eyes. Ladies with a similar coloring suit the ash blonde tones nicely and will benefit from regular toning treatments to keep the hair looking cool.

Hairstyle Suitability Rating: ★★★★★
Hairstyle Popularity Rating: ★★★★★

Hairstyle Type

Category
Casual
Length
Medium
Elasticity
Straight
Hair Color
Dark Blonde

Haircut Technique

Type
Scissor Cut

Suitability

Gender
Women
Face Shape
round,oval,oblong,diamond,triangular
Hair Density
Medium
Hair Texture
Medium

Age
Under 21, 21 - 30, 31 - 40, and 41 - 50
Height
Any
Weight
Thin/Average/Large

Forehead Height
Short/Average
Glasses
Yes

Styling

Time
20 minutes
Tip
Use a flat iron to finish off this 'do for a sleek look.
Products
gel spray, moulding cream, smoothing shine, hair spray
Tools
blow dry, straightening iron


Similar hairstyles you may be interested in...


step 1

Hold the gel spray no closer than 3 inches from your hair and then evenly mist the gel spray into the roots to create a stronger hold style. Gel spray will hold well and will not look wet or weigh the hair down. Using your gel spray in this fashion will create added hold and a longer lasting style.


step 2

Using the corner of your comb and standing in front of a mirror find the middle of your nose and then drag the comb straight up slowly until you reach your hairline and then continue back in a straight manner to achieve an even middle part. A middle part is a great way to make small, round face shapes appear longer and thinner.


step 3

A medium radial brush is used on medium to long hair types to smooth out wavy or curly hair textures or to add body to straight hair. When selecting a radial brush, always use one with a pure bristle as this will not tear or damage the hair.


step 4

Using your brush, blow-dry in small sections starting from the nape/back. Tilting your head forward, place the brush an inch below the roots to hold them taut and aim the dryer above the brush for a few seconds before continuing to the ends.


step 5

Using your brush, blow-dry in small sections starting from the sides. Tilting your head forward, place the brush an inch below the roots to hold them taut and aim the dryer above the brush for a few seconds before continuing to the ends. Repeat this step on a new section directly above the dry one.


step 6

To blow-dry the crown/top sections, take a section of hair no bigger than the diameter of the brush and blow-dry the hair placing the brush under the section of hair. With your blow-dryer in front of the brush, follow the brush in an upwards direction at the roots and an outwards position at the ends for volume and softness. Continue until the section is dry.


step 7

Take a section of your hair from your ear to your temple the same diameter as the brush. Place your brush underneath the hair starting at the roots and pull the hair slowly in a forward and downward direction with your blow-dryer above. Be sure the section is dry and then repeat the step on a new section of hair directly above.


step 8

Take a section of your hair from your ear to your temple that is the same diameter as the brush. Place your brush underneath the hair starting at the roots and pull the hair slowly in a forward and downward direction with your blow-dryer above. Be sure the section is dry and then repeat the step on a new section of hair directly above.


step 9

When straightening your hair, first make sure that your hair is completely dry. Then, section your hair off starting from the back/nape using a comb. Straighten your hair starting from the roots and working your way down to the ends using your comb as your guide. Make sure not to leave the straightening iron in one spot for more than 3 seconds. For more information about straightening techniques click here.


step 10

Using a small amount of moulding cream, work it through the mid-lengths and ends in a downward motion. For added texture, pinch the ends as you go sparingly.


step 11

Apply some moulding cream to your fingertips and then pull it through the ends of your hair in a downward motion to achieve a textured look.


step 12

Apply a very small amount of smoothing shine to the palms of your hands and then run it through the mid-lengths and ends of your hair. Be careful not to add any to the roots or a large amount to any section of the hair as smoothing shine can be very heavy on the hair, weighing it down and making it appear oily.


step 13

To finish, apply a minimal amount of hairspray from an arms length distance to the top, sides and back. Take care not to use too much or you will end up with a white, flaky residue which looks like dandruff.


Recommended Hairstyles...