Christina Hendricks Long Wavy Ginger Red Hairstyle
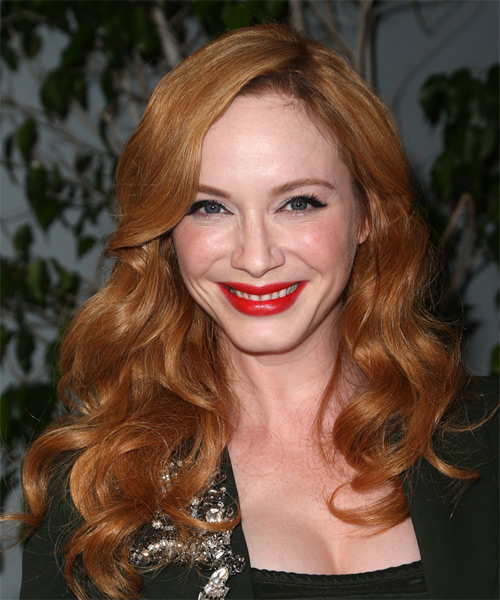

Added: 03 Aug 2015
Large loose waves are added to the sides and back of these fiery red locks to give the over-all look movement and bounce. This hairstyle is easy to re-create at home with the right tools and is great for any occasion. Product is needed to tame fly-away hair.

Christina Hendricks is one of Hollywood’s most famous redheads, and here she is working her copper locks to the max! Christina has an oval face shape with a high forehead, so this long curly ‘do works well to flaunt her features. The long side-swept fringe provides some forehead coverage for her while the large curls add volume and body all over. They also help to soften up her jawline too. Christina’s face shape is best suited to a side part as seen here, and she would also look great in a full-on fringe.

Christina loves her red locks and well she should—tones of copper and red are perfect for her cool, fair complexion and blue eyes. Ladies with a similar porcelain complexion would do well in this shade too. Red and copper hair also suits ladies with a ruddy or freckled complexion as well.

Christina Hendricks is an American actress. She is best known for her role as Joan Holloway in the television series Mad Men.

Hairstyle Suitability Rating: ★★★★★
Hairstyle Popularity Rating: ★★★★★

Hairstyle Type

Category
Casual
Length
Long
Elasticity
Wavy
Hair Color
Ginger Red

Haircut Technique

Type
Scissor Cut

Suitability

Gender
Women
Face Shape
oval,oblong,square,diamond
Hair Density
Thin/Medium
Hair Texture
Fine/Medium

Age
Under 21, 21 - 30, 31 - 40, and 41 - 50
Height
Any
Weight
Thin/Average/Large

Forehead Height
Short/Average
Neck Length
Short/Average
Ears
Small/Average
Nose
Small/Average
Glasses
Yes

Styling

Time
30+ minutes
Tip
This is a very quick and easy style to create.
Products
mousse, wax, smoothing shine, hair spray
Tools
blow dry, curling iron


Similar hairstyles you may be interested in...


step 1

Apply styling mousse to damp hair, using your palm as a measuring guide, and evenly distribute it along the hair shaft. Styling mousse will add hold and can help achieve better results.


step 2

Using the corner of your comb and standing in front of a mirror find the middle of your left eye and then drag the comb straight up slowly until you reach your hairline and then continue back in a straight manner to achieve an even left part. A side part is great for longer face shapes because it creates the illusion of width.


step 3

A large radial brush is usually used on long straight hair types or to smooth out wavy or curly hair textures. When selecting a radial brush, always use one with a pure bristle as this will not tear or damage the hair.


step 4

To blow-dry under, start at the nape/back and place your brush under the section of hair close to the nape. With the dryer held up over the hair, pull the brush from the roots and continue to the mid length's, keeping the blow-dryer following over the top. Once you reach the ends, curve them under. Repeat this step until the section is completely dry.


step 5

Take a section of your hair from your ear to your temple that is the same diameter as the brush. Place your brush on top of the hair starting at the roots and pull the hair slowly in a backward direction with your blow-dryer following in front. Be sure the section is dry and then repeat the step on a new section of hair directly behind.


step 6

Take a section of your hair from your ear to your temple that is the same diameter as the brush. Place your brush on top of the hair starting at the roots and pull the hair slowly in a backward direction with your blow-dryer following in front. Be sure the section is dry and then repeat the step on a new section of hair directly behind.


step 7

A large curling iron is used to create large soft curls and can be used to add body.


step 8

Take a small section of hair and place the ends at the base of your curling iron barrel and then wrap the hair up around the barrel until you reach your mid-lengths. Hold the hair for 5 to 10 seconds and then release the hair by unwinding the strands backwards.


step 9

Apply a small amount of wax to your fingertips and then lightly piece and pinch the ends of your hair.


step 10

Apply a very small amount of smoothing shine to the palms of your hands and then run it through the mid-lengths and ends of your hair. Be careful not to add any to the roots or a large amount to any section of the hair as smoothing shine can be very heavy on the hair, weighing it down and making it appear oily.


step 11

To finish, apply a minimal amount of hairspray from an arms length distance to the top, sides and back. Take care not to use too much or you will end up with a white, flaky residue which looks like dandruff.


Recommended Hairstyles...