Short Asymmetrical Bright Black Haircut


Added: 10 Nov 2010
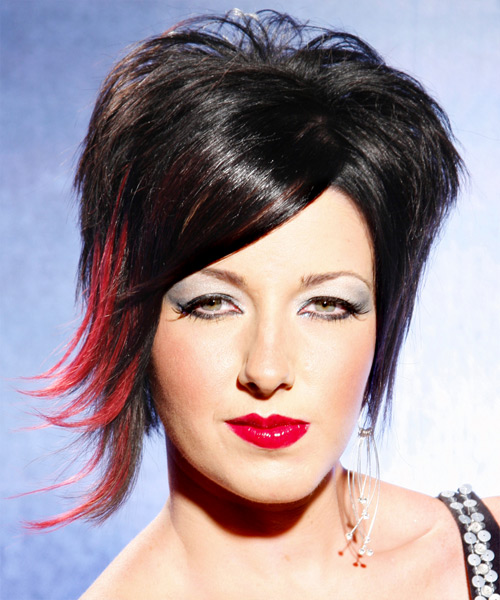
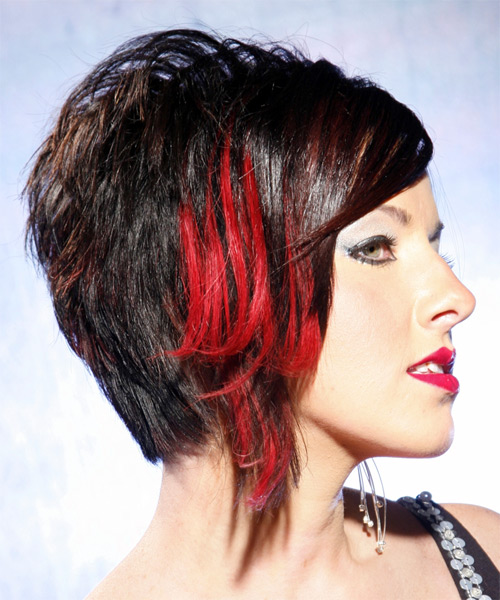
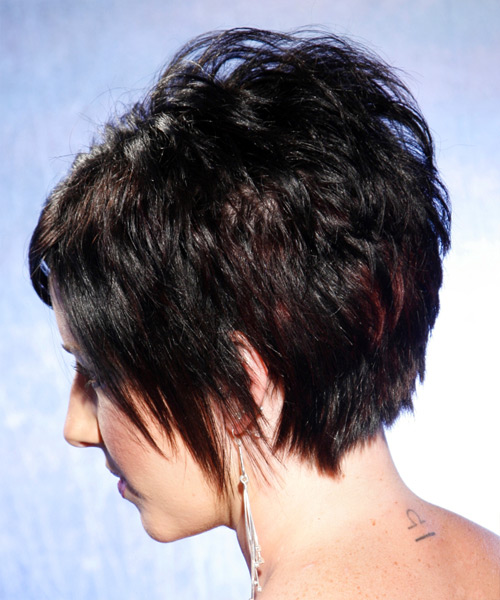
This is a short asymmetrical haircut that would look great and suitable for most women. The asymmetrical lengths add a little interest, while the dark and light hair blend gives it an edgy look. It is a perfect cut for those who want to accentuate their face shape and highlight their eyes with bangs. Our model looks beautiful yet stylish in this asymmetrical bright black haircut . It is a funky 'do for the wicked and wild. This is the perfect hairstyle for a night out on the town. It's sleek and easy to style, combined with all of the best elements from this cut in one sexy and bold look. The asymmetrical length adds spice to this look and complements the textured layers through the top and crown. The color perfectly creates a "chic" finish. The Back is layered short to the head for a clean finish, and the sides are wispy cut (with one side left longer than the other). This asymmetrical 'do is ideal for women with round, oval, square, heart, and diamond-shaped faces. With medium to thick hair density and medium to coarse texture, the 'do will suit most skin tones and hair types. Asymmetrical haircuts are a refreshing change from traditional styles. They offer an effortless and edgy look which makes you stand out in a crowd. It is the perfect choice if you're looking for something more creative than you usually get. The length is short enough to be easily maintainable but long enough to leave some playtime for your hair to bounce back into shape later. The haircut is easy to maintain with regular trimming after the first 4 to 6 weeks.


Visual Story

Short Asymmetrical Bright Black Haircut- Visual Story


Hairstyle Suitability Rating: ★★★★★
Hairstyle Popularity Rating: ★★★★★

Hairstyle Type

Category
Alternative
Length
Short
Elasticity
Straight
Hair Color
Black Bright

Haircut Technique

Type
Razor Cut

Suitability

Gender
Women
Face Shape
round,oval,square,heart,diamond
Hair Density
Medium/Thick
Hair Texture
Medium/Coarse

Age
Under 21, 21 - 30, and 31 - 40
Height
Any
Weight
Thin/Average/Large

Forehead Height
Short/Average
Neck Length
Short/Average
Ears
Small/Average
Nose
Small/Average
Glasses
No

Styling

Time
30+ minutes
Tip
Tease your hair at the roots for height and control.
Products
mousse, wax, lacquer
Tools
blow dry


Similar hairstyles you may be interested in...


step 1

Apply styling mousse to damp hair, using your palm as a measuring guide, and evenly distribute it along the hair shaft. Styling mousse will add hold and can help achieve better results.


step 2

A small radial brush is used on shorter hair types to add more body or in longer hair types to create curl. When selecting a radial brush, always use one with a pure bristle as this will not tear or damage the hair.


step 3

Using your brush, blow-dry in small sections starting from the nape/back. Tilting your head forward, place the brush an inch below the roots to hold them taut and aim the dryer above the brush for a few seconds before continuing to the ends.


step 4

To blow-dry the sides, take out your first sections from the front and clip the rest of the hair up. Place your brush on top of the section, and starting from the roots, blow-dry down using tension as you go. Next, place the blow-dryer underneath the hair and continue to blow-dry the ends out. Continue this step until the hair is dry.


step 5

Using your brush, blow-dry in small sections starting from the sides. Tilting your head forward, place the brush an inch below the roots to hold them taut and aim the dryer above the brush for a few seconds before continuing to the ends. Repeat this step on a new section directly above the dry one.


step 6

To blow-dry the crown/top sections, take a section of hair no bigger than the diameter of the brush and blow-dry the hair placing the brush under the section of hair. With your blow-dryer in front of the brush, follow the brush in an upwards direction at the roots and an outwards position at the ends for volume and softness. Continue until the section is dry.


step 7

When blow-drying your bangs to the side, section your hair up and clip your hair back to leave only your bangs out. Remember to make sure that your bangs are damp to make blow-drying more effective. Next, take your brush and place it underneath the hair and then blow-dry starting from the roots, adding tension to the hair as you go. Slowly pull your section down to the ends and continue until dry.


step 8

Pick up a small selection of hair from your mid section no bigger than your tail comb. Place your comb at the roots and then comb up and down until the hair is standing up by itself. Continue to the crown and finish at the sides. Repeat this step if you require more volume.


step 9

Apply some wax to your fingertips and then pull through the ends of your hair in a downward motion to achieve a sculptured look. Pinch clumps of hair in different directions for a messier result.


step 10

Apply a small amount of wax to your fingertips, and then starting about halfway down the hair shaft, pinch and drag the hair in a downward motion before flicking the ends out. Remember not to apply too much wax as it will weigh your hair down.


step 11

Using a small amount of wax, work it through the mid-lengths and ends in a downward, pinching motion. For added texture, apply more pinching and more wax.


step 12

Apply wax to your fingertips then drag through your bangs, sweeping the hair to the right as you go. Pinching the ends will create soft texture.


step 13

Apply some hard wax to your fingertips and then rub it into your roots while lifting your strands for soft volume.


step 14

Lacquer is great for strong hold. A small amount is all that is required to finish and should be applied from an arms length distance to the entire style.


Recommended Hairstyles...