Lisa Rinna Short Straight Hairstyle
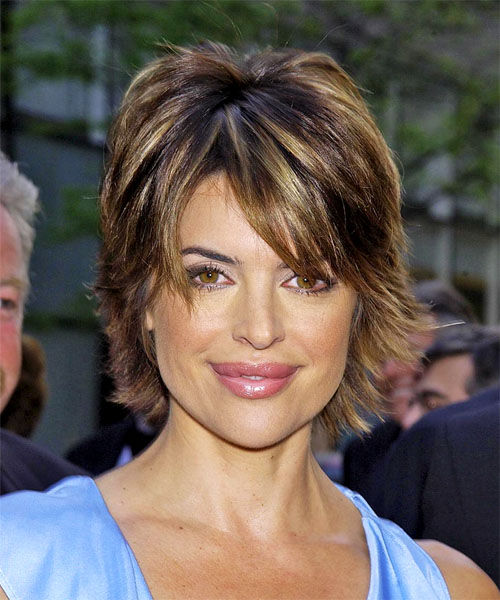

Added: 10 Nov 2010
This is Lisa's signature look, a great short crop which enhances her striking facial features. This style has great movement and is very easy to re-create. Lisa's back and sides have been given a graduated cut with chipped ends, while her chipped bangs have been side swept to add to the textured effect.

Hairstyle Suitability Rating: ★★★★★
Hairstyle Popularity Rating: ★★★★★

Hairstyle Type

Category
Casual
Length
Short
Elasticity
Straight

Haircut Technique

Type
Razor Cut

Suitability

Gender
Women
Face Shape
oval,oblong,square,diamond
Hair Density
Medium/Thick
Hair Texture
Medium/Coarse

Age
Under 21, 21 - 30, 31 - 40, 41 - 50, and 51 - 60
Height
Any
Weight
Thin/Average/Large

Forehead Height
Short/Average
Neck Length
Short/Average
Ears
Small/Average
Nose
Small/Average
Glasses
No

Styling

Time
20 minutes
Tip
Use your fingers to pinch the styling products through to create a textured finish.
Products
mousse, wax
Tools
blow dry


Similar hairstyles you may be interested in...


step 1

Apply styling mousse to damp hair, using your palm as a measuring guide, and evenly distribute it along the hair shaft. Styling mousse will add hold and can help achieve better results.


step 2

Using the corner of your comb and standing in front of a mirror find the middle of your right eye and then drag the comb straight up slowly until you reach your hairline and then continue back in a straight manner to achieve an even right part. A side part is great for longer face shapes because it creates the illusion of width.


step 3

A small radial brush is used on shorter hair types to add more body or in longer hair types to create curl. When selecting a radial brush, always use one with a pure bristle as this will not tear or damage the hair.


step 4

Starting at the nape/back of the hair, place your brush on top of the section and blow-dryer down starting from the roots and using tension as you go. Next, place the blow-dryer underneath the hair and continue to blow-dry the ends out. Make sure to follow the brush with the blow-dryer in an outwards direction. If you like fuller flicks, hold the ends out and roll them up into the brush and apply the heat for longer.


step 5

To blow-dry the sides, take out your first sections from the front and clip the rest of the hair up. Place your brush on top of the section, and starting from the roots, blow-dry down using tension as you go. Next, place the blow-dryer underneath the hair and continue to blow-dry the ends out. Continue this step until the hair is dry.


step 6

To blow-dry your bangs to the side, clip the back and side sections up, leaving just your bangs out. Place your brush beneath your bangs, holding your hair to the side and remembering to hold the tension between your hair and brush. With your blow-dryer on a low setting, apply heat by starting at the roots and make sure to stretch your hair out to the ends. Repeat until your hair is dry.


step 7

Using wax and your fingers grab the mid-lengths of your hair and then drag it out and upwards for a full and messy result. Remember not to overdo the wax or your result will be a flat and greasy style.


step 8

To get your sides to sit out, apply a small amount of wax to your fingertips and then working mainly on the ends, pinch them while dragging the hair in an out and upwards motion. Be careful not to overdo that wax or your result will be a flat and limp style.


step 9

Apply wax to your fingertips then drag through your bangs, sweeping the hair to the left as you go. Pinching the ends will create soft texture.


Recommended Hairstyles...