Sarah Paulson Short Straight Light Blonde Hairstyle with Side Swept Bangs


Added: 11 Oct 2016
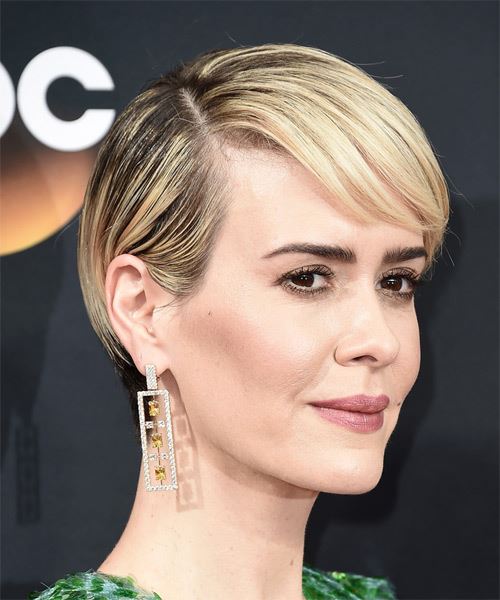
The back and sides of this hairstyle is tapered into the head with jagged cut layers through the top styled over to the side for a fun and fancy feel. The bangs are swept to the side to soften the face and completes the over-all 'do brilliantly. Product is needed to keep this hairstyle is in place.

Sarah Paulson looks chic and stylish here in a layered short hairstyle. Sarah suits short hair well, due to her oblong face shape and high cheekbones. She also looks best in styles with side swept bangs thanks to her high forehead. The tapered sides and back in this cut show off her face nicely, while the longer layers at the front give her some forehead coverage and bring the focus up to her eyes. This ‘do works well with her hair type, which is fine and straight and looks best in cuts that are layered with precision.

As for her color, Sarah has a fair, cool complexion, dark eyes and naturally dark hair. She sticks close to her natural color at the roots here and lightens up the rest to a light wheat blonde tone. This two-toned look gives Sarah's 'do a trendy edge while flattering her complexion and making her eye color even more prominent.

Sarah Paulson is an American actress. After beginning her acting career on stage, she starred in the 1990s television series American Gothic and Jack & Jill.


Visual Story

Sarah Paulson Short Straight   Light Blonde   Hairstyle with Side Swept Bangs- Visual Story


Hairstyle Suitability Rating: ★★★★★
Hairstyle Popularity Rating: ★★★★★

Hairstyle Type

Category
Formal
Length
Short
Elasticity
Straight
Hair Color
Light Blonde

Haircut Technique

Type
Scissor Cut

Suitability

Gender
Women
Face Shape
oval,oblong,heart,diamond
Hair Density
Medium
Hair Texture
Fine

Age
21 - 30, 31 - 40, 41 - 50, 51 - 60, and Over 60
Height
Weight
Thin/Average

Forehead Height
Long
Glasses
Yes

Styling

Time
20 minutes
Tip
Use pomade to tuck the hair behind the ear.
Products
gel spray, wax
Tools
blow dry


Similar hairstyles you may be interested in...


step 1

Hold the gel spray no closer than 3 inches from your hair and then evenly mist the gel spray into the roots to create a stronger hold style. Gel spray will hold well and will not look wet or weigh the hair down. Using your gel spray in this fashion will create added hold and a longer lasting style.


step 2

Using the corner of your comb and standing in front of a mirror find the middle of your right eye and then drag the comb straight up slowly until you reach your hairline and then continue back in a straight manner to achieve an even right part. A side part is great for longer face shapes because it creates the illusion of width.


step 3

A medium radial brush is used on medium to long hair types to smooth out wavy or curly hair textures or to add body to straight hair. When selecting a radial brush, always use one with a pure bristle as this will not tear or damage the hair.


step 4

To blow-dry under, start at the nape/back and place your brush under the section of hair close to the nape. With the dryer held up over the hair, pull the brush from the roots and continue to the mid length's, keeping the blow-dryer following over the top. Once you reach the ends, curve them under. Repeat this step until the section is completely dry.


step 5

To blow-dry the sides, take out a small section of hair from the front and clip the rest of the hair away. Next, place the brush under the section and then pull the brush and hair forward around your face (this curving motion creates body). Place the hair-dryer on top of the brush until you reach the ends and then turn the ends under. Repeat until dry.


step 6

To blow-dry the crown/top sections, take a section of hair no bigger than the diameter of the brush and blow-dry the hair placing the brush under the section of hair. With your blow-dryer in front of the brush, follow the brush in an upwards direction at the roots and an outwards position at the ends for volume and softness. Continue until the section is dry.


step 7

To blow-dry your bangs to the side, clip the back and side sections up, leaving just your bangs out. Place your brush beneath your bangs, holding your hair to the side and remembering to hold the tension between your hair and brush. With your blow-dryer on a low setting, apply heat by starting at the roots and make sure to stretch your hair out to the ends. Repeat until your hair is dry.


step 8

Apply wax to your fingertips then drag through your bangs, sweeping the hair to the left as you go. Pinching the ends will create soft texture.


step 9

Apply some wax to your fingertips and then pull through the ends of your hair in a downward motion to achieve a sculptured look. Pinch clumps of hair in different directions for a messier result.


step 10

Apply a small amount of wax to your fingertips, then place it at the roots above your ear and drag it through as you pull your hair behind your ear.


Recommended Hairstyles...