Short Bob Haircut With Tapered Back


Added: 13 Jan 2011
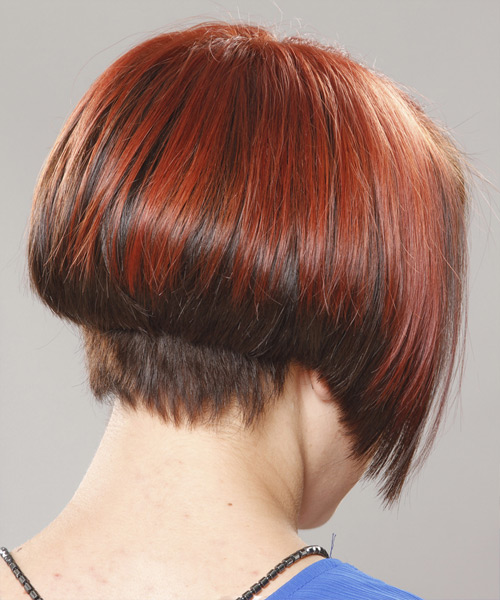
This ultra-modern and edgy short bob haircut with a tapered back is perfect for those looking to add some edge to their look. This short-length style has been cut at various angles, resulting in a look which features high, sharp cheekbones and soft jawlines. The tapered back is an excellent way to create a sophisticated and feminine look for those who are not looking for anything too dramatic.

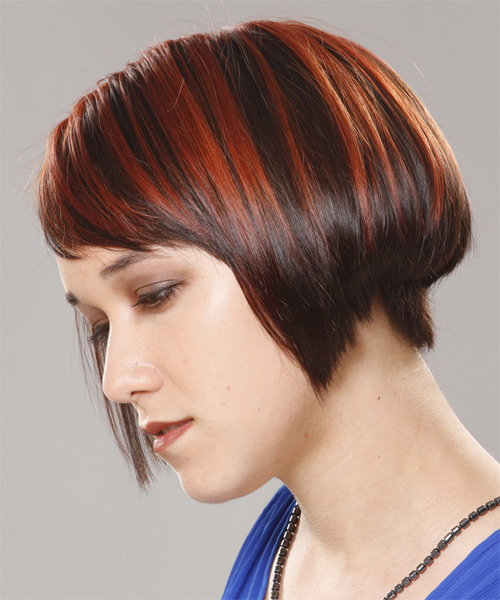
Our model looks stunning in this short bob haircut with a tapered back. Her beautiful brown eyes and bold red lips add personality to this style. For the hair styling, the back of this bob haircut is tapered and cut close to the head to allow the weight-line of the bob to sit above the hairline. The sides are angled down to the jawline to show off the jagged cut edge, which gives the style texture and shape. This short bob haircut with a tapered back is suitable for women with a round, oval or square face shape who want to keep the front and sides of their hair long. It would suit women who have thin to medium hair density, and fine to medium texture. This look is versatile enough to wear during the day or for a night out on the town!

This short bob cut is the perfect way to make a statement in the hair world, and with its two-toned color, this 'do will turn heads! It needs to be maintained every 4-6 weeks. Spray a small amount of hairspray over the top sections to keep the front areas down and flat.


Visual Story

Short Bob Haircut With Tapered Back- Visual Story


Hairstyle Suitability Rating: ★★★★★
Hairstyle Popularity Rating: ★★★★★

Hairstyle Type

Category
Formal
Length
Short
Elasticity
Straight
Hair Color
Dark Mocha Red

Haircut Technique

Type
Scissor Cut

Suitability

Gender
Women
Face Shape
round,oval,square,heart,triangular
Hair Density
Thin/Medium
Hair Texture
Fine/Medium

Age
Under 21, 21 - 30, and 31 - 40
Height
Any
Weight
Thin/Average/Large

Forehead Height
Short/Average
Neck Length
Short/Average
Ears
Small/Average
Nose
Small/Average
Glasses
Yes

Styling

Time
20 minutes
Tip
Spray a small amount of hairspray over the top sections to keep the front sections down and flat.
Products
moisturizer, wax, hair spray
Tools
blow dry


Similar hairstyles you may be interested in...


step 1

Apply a small amount of hair moisturizer to the palm of your hand and distribute it evenly through the mid-lengths and the ends. Moisturizer will help your hair to maintain good condition and protect your strands from heat as you style.


step 2

A medium radial brush is used on medium to long hair types to smooth out wavy or curly hair textures or to add body to straight hair. When selecting a radial brush, always use one with a pure bristle as this will not tear or damage the hair.


step 3

To blow-dry under, start at the nape/back and place your brush under the section of hair close to the nape. With the dryer held up over the hair, pull the brush from the roots and continue to the mid length's, keeping the blow-dryer following over the top. Once you reach the ends, curve them under. Repeat this step until the section is completely dry.


step 4

To blow-dry the sides, take out a small section of hair from the front and clip the rest of the hair away. Next, place the brush under the section and then pull the brush and hair forward around your face (this curving motion creates body). Place the hair-dryer on top of the brush until you reach the ends and then turn the ends under. Repeat until dry.


step 5

Take a section of your hair no wider than the diameter of your brush. Place your brush under and at the roots of your section. Then with your blow-dryer above, drag the brush up through the mid-lengths and ends of the hair following with your blow-dryer and pulling the hair to the left. Repeat until your hair is completely dry.


step 6

To blow-dry your bangs to the side, clip the back and side sections up, leaving just your bangs out. Place your brush beneath your bangs, holding your hair to the side and remembering to hold the tension between your hair and brush. With your blow-dryer on a low setting, apply heat by starting at the roots and make sure to stretch your hair out to the ends. Repeat until your hair is dry.


step 7

Apply some wax to your fingertips and then pull through the ends of your hair in a downward motion to achieve a sculptured look. Pinch clumps of hair in different directions for a messier result.


step 8

Using a small amount of wax, work it through the mid-lengths and ends in a downward, pinching motion. For added texture, apply more pinching and more wax.


step 9

Apply wax to your fingertips then drag through your bangs, sweeping the hair to the left as you go. Pinching the ends will create soft texture.


step 10

To finish, apply a minimal amount of hairspray from an arms length distance to the top, sides and back. Take care not to use too much or you will end up with a white, flaky residue which looks like dandruff.


Recommended Hairstyles...