Mid-Length Golden Hairstyle With Waves


Added: 10 Nov 2010
This medium-length, wavy, textured hairstyle can make your facial features prominent. The soft waves of this ‘do give a polished and casual finish blend, making it great for adding volume and dimension to your face. At the same time, soft golden highlights will radiate in this complementary style.

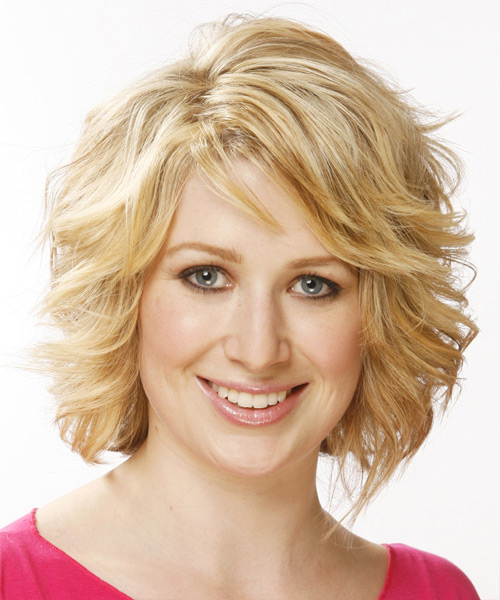
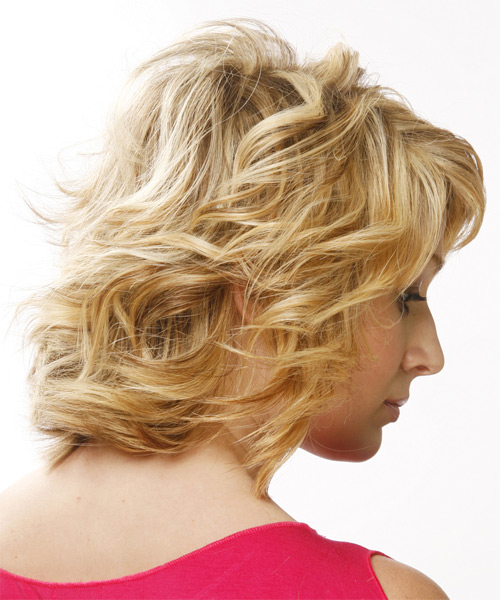
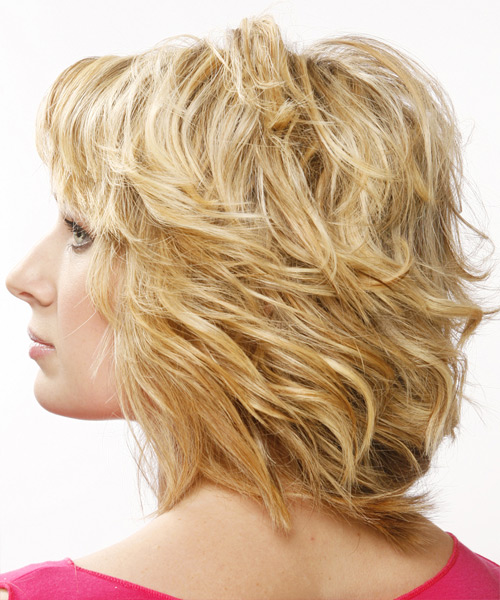
Our model unravels this beautiful medium-wavy golden hairstyle with smeared eyeliner and thick mascara in her hazel-colored eyes, which shows off a lovely glow on her attractive face that compels it to stand out even more than it already does. This makes it the perfect ‘do for going out with friends for casual events or occasions. You can achieve this hairdo with angled graduated layers cut from the top to the ends to help give this style an even wave. The bangs were jagged cut and swept over to one side to soften the look around the face for the perfect finish. The sides have been blunt cut to the neck and layered up to give the top plenty of volume. The back has been kept the same as the sides for an even, wavy look all over. This hairstyle is perfect if you have a round or oval face and medium-density hair with a medium texture. It is a versatile and stunning wavy style that can be fashioned in a myriad of ways to create an amazing and trendy look. Whether heading out for a relaxed day or a wedding event, this hairstyle will turn heads and make you feel confident and enchanting.

This style is perfect for women who are always up for a challenge and love to create gorgeous waves. This style can last up to 4 to 6 weeks with patience and regular trims. To get started, add a tight lock with a medium curling iron. Get ready to captivate your attention and exude the presence of a superstar!


Visual Story

Mid-Length Golden Hairstyle With Waves- Visual Story


Hairstyle Suitability Rating: ★★★★★
Hairstyle Popularity Rating: ★★★★★

Hairstyle Type

Category
Formal
Length
Medium
Elasticity
Wavy
Hair Color
Golden

Haircut Technique

Type
Scissor Cut

Suitability

Gender
Women
Face Shape
round,oval,heart,diamond
Hair Density
Medium/Thick
Hair Texture
Medium/Coarse

Age
Under 21, 21 - 30, and 31 - 40
Height
Any
Weight
Thin/Average/Large

Forehead Height
Short/Average
Neck Length
Long
Ears
Small/Average
Nose
Small/Average
Glasses
Yes

Styling

Time
30 minutes
Tip
Use the medium curling iron to add a tight wave all over.
Products
moisturizer, sculpture lotion, wax, smoothing shine, hair spray
Tools
blow dry, curling iron


Similar hairstyles you may be interested in...


step 1

Apply a small amount of hair moisturizer to the palm of your hand and distribute it evenly through the mid-lengths and the ends. Moisturizer will help your hair to maintain good condition and protect your strands from heat as you style.


step 2

Apply sculpture lotion to the palm of the hand and then place it evenly throughout the hair. Sculpture lotion can be used as an alternative to mousse for messy hair, as a styling aid when blow-drying for volume, and for a stronger hold.


step 3

Using the corner of your comb and standing in front of a mirror find the middle of your right eye and then drag the comb straight up slowly until you reach your hairline and then continue back in a straight manner to achieve an even right part. A side part is great for longer face shapes because it creates the illusion of width.


step 4

It is always a good idea to work in sections. This will help to make your hair styling quicker, easier to follow and more orderly. Comb your hair out and place your hair up into four equal sections, two in front and two in back, starting from ear to ear.


step 5

A medium radial brush is used on medium to long hair types to smooth out wavy or curly hair textures or to add body to straight hair. When selecting a radial brush, always use one with a pure bristle as this will not tear or damage the hair.


step 6

To blow-dry under, start at the nape/back and place your brush under the section of hair close to the nape. With the dryer held up over the hair, pull the brush from the roots and continue to the mid length's, keeping the blow-dryer following over the top. Once you reach the ends, curve them under. Repeat this step until the section is completely dry.


step 7

To blow-dry the sides, take out a small section of hair from the front and clip the rest of the hair away. Next, place the brush under the section and then pull the brush and hair forward around your face (this curving motion creates body). Place the hair-dryer on top of the brush until you reach the ends and then turn the ends under. Repeat until dry.


step 8

To blow-dry the crown/top sections, take a section of hair no bigger than the diameter of the brush and blow-dry the hair placing the brush under the section of hair. With your blow-dryer in front of the brush, follow the brush in an upwards direction at the roots and an outwards position at the ends for volume and softness. Continue until the section is dry.


step 9

To blow-dry your bangs to the side, clip the back and side sections up, leaving just your bangs out. Place your brush beneath your bangs, holding your hair to the side and remembering to hold the tension between your hair and brush. With your blow-dryer on a low setting, apply heat by starting at the roots and make sure to stretch your hair out to the ends. Repeat until your hair is dry.


step 10

A medium curling iron is used to create medium sized curls.


step 11

Starting from the back, take a small section of hair and place the ends at the base of your curling iron barrel and then wrap the hair up around the barrel until you reach your roots. Hold the hair for 5 to 10 seconds and then release the hair by unwinding the strands backwards. Continue this step until the entire back section of your hair is completed.


step 12

Take a small section of hair and place the ends at the base of your curling iron barrel and then wrap the hair up around the barrel until you reach your mid-lengths. Hold the hair for 5 to 10 seconds and then release the hair by unwinding the strands backwards.


step 13

Apply a small amount of wax to your fingertips and then lightly piece and pinch the ends of your hair.


step 14

Apply wax to your fingertips then drag through your bangs, sweeping the hair to the left as you go. Pinching the ends will create soft texture.


step 15

Apply some hard wax to your fingertips and then rub it into your roots while lifting your strands for soft volume.


step 16

Apply a very small amount of smoothing shine to the palms of your hands and then run it through the mid-lengths and ends of your hair. Be careful not to add any to the roots or a large amount to any section of the hair as smoothing shine can be very heavy on the hair, weighing it down and making it appear oily.


step 17

To finish, apply a minimal amount of hairspray from an arms length distance to the top, sides and back. Take care not to use too much or you will end up with a white, flaky residue which looks like dandruff.


Recommended Hairstyles...