Medium Flicked-Out Mahogany Hairstyle With Blonde Highlights


Added: 10 Nov 2010
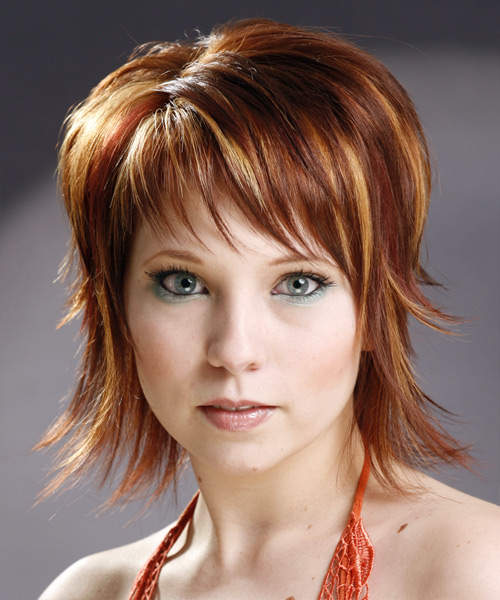
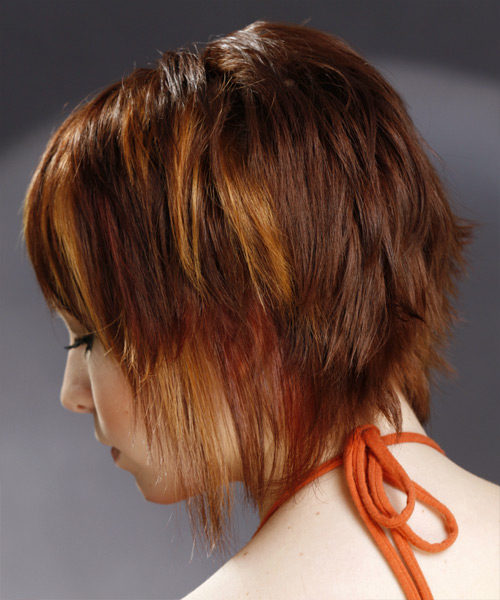
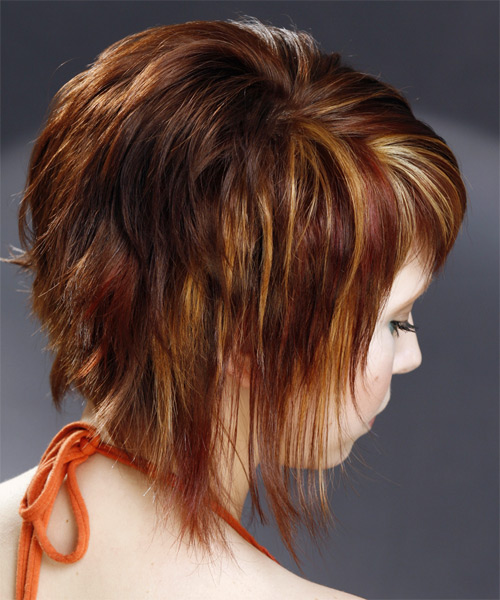
This medium straight dark mahogany red hairstyle is elegant and fashionable. This style is feminine and beautiful with blonde highlights and a smooth texture. It is flattering for all face shapes, offering high-end glamour with a soft touch.

Our model perfectly flaunts this medium-length hairstyle, wearing an orange-colored strip top with a smear of turquoise colored under eye shadow which draws attention to her beautiful blonde highlights. It is a cool mid-length style that shows how well layers can be styled. The layers have been razor cut to create this full-flicked style and add volume around the top. The bangs have also been razor-cut and swept to one side to blend in with style. The sides have been razor cut to the neck and flicked out to create this fun, textured 'do. The back has also been razor cut into the neck for an even look all over. This chic, medium-length hairstyle is great for women with thick, coarse, and dry hair. It features a wavy texture and side-swept bangs that frame the face. This slick hairstyle is a perfectly simple look that suits all women. The blonde highlights are a great way to add dimension and brightness to your look.

This straight, chic look is perfect for any occasion. The dark mahogany color greatly contrast the blonde highlights, which balance out the entire look. It washes out easily, so you can keep it in style by trimming after every 4 to 6 weeks. Pinch the back section with your wax and lift the top sections to create this textured look.


Visual Story

Medium Flicked-Out Mahogany Hairstyle With Blonde Highlights- Visual Story


Hairstyle Suitability Rating: ★★★★★
Hairstyle Popularity Rating: ★★★★★

Hairstyle Type

Category
Formal
Length
Medium
Elasticity
Straight
Hair Color
Dark Mahogany Red and Blonde Highlights

Haircut Technique

Type
Razor Cut

Suitability

Gender
Women
Face Shape
oval,oblong,square,diamond,triangular
Hair Density
Medium/Thick
Hair Texture
Medium/Coarse

Age
Under 21, 21 - 30, 31 - 40, and 41 - 50
Height
Any
Weight
Thin/Average/Large

Forehead Height
Short/Average
Neck Length
Long
Ears
Small/Average
Nose
Small/Average
Glasses
No

Styling

Time
30+ minutes
Tip
Pinch the back section out with your wax and then lift the top sections to create this textured look.
Products
moisturizer, mousse, wax, smoothing shine, hair spray
Tools
blow dry


Similar hairstyles you may be interested in...


step 1

Apply a small amount of hair moisturizer to the palm of your hand and distribute it evenly through the mid-lengths and the ends. Moisturizer will help your hair to maintain good condition and protect your strands from heat as you style.


step 2

Apply styling mousse to damp hair, using your palm as a measuring guide, and evenly distribute it along the hair shaft. Styling mousse will add hold and can help achieve better results.


step 3

Using the corner of your comb and standing in front of a mirror find the middle of your right eye and then drag the comb straight up slowly until you reach your hairline and then continue back in a straight manner to achieve an even right part. A side part is great for longer face shapes because it creates the illusion of width.


step 4

It is always a good idea to work in sections. This will help to make your hair styling quicker, easier to follow and more orderly. Comb your hair out and place your hair up into four equal sections, two in front and two in back, starting from ear to ear.


step 5

A small radial brush is used on shorter hair types to add more body or in longer hair types to create curl. When selecting a radial brush, always use one with a pure bristle as this will not tear or damage the hair.


step 6

Starting at the nape/back of the hair, place your brush on top of the section and blow-dryer down starting from the roots and using tension as you go. Next, place the blow-dryer underneath the hair and continue to blow-dry the ends out. Make sure to follow the brush with the blow-dryer in an outwards direction. If you like fuller flicks, hold the ends out and roll them up into the brush and apply the heat for longer.


step 7

To blow-dry the sides, take out your first sections from the front and clip the rest of the hair up. Place your brush on top of the section, and starting from the roots, blow-dry down using tension as you go. Next, place the blow-dryer underneath the hair and continue to blow-dry the ends out. Continue this step until the hair is dry.


step 8

Working in sections, place your brush at the roots of your hair and then using a blow-dryer on low heat, drag your brush through to the ends styling towards the left.


step 9

Working in sections, place your brush at the roots of your hair and then using a blow-dryer on low heat, drag your brush through to the ends styling towards the right.


step 10

To blow-dry the crown/top sections, take a section of hair no bigger than the diameter of the brush and blow-dry the hair placing the brush under the section of hair. With your blow-dryer in front of the brush, follow the brush in an upwards direction at the roots and an outwards position at the ends for volume and softness. Continue until the section is dry.


step 11

To blow-dry your bangs to the side, clip the back and side sections up, leaving just your bangs out. Place your brush beneath your bangs, holding your hair to the side and remembering to hold the tension between your hair and brush. With your blow-dryer on a low setting, apply heat by starting at the roots and make sure to stretch your hair out to the ends. Repeat until your hair is dry.


step 12

Using wax and your fingers grab the mid-lengths of your hair and then drag it out and upwards for a full and messy result. Remember not to overdo the wax or your result will be a flat and greasy style.


step 13

Apply a small amount of wax to your fingertips, and then starting about halfway down the hair shaft, pinch and drag the hair in a downward motion before flicking the ends out. Remember not to apply too much wax as it will weigh your hair down.


step 14

Apply some hard wax to your fingertips and then rub it into your roots while lifting your strands for soft volume.


step 15

Apply wax to your fingertips then drag through your bangs, sweeping the hair to the left as you go. Pinching the ends will create soft texture.


step 16

Apply a very small amount of smoothing shine to the palms of your hands and then run it through the mid-lengths and ends of your hair. Be careful not to add any to the roots or a large amount to any section of the hair as smoothing shine can be very heavy on the hair, weighing it down and making it appear oily.


step 17

To finish, apply a minimal amount of hairspray from an arms length distance to the top, sides and back. Take care not to use too much or you will end up with a white, flaky residue which looks like dandruff.


Recommended Hairstyles...