Demi Lovato Medium Straight Black Bob Haircut


Added: 11 Apr 2016
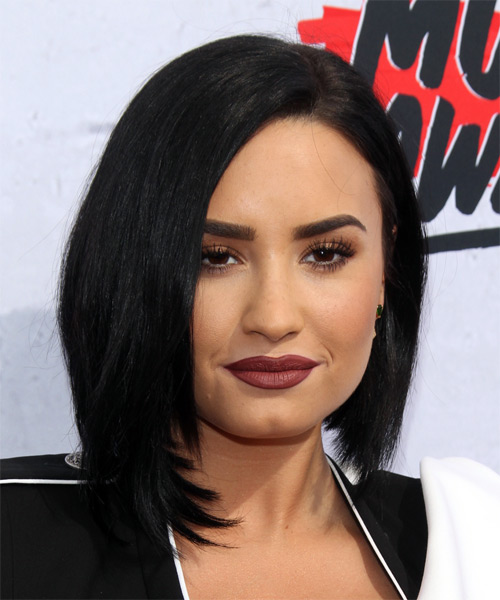
A simple and sleek bob frames the face and highlights a long neck. This style is quick and easy to achieve and can be worn in front of or behind the ears. An asymmetrical finish gives this 'do its edge.

Demi Lovato looks stunning here in a classic graduated bob that highlights her best features. Having a low forehead and rounded hairline, Demi's sleek 'do is ideal for her round face shape and thick hair texture. Only blow-drying is needed to perfect this 'do which looks best worn sleek with the ends styled in towards the neck. Demi is flaunting a side part here, which suits her round face shape nicely and brings the focus to her dramatic eyes. The asymmetrical cut updates this bob for Demi and gives her an edgy finish.

Demi’s color is another standout feature of this ‘do. Although she has been known to experiment with funky hair colors like green and blue, Demi has gone back to her roots and opted for a rich black shade instead. This is ideal for her tanned skin tone and dark eyes. Plus, when paired with this dark wine lipstick, Demi's look is vampy and sophisticated.

Demetria "Demi" Lovato is an American singer, songwriter, actress and model who made her debut as a child actress in Barney & Friends.

Hairstyle Suitability Rating: ★★★★★
Hairstyle Popularity Rating: ★★★★★

Hairstyle Type

Category
Formal
Length
Medium
Elasticity
Straight
Hair Color
Black

Haircut Technique

Type
Blunt Cut

Suitability

Gender
Women
Face Shape
round,oval,oblong,square,heart,diamond
Hair Density
Thick
Hair Texture
Coarse

Age
Under 21, 21 - 30, 31 - 40, 41 - 50, 51 - 60, and Over 60
Height
Any
Weight
Thin/Average/Large

Forehead Height
Long
Glasses
Yes

Styling

Time
20 minutes
Tip
Use a heat spray before styling for a glossy finish and to protect your strands from damage.
Products
moulding cream, hair spray
Tools
blow dry


Similar hairstyles you may be interested in...


step 1

Using the corner of your comb and standing in front of a mirror find the middle of your left eye and then drag the comb straight up slowly until you reach your hairline and then continue back in a straight manner to achieve an even left part. A side part is great for longer face shapes because it creates the illusion of width.


step 2

A large radial brush is usually used on long straight hair types or to smooth out wavy or curly hair textures. When selecting a radial brush, always use one with a pure bristle as this will not tear or damage the hair.


step 3

To blow-dry under, start at the nape/back and place your brush under the section of hair close to the nape. With the dryer held up over the hair, pull the brush from the roots and continue to the mid length's, keeping the blow-dryer following over the top. Once you reach the ends, curve them under. Repeat this step until the section is completely dry.


step 4

To blow-dry the sides, take out a small section of hair from the front and clip the rest of the hair away. Next, place the brush under the section and then pull the brush and hair forward around your face (this curving motion creates body). Place the hair-dryer on top of the brush until you reach the ends and then turn the ends under. Repeat until dry.


step 5

To blow-dry the crown/top sections, take a section of hair no bigger than the diameter of the brush and blow-dry the hair placing the brush under the section of hair. With your blow-dryer in front of the brush, follow the brush in an upwards direction at the roots and an outwards position at the ends for volume and softness. Continue until the section is dry.


step 6

When blow-drying your bangs to the side, section your hair up and clip your hair back to leave only your bangs out. Remember to make sure that your bangs are damp to make blow-drying more effective. Next, take your brush and place it underneath the hair and then blow-dry starting from the roots, adding tension to the hair as you go. Slowly pull your section down to the ends and continue until dry.


step 7

Using a small amount of moulding cream, work it through the mid-lengths and ends in a downward motion. For added texture, pinch the ends as you go sparingly.


step 8

Apply a small amount of moulding cream to your fingertips, then place it at the roots above your ear and drag it through as you pull your hair behind your ear.


step 9

To finish, apply a minimal amount of hairspray from an arms length distance to the top, sides and back. Take care not to use too much or you will end up with a white, flaky residue which looks like dandruff.


Recommended Hairstyles...