Long Formal Ombre Waves


Added: 12 Mar 2014
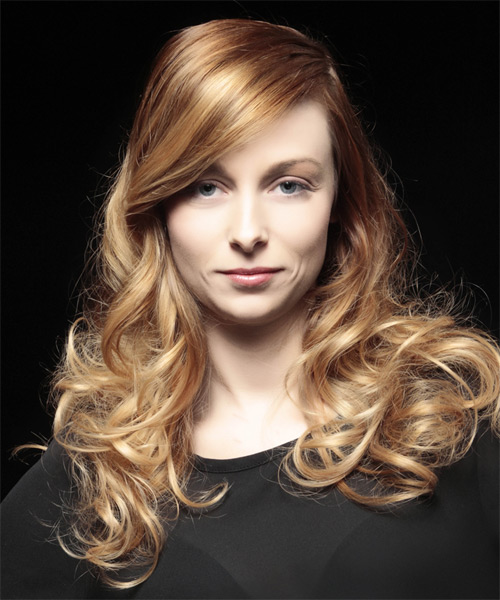
A subtle upgrade to your waves is an elegant and effortless way to style a quick updo. Our model is confidently flaunting her long caramel ombre waves with this look. The top of this ombre 'do is smoothed down flat to contour the top of the head, while the ends are pinched with product to achieve a texture through the waves and movement. You can create a natural wave by wrapping random pieces around a curling wand and lightly tousling with your fingers. This "long form" ombre technique creates a high-frizz look that lasts all day!

A subtle transition in this hairstyle with Light Caramel Brunette and Light Blonde Two-Tones is genuinely astonishing. It looks fantastic on anyone, and the waves add a light touch of color to your look. This long, sleek wavy hairdo is perfect for any special occasion. The longer length helps to create the impression of height, while the lighter color balances out the body's contours and toning.

These long, ombre waves are sure to brighten up any cut! This hairstyle will complement face shapes like oval, oblong, square, and diamond. The length and density of your hair determine how it will look. Ombre waves will be more prominent at the crown if you have a thin hair texture with medium density. If your crown area is full, this cut will create some bounce to make it look fuller. This gorgeous hairstyle will turn heads on any occasion, and it is easy to maintain with regular color touch-ups and trims every four to six weeks.

Hairstyle Suitability Rating: ★★★★★
Hairstyle Popularity Rating: ★★★★★

Hairstyle Type

Category
Formal
Length
Long
Elasticity
Wavy
Hair Color
Light Caramel Brunette and Light Blonde Two-Tone

Haircut Technique

Type
Scissor Cut

Suitability

Gender
Women
Face Shape
oval,oblong,square,diamond
Hair Density
Thin/Medium
Hair Texture
Fine/Medium

Age
21 - 30, 31 - 40, and 41 - 50
Height
Any
Weight
Thin/Average/Large

Forehead Height
Short/Average
Neck Length
Short/Average
Ears
Small/Average
Nose
Small/Average
Glasses
Yes

Styling

Time
30+ minutes
Tip
Direct your hair into position while applying the finishing products.
Products
mousse, wax, smoothing shine, hair spray
Tools
blow dry, velcro rollers, curling iron


Similar hairstyles you may be interested in...


step 1

Apply styling mousse to damp hair, using your palm as a measuring guide, and evenly distribute it along the hair shaft. Styling mousse will add hold and can help achieve better results.


step 2

Using the corner of your comb and standing in front of a mirror find the middle of your left eye and then drag the comb straight up slowly until you reach your hairline and then continue back in a straight manner to achieve an even left part. A side part is great for longer face shapes because it creates the illusion of width.


step 3

A medium radial brush is used on medium to long hair types to smooth out wavy or curly hair textures or to add body to straight hair. When selecting a radial brush, always use one with a pure bristle as this will not tear or damage the hair.


step 4

To blow-dry under, start at the nape/back and place your brush under the section of hair close to the nape. With the dryer held up over the hair, pull the brush from the roots and continue to the mid length's, keeping the blow-dryer following over the top. Once you reach the ends, curve them under. Repeat this step until the section is completely dry.


step 5

To blow-dry the sides, take out a small section of hair from the front and clip the rest of the hair away. Next, place the brush under the section and then pull the brush and hair forward around your face (this curving motion creates body). Place the hair-dryer on top of the brush until you reach the ends and then turn the ends under. Repeat until dry.


step 6

Take a section of your hair no wider than the diameter of your brush. Place your brush under and at the roots of your section. Then with your blow-dryer above, drag the brush up through the mid-lengths and ends of the hair following with your blow-dryer and pulling the hair to the right. Repeat until your hair is completely dry.


step 7

Take a section of hair no wider than the diameter of the velcro roller and comb it through to ensure there are no knots. Place the roller at the ends of the section of hair, being sure to smooth the ends under, and then twist the roller down the hair shaft to the roots. Continue applying the velcro rollers all the way through the entire hair for a full volume finish throughout the sides. Keep the rollers in your hair for approximately 20 minutes.


step 8

A large curling iron is used to create large soft curls and can be used to add body.


step 9

Take a small section of hair and place the ends at the base of your curling iron barrel and then wrap the hair up around the barrel until you reach your mid-lengths. Hold the hair for 5 to 10 seconds and then release the hair by unwinding the strands backwards.


step 10

Apply a small amount of wax to your fingertips and then lightly piece and pinch the ends of your hair.


step 11

Apply a very small amount of smoothing shine to the palms of your hands and then run it through the mid-lengths and ends of your hair. Be careful not to add any to the roots or a large amount to any section of the hair as smoothing shine can be very heavy on the hair, weighing it down and making it appear oily.


step 12

To finish, apply a minimal amount of hairspray from an arms length distance to the top, sides and back. Take care not to use too much or you will end up with a white, flaky residue which looks like dandruff.


Recommended Hairstyles...