Softly Layered Pixie Haircut With Thick Bangs


Added: 10 Nov 2010
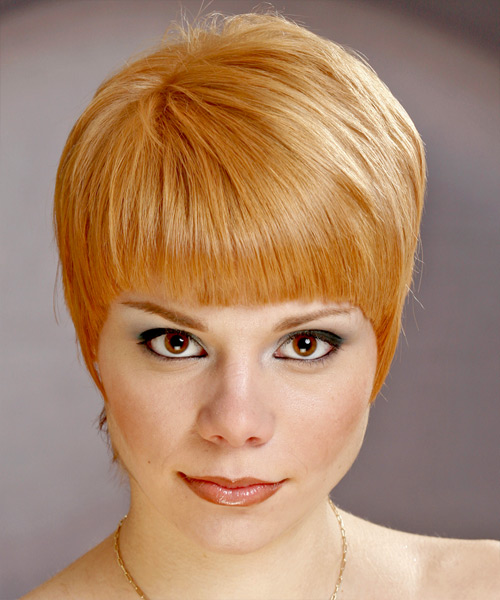
Looking for a casual hairstyle? If you are in the mood for a cute and trendy hairstyle for the weekend, you should consider this softly layered Pixie haircut with thick bangs. These two elements will create a fantastic hairstyle that can help enhance your beauty and give you an elegant look that everyone will admire. The Pixie haircut is simple and elegant, and it is alleged to be inspired by the Titus haircut from the 1800s in France, where women wore a form of Pixie cut before they were put to the guillotine. After being worn by celebrities such as Halle Berry in the 90s, it became trendy to wear one. Your style will mature more when you take advantage of this popular style.

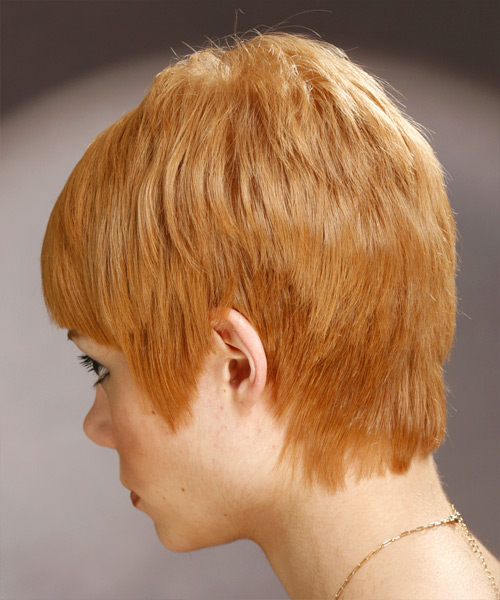
Pixie haircuts are great for women with thin hair or girls who desire long bangs. The layered Pixie can also be worn with hair which is thick and medium-length for a fun, youthful look. This is a funky Pixie haircut that is so easy to re-create. The top has been softly layered to create a complete and even look around the crown, and the bangs have been solid cut and left thick. This style is perfect for those on the move who have little time to style their hair. The sides have been cut and shaped around the ears for a softer finish. The back has been taper cut and shaped softly and neatly around the neck. This gorgeous hairstyle works well on any face shape, and the sleek style is suitable for all ages. A small amount of finishing products is needed to complete this style.


Visual Story

Softly Layered Pixie Haircut With Thick Bangs- Visual Story


Hairstyle Suitability Rating: ★★★★★
Hairstyle Popularity Rating: ★★★★★

Hairstyle Type

Category
Casual
Length
Short
Elasticity
Straight
Hair Color
Copper

Haircut Technique

Type

Suitability

Gender
Women
Face Shape
oval,heart,diamond
Hair Density
Thin/Medium
Hair Texture
Fine/Medium

Age
Under 21, 21 - 30, 31 - 40, and 41 - 50
Height
Any
Weight
Thin/Average/Large

Forehead Height
Short/Average
Neck Length
Long
Ears
Small/Average
Nose
Small/Average
Glasses
Yes

Styling

Time
30 minutes
Tip
A small amount of finishing products is all that is needed to complete this style.
Products
moisturizer, mousse, wax, hair spray
Tools
blow dry


Similar hairstyles you may be interested in...


step 1

Apply a small amount of hair moisturizer to the palm of your hand and distribute it evenly through the mid-lengths and the ends. Moisturizer will help your hair to maintain good condition and protect your strands from heat as you style.


step 2

Apply styling mousse to damp hair, using your palm as a measuring guide, and evenly distribute it along the hair shaft. Styling mousse will add hold and can help achieve better results.


step 3

Using the corner of your comb and standing in front of a mirror find the middle of your right eye and then drag the comb straight up slowly until you reach your hairline and then continue back in a straight manner to achieve an even right part. A side part is great for longer face shapes because it creates the illusion of width.


step 4

It is always a good idea to work in sections. This will help to make your hair styling quicker, easier to follow and more orderly. Comb your hair out and place your hair up into four equal sections, two in front and two in back, starting from ear to ear.


step 5

A small radial brush is used on shorter hair types to add more body or in longer hair types to create curl. When selecting a radial brush, always use one with a pure bristle as this will not tear or damage the hair.


step 6

To blow-dry under, start at the nape/back and place your brush under the section of hair close to the nape. With the dryer held up over the hair, pull the brush from the roots and continue to the mid length's, keeping the blow-dryer following over the top. Once you reach the ends, curve them under. Repeat this step until the section is completely dry.


step 7

To blow-dry the sides, take out a small section of hair from the front and clip the rest of the hair away. Next, place the brush under the section and then pull the brush and hair forward around your face (this curving motion creates body). Place the hair-dryer on top of the brush until you reach the ends and then turn the ends under. Repeat until dry.


step 8

To blow-dry the crown/top sections, take a section of hair no bigger than the diameter of the brush and blow-dry the hair placing the brush under the section of hair. With your blow-dryer in front of the brush, follow the brush in an upwards direction at the roots and an outwards position at the ends for volume and softness. Continue until the section is dry.


step 9

When blow-drying your bangs forward, clip your hair back leaving only your bangs out. Position your bangs evenly in your brush, taking the hair in a forward direction. Blow-dry from roots to ends, keeping the tension consistent, and evenly distribute heat over the whole section of hair that you are working on. Repeat until the hair is dry. This will stop any frizz that may occur.


step 10

Apply some wax to your fingertips and then pull through the ends of your hair in a downward motion to achieve a sculptured look. Pinch clumps of hair in different directions for a messier result.


step 11

Using a small amount of wax, work it through the mid-lengths and ends in a downward, pinching motion. For added texture, apply more pinching and more wax.


step 12

Apply some hard wax to your fingertips and then rub it into your roots while lifting your strands for soft volume.


step 13

Apply a small amount of wax to your fingertips, and then using your fingers, rake through your bangs pinching the ends as you go to create a feathered, textured effect.


step 14

To finish, apply a minimal amount of hairspray from an arms length distance to the top, sides and back. Take care not to use too much or you will end up with a white, flaky residue which looks like dandruff.


Recommended Hairstyles...