Added:
14 Aug 2016
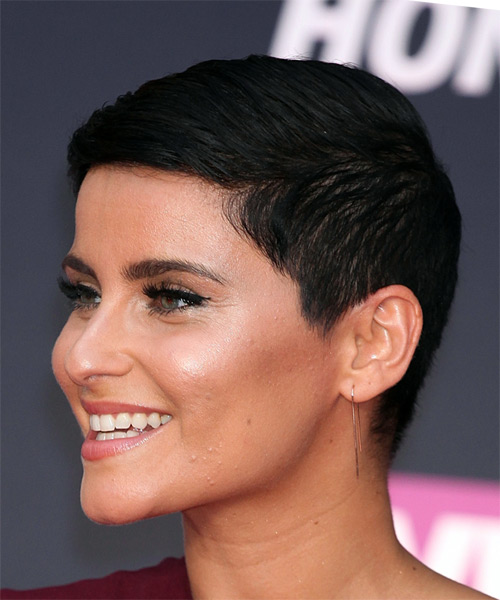
The back and sides of this dark 'do are tapered into the head to achieve a sleek finish. The top is left slightly longer and smoothed down to contour to the head with the bangs worn off the face for a fab finish to the overall style. A small amount of product is needed for shine and hold.
Nelly Furtado is looking elegant here in a short and sweet hairstyle. It is flattering to her features as the fringe helps to balance the width of her face and the sleek styling helps to keep a focus on her best feature -her bright, expressive eyes. Nelly's delicate facial features are complimented by this short’ do and her side-swept bangs focus the attention on her beautiful eyes. The end result is a feminine, modern and sophisticated look with some added lift at the roots.
Nelly is a natural dark brunette with blue eyes and an olive complexion. Here, she goes for a inky black color that flatters her skin tone and brings out her eyes while creating dimension and interest to her cut. No highlights are needed here--this color looks best on its own, and pixie cuts tend to look better in one rich vibrant hair color as opposed to a highlighted look.
Nelly Kim Furtado is a Canadian singer, songwriter and record producer. Furtado first gained fame with her critical acclaimed and successful debut album Whoa, Nelly! which spawned two top 10 hits.
Nelly Furtado Black Pixie Haircut

Images © MediaPunch/TheHairStyler.com
Images © MediaPunch/TheHairStyler.com
Hairstyle Suitability Rating:
Hairstyle Popularity Rating: ★★★★★
Hairstyle Popularity Rating: ★★★★★
Hairstyle Type
Category
Casual
Length
Short
Elasticity
Straight
Hair Color
Black
Haircut Technique
Type
Clipper Cut
Suitability
Gender
Women
Face Shape
round,oval,oblong,heart,diamond
Hair Density
Medium
Hair Texture
Medium
Age
31 - 40, 41 - 50, 51 - 60, and Over 60
Height
Any
Weight
Thin/Average/Large
Forehead Height
Short/Average
Nose
Small/Average
Glasses
Yes
Styling
Time
10 minutes
Tip
Use pomade to reduce flyaways and add a subtle sheen to the hair.
Products
gel
Tools
blow dry

