Fun Chin-Length Hairstyle With Volume


Added: 10 Nov 2010
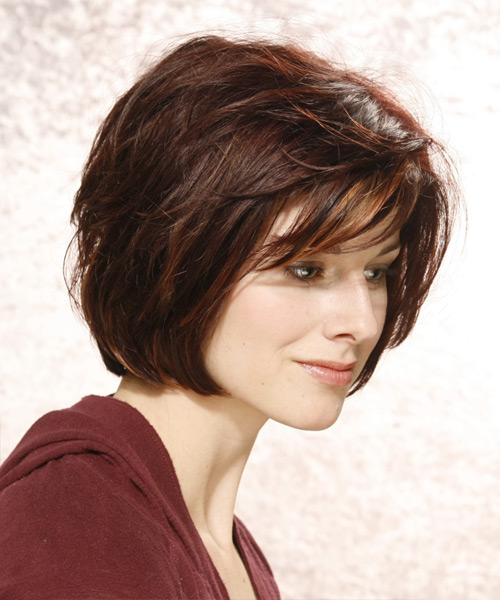
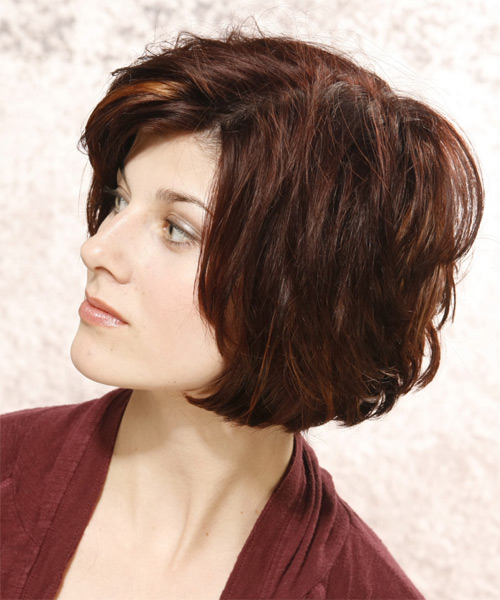
This medium straight hairstyle is a contemporary take on a traditional look. The sides are tapered, and a side part adds a refined touch to the overall style. This hairstyle is easy to maintain and perfect for any event or occasion. Our lovely model perfectly showcases this chin-length hairstyle in a beautiful copper-colored top with minimalistic makeup that makes her look undeniably stunning. The back features textured layers for body and volume, which have been blended up to the crown layers. The sides' length has been kept at the jawline, and soft layers have been blended into the shorter layers through the top. This hairstyle is an excellent option for those with thin or medium texture hair and an oval, oblong, or square face shape. It is a versatile choice that's perfect for any occasion and can be effortlessly maintained. The layers in this hairstyle can add depth and dimension, allowing you to experiment with curls or waves that suit your style. It's an ideal do' for women with fine to medium-density hair, making it a perfect option. It is a great way to give your natural hair extra body and volume while still keeping it styled.

With regular trims after every 4 to 6 weeks, you can prevent split ends and keep your hair looking full and voluminous. Try spraying a small amount of lacquer into your roots for added volume and hold. It will help to lift your hair and keep it in place throughout the day. With these simple tips, you can easily maintain your medium straight hairstyle and keep it looking great for any occasion.


Visual Story

Fun Chin-Length Hairstyle With Volume- Visual Story


Hairstyle Suitability Rating: ★★★★★
Hairstyle Popularity Rating: ★★★★★

Hairstyle Type

Category
Casual
Length
Medium
Elasticity
Straight
Hair Color
Dark Brunette

Haircut Technique

Type

Suitability

Gender
Women
Face Shape
oval,oblong,square,diamond,triangular
Hair Density
Thin/Medium
Hair Texture
Fine/Medium

Age
21 - 30, 31 - 40, 41 - 50, 51 - 60, and Over 60
Height
Any
Weight
Thin/Average/Large

Forehead Height
Short/Average
Neck Length
Short/Average
Ears
Small/Average
Nose
Small/Average
Glasses
No

Styling

Time
30+ minutes
Tip
Spray a small amount of laquer into your roots for extra volume and hold.
Products
mousse, wax, lacquer
Tools
blow dry


Similar hairstyles you may be interested in...


step 1

Apply styling mousse to damp hair, using your palm as a measuring guide, and evenly distribute it along the hair shaft. Styling mousse will add hold and can help achieve better results.


step 2

Using the corner of your comb and standing in front of a mirror find the middle of your left eye and then drag the comb straight up slowly until you reach your hairline and then continue back in a straight manner to achieve an even left part. A side part is great for longer face shapes because it creates the illusion of width.


step 3

A small radial brush is used on shorter hair types to add more body or in longer hair types to create curl. When selecting a radial brush, always use one with a pure bristle as this will not tear or damage the hair.


step 4

To blow-dry under, start at the nape/back and place your brush under the section of hair close to the nape. With the dryer held up over the hair, pull the brush from the roots and continue to the mid length's, keeping the blow-dryer following over the top. Once you reach the ends, curve them under. Repeat this step until the section is completely dry.


step 5

To blow-dry the sides, take out a small section of hair from the front and clip the rest of the hair away. Next, place the brush under the section and then pull the brush and hair forward around your face (this curving motion creates body). Place the hair-dryer on top of the brush until you reach the ends and then turn the ends under. Repeat until dry.


step 6

To blow-dry the crown/top sections, take a section of hair no bigger than the diameter of the brush and blow-dry the hair placing the brush under the section of hair. With your blow-dryer in front of the brush, follow the brush in an upwards direction at the roots and an outwards position at the ends for volume and softness. Continue until the section is dry.


step 7

When blow-drying your bangs to the side, section your hair up and clip your hair back to leave only your bangs out. Remember to make sure that your bangs are damp to make blow-drying more effective. Next, take your brush and place it underneath the hair and then blow-dry starting from the roots, adding tension to the hair as you go. Slowly pull your section down to the ends and continue until dry.


step 8

Apply some wax to your fingertips and then pull through the ends of your hair in a downward motion to achieve a sculptured look. Pinch clumps of hair in different directions for a messier result.


step 9

Using a small amount of wax, work it through the mid-lengths and ends in a downward, pinching motion. For added texture, apply more pinching and more wax.


step 10

Apply some hard wax to your fingertips and then rub it into your roots while lifting your strands for soft volume.


step 11

To finish the look, apply wax to your fingertips, making sure to smooth the wax over all of your fingers, then simply pinch the wax onto the ends of your hair, applying as much or as little as needed.


step 12

Apply wax to your fingertips then drag through your bangs, sweeping the hair to the right as you go. Pinching the ends will create soft texture.


step 13

Lacquer is great for strong hold. A small amount is all that is required to finish and should be applied from an arms length distance to the entire style.


Recommended Hairstyles...