Lisa Rinna Medium Straight Light Brunette Shag Hairstyle with Layered Bangs


Added: 15 May 2018
The ends of this short sassy 'do are jagged cut to achieve a wispy look and feel. Product is pinched through the top add lift making this a fantastic style to complement an angular face. This hairstyle is best suited for those with medium to thick hair and needs regular trims every 4-6 weeks to maintain shape.

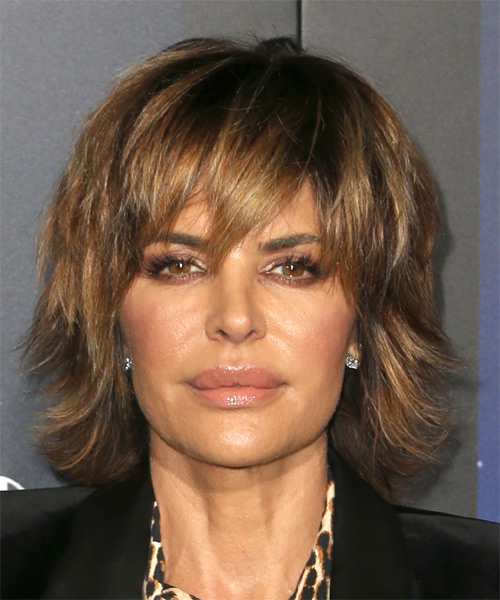
Lisa Rinna looks trendy and chic here in a layered, shoulder length ‘do. This hairstyle is ideal for her thick hair type as it works with her natural volume and body throughout, especially in the crown area. The lift at the top brings the focus upwards and makes her face appear more oval. The long wispy fringe is another good feature for square faces, which benefits from layers around the eyes and cheekbones, in addition to some forehead coverage. To minimize a square jaw line, flipped out layered ends are a great way to add softness to this area.

Lisa has a warm, tanned skin tone and amber brown eyes. This makes her suited to golden brown and blonde hair colors as well as red tones. Here she has opted for a multi-tonal look with a golden brown base and golden highlights throughout. This gives her hair color an all over warm, but not brassy, finish.

Hairstyle Suitability Rating: ★★★★★
Hairstyle Popularity Rating: ★★★★★

Hairstyle Type

Category
Casual
Length
Medium
Elasticity
Straight
Hair Color
Light Brunette

Haircut Technique

Type
Scissor Cut

Suitability

Gender
Women
Face Shape
oval,square,heart,diamond
Hair Density
Thick
Hair Texture
Medium

Age
21 - 30, 31 - 40, 41 - 50, 51 - 60, and Over 60
Height
Any
Weight
Thin/Average/Large

Forehead Height
Short/Average
Glasses
Yes

Styling

Time
20 minutes
Tip
Use a small round brush to stye short shag 'dos.
Products
mousse, gel
Tools
blow dry


Similar hairstyles you may be interested in...


step 1

Apply styling mousse to damp hair, using your palm as a measuring guide, and evenly distribute it along the hair shaft. Styling mousse will add hold and can help achieve better results.


step 2

Using the corner of your comb and standing in front of a mirror find the middle of your left eye and then drag the comb straight up slowly until you reach your hairline and then continue back in a straight manner to achieve an even left part. A side part is great for longer face shapes because it creates the illusion of width.


step 3

A small radial brush is used on shorter hair types to add more body or in longer hair types to create curl. When selecting a radial brush, always use one with a pure bristle as this will not tear or damage the hair.


step 4

Starting at the nape/back of the hair, place your brush on top of the section and blow-dryer down starting from the roots and using tension as you go. Next, place the blow-dryer underneath the hair and continue to blow-dry the ends out. Make sure to follow the brush with the blow-dryer in an outwards direction. If you like fuller flicks, hold the ends out and roll them up into the brush and apply the heat for longer.


step 5

To blow-dry the sides, take out your first sections from the front and clip the rest of the hair up. Place your brush on top of the section, and starting from the roots, blow-dry down using tension as you go. Next, place the blow-dryer underneath the hair and continue to blow-dry the ends out. Continue this step until the hair is dry.


step 6

To blow-dry the crown/top sections, take a section of hair no bigger than the diameter of the brush and blow-dry the hair placing the brush under the section of hair. With your blow-dryer in front of the brush, follow the brush in an upwards direction at the roots and an outwards position at the ends for volume and softness. Continue until the section is dry.


step 7

When blow-drying your bangs to the side, section your hair up and clip your hair back to leave only your bangs out. Remember to make sure that your bangs are damp to make blow-drying more effective. Next, take your brush and place it underneath the hair and then blow-dry starting from the roots, adding tension to the hair as you go. Slowly pull your section down to the ends and continue until dry.


step 8

Apply gel to your fingertips and then pinch small clumps of hair in an up and forward motion. For a messier look, pinch the clumps in different directions.


step 9

To get your sides to sit out, apply a small amount of gel to your fingertips and then working mainly on the ends, pinch them while dragging the hair in an out and upwards motion. The more gel and the more pinching that you apply, the more textured the result.


step 10

Apply gel to your fingertips then gently rake through your bangs, sweeping the hair to the right as you go.


Recommended Hairstyles...