Short Spiky Hairstyle With Textured Finish


Added: 04 Apr 2013
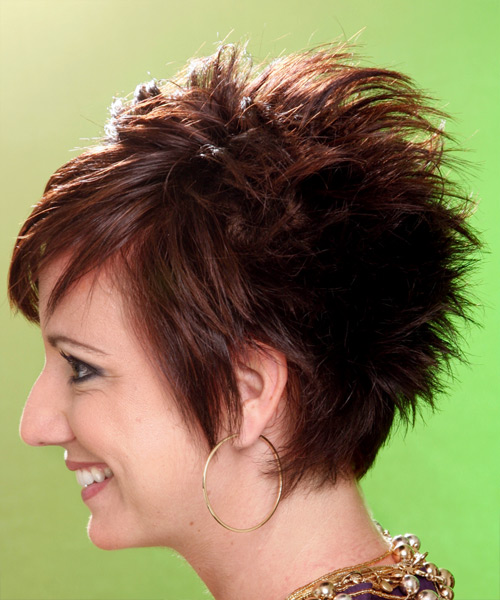
Do you want to cut your hair short but don't know how to do it? This hairstyle is a great way to keep your hair short and straight while still having the desired look. This short chocolate hairstyle has a rounded shape, which is slightly textured and perfect for any occasion.

Our gorgeous model is perfectly flaunting this short straight chocolate hairdo. With her purple top and necklace, she looks ravishing in her spiky hair look. Her jewelry compliments this hairdo, making her look younger than her actual age. It is a classic short look with a textured finish. For the hair styling technique, the back has short razored layers with a wispy finish to the nape. The sides also have razored layers to achieve definition and blend in with the textured layers on top. It is a perfect hairstyle for women with medium to thick hair texture that is fine and medium in density. The length is kept short, along with several layers, to add fullness and shape. Perfect for all face shapes, this short hairstyle gives a bold look but is still subtle. It is the ideal choice for any occasion. It looks great with formal or casual wear and doesn't require much maintenance.

This style requires regular trims after 4 to 6 weeks to maintain the shape of your hair, so make sure you get them at least every 4 weeks. This hairdo is perfect for those who want a short, tapered cut. With a light finish and soft texture, this style is easy to maintain and looks great on all skin tones. Tease your hair at the roots for height and control.


Visual Story

Short Spiky Hairstyle With Textured Finish- Visual Story


Hairstyle Suitability Rating: ★★★★★
Hairstyle Popularity Rating: ★★★★★

Hairstyle Type

Category
Alternative
Length
Short
Elasticity
Straight
Hair Color
Chocolate

Haircut Technique

Type
Razor Cut

Suitability

Gender
Women
Face Shape
round,oval,square,heart,triangular
Hair Density
Medium/Thick
Hair Texture
Fine/Medium

Age
Under 21, 21 - 30, 31 - 40, and 41 - 50
Height
Any
Weight
Thin/Average/Large

Forehead Height
Short/Average
Neck Length
Short/Average
Ears
Small/Average
Nose
Small/Average
Glasses
No

Styling

Time
30+ minutes
Tip
Tease your hair at the roots for height and control.
Products
mousse, wax, lacquer
Tools
blow dry


Similar hairstyles you may be interested in...


step 1

Apply styling mousse to damp hair, using your palm as a measuring guide, and evenly distribute it along the hair shaft. Styling mousse will add hold and can help achieve better results.


step 2

A small radial brush is used on shorter hair types to add more body or in longer hair types to create curl. When selecting a radial brush, always use one with a pure bristle as this will not tear or damage the hair.


step 3

To blow-dry under, start at the nape/back and place your brush under the section of hair close to the nape. With the dryer held up over the hair, pull the brush from the roots and continue to the mid length's, keeping the blow-dryer following over the top. Once you reach the ends, curve them under. Repeat this step until the section is completely dry.


step 4

To blow-dry the sides, take out a small section of hair from the front and clip the rest of the hair away. Next, place the brush under the section and then pull the brush and hair forward around your face (this curving motion creates body). Place the hair-dryer on top of the brush until you reach the ends and then turn the ends under. Repeat until dry.


step 5

To blow-dry the crown/top sections, take a section of hair no bigger than the diameter of the brush and blow-dry the hair placing the brush under the section of hair. With your blow-dryer in front of the brush, follow the brush in an upwards direction at the roots and an outwards position at the ends for volume and softness. Continue until the section is dry.


step 6

When blow-drying your bangs to the side, section your hair up and clip your hair back to leave only your bangs out. Remember to make sure that your bangs are damp to make blow-drying more effective. Next, take your brush and place it underneath the hair and then blow-dry starting from the roots, adding tension to the hair as you go. Slowly pull your section down to the ends and continue until dry.


step 7

Pick up a small selection of hair from your mid section no bigger than your tail comb. Place your comb at the roots and then comb up and down until the hair is standing up by itself. Continue to the crown and finish at the sides. Repeat this step if you require more volume.


step 8

Using wax and your fingers grab the mid-lengths of your hair and then drag it out and upwards for a full and messy result. Remember not to overdo the wax or your result will be a flat and greasy style.


step 9

To get your sides to sit out, apply a small amount of wax to your fingertips and then working mainly on the ends, pinch them while dragging the hair in an out and upwards motion. Be careful not to overdo that wax or your result will be a flat and limp style.


step 10

Apply wax to your fingertips, then grab a small section of hair and rub the wax in before twisting and pulling your hair upwards. Repeat in each new section. For longer lasting spikes use a generous amount of hard wax.


step 11

Apply some hard wax to your fingertips and then rub it into your roots while lifting your strands for soft volume.


step 12

To finish the look, apply wax to your fingertips, making sure to smooth the wax over all of your fingers, then simply pinch the wax onto the ends of your hair, applying as much or as little as needed.


step 13

Apply wax to your fingertips then drag through your bangs, sweeping the hair to the right as you go. Pinching the ends will create soft texture.


step 14

Lacquer is great for strong hold. A small amount is all that is required to finish and should be applied from an arms length distance to the entire style.


Recommended Hairstyles...