Voluminous And Wispy Short Hairstyle With Medium-Length Layers


Added: 10 Nov 2010
This voluminous and wispy 'do with short to medium-length layers is the perfect style for anyone who loves big, voluminous hair but also wants a bit of a modern edge. The wispy layers and short to medium-length give this style a playful, youthful feel, while the layers' fullness and body create a feminine and striking look.

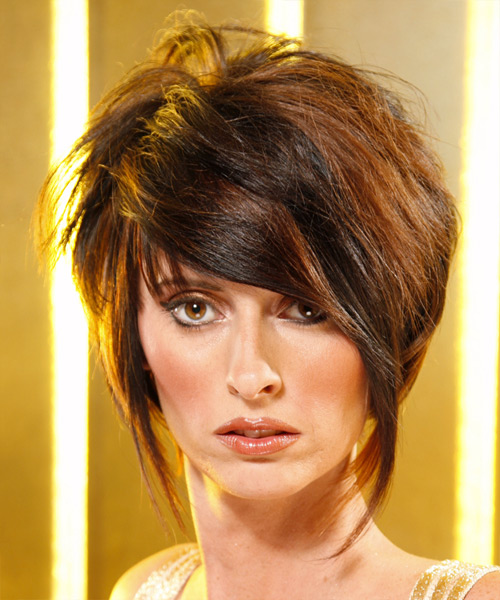
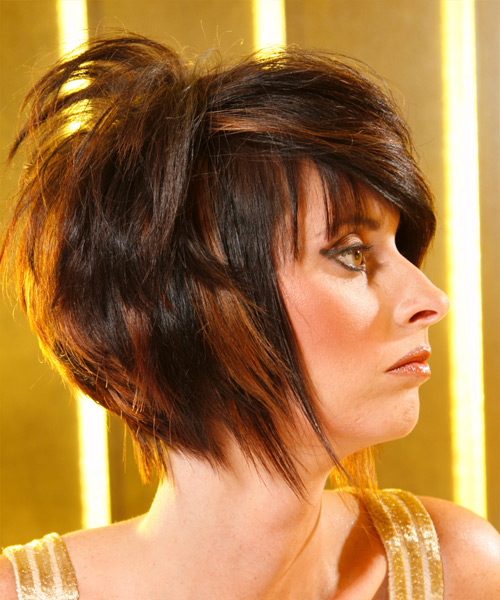
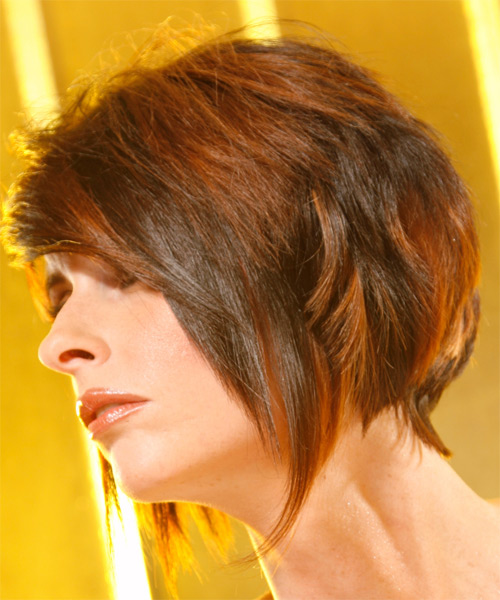
This dazzling hairstyle is perfect for our charming model girl's sharp facial features. Her contoured face and pointed nose complement her voluminous and wispy medium-length layers. This light brunette hair color creates major fashionista trends! It is a magnificent hairstyle with short to medium-length to create volume and body through the crown and top sections. For the hair styling technique, the edges of this look have wispy medium-length pieces to frame the sides of the face and to achieve contrast between the different lengths. This short hairstyle is a versatile cut that looks great on most face shapes. The layers give the style movement and body, while the short to length length provides lots of options for styling. This haircut is best suited for women with medium to thick hair density and fine to medium hair texture. It has lots of body and movement and can be worn in various ways, making it perfect for any occasion. Whether going out on the town or running errands, this style will make you feel confident and beautiful.

This short hairstyle is characterized by layers in various lengths which add movement and body to the hair, while the blunt cut ends give it a modern edge. It is best maintained with regular trims after 4 to 6 weeks. Tease your hair at the roots for height and control!


Visual Story

Voluminous And Wispy Short Hairstyle With Medium-Length Layers- Visual Story


Hairstyle Suitability Rating: ★★★★★
Hairstyle Popularity Rating: ★★★★★

Hairstyle Type

Category
Alternative
Length
Short
Elasticity
Straight
Hair Color
Light Brunette

Haircut Technique

Type

Suitability

Gender
Women
Face Shape
round,oval,heart,triangular
Hair Density
Medium/Thick
Hair Texture
Fine/Medium

Age
Under 21, 21 - 30, and 31 - 40
Height
Any
Weight
Thin/Average

Forehead Height
Short/Average
Neck Length
Short/Average
Ears
Small/Average
Nose
Small/Average
Glasses
No

Styling

Time
30+ minutes
Tip
Tease your hair at the roots for height and control
Products
mousse, moulding cream, lacquer
Tools
blow dry


Similar hairstyles you may be interested in...


step 1

Apply styling mousse to damp hair, using your palm as a measuring guide, and evenly distribute it along the hair shaft. Styling mousse will add hold and can help achieve better results.


step 2

A medium radial brush is used on medium to long hair types to smooth out wavy or curly hair textures or to add body to straight hair. When selecting a radial brush, always use one with a pure bristle as this will not tear or damage the hair.


step 3

To blow-dry under, start at the nape/back and place your brush under the section of hair close to the nape. With the dryer held up over the hair, pull the brush from the roots and continue to the mid length's, keeping the blow-dryer following over the top. Once you reach the ends, curve them under. Repeat this step until the section is completely dry.


step 4

Using your brush, blow-dry in small sections starting from the sides. Tilting your head forward, place the brush an inch below the roots to hold them taut and aim the dryer above the brush for a few seconds before continuing to the ends. Repeat this step on a new section directly above the dry one.


step 5

Take a section of your hair no wider than the diameter of your brush. Place your brush under and at the roots of your section. Then with your blow-dryer above, drag the brush up through the mid-lengths and ends of the hair following with your blow-dryer and pulling the hair to the left. Repeat until your hair is completely dry.


step 6

To blow-dry the crown/top sections, take a section of hair no bigger than the diameter of the brush and blow-dry the hair placing the brush under the section of hair. With your blow-dryer in front of the brush, follow the brush in an upwards direction at the roots and an outwards position at the ends for volume and softness. Continue until the section is dry.


step 7

Pick up a small selection of hair from your mid section no bigger than your tail comb. Place your comb at the roots and then comb up and down until the hair is standing up by itself. Continue to the crown and finish at the sides. Repeat this step if you require more volume.


step 8

Apply some moulding cream to your fingertips and then pull it through the ends of your hair in a downward motion to achieve a textured look.


step 9

Using a small amount of moulding cream, work it through the mid-lengths and ends in a downward motion. For added texture, pinch the ends as you go sparingly.


step 10

Apply some moulding cream to your fingertips and then rub it into your roots while lifting your strands for added body. Be sure not to use too much moulding cream at the roots as this can result in a glugy and thick uncomfortable feel.


step 11

Apply moulding cream to your fingertips then gently rake through your bangs, sweeping the hair to the left as you go. Be careful not to use too much product as it can become sticky and clumpy.


step 12

Lacquer is great for strong hold. A small amount is all that is required to finish and should be applied from an arms length distance to the entire style.


Recommended Hairstyles...