Long Straight Light Blonde Bob Haircut


Added: 10 Nov 2010
A light blonde bob is a perfect look for someone who wants to add a bit of style and distinction to their appearance but doesn't want to stray too far from her natural color. This haircut is long, straight, and sleek, with several layers on top of one another to add some dimension.

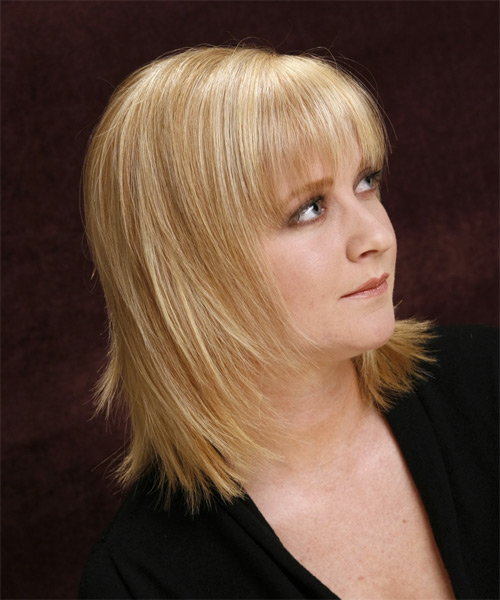
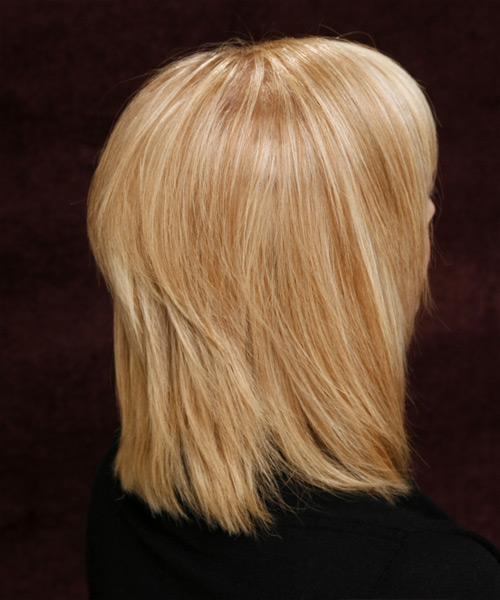
Our gorgeous model is effortlessly flaunting this long straight light blonde bob haircut with beautiful dark brown colored eyes. The model has added some pizzazz to her look with a black blazer, which complements her overall appearance in this elegant hairstyle. This is a funked-up bob with plenty of textured layers for movement and to add softness. For this hairstyle, the bangs also give this style a frame for the face. The subtle highlights also complement the cut. The back has been blunt cut straight to maintain the bob shape. The sides have been layered from the jawline and tapered down to the edges for a soft finish. This long straight light blonde bob haircut is suited for women with oval or oblong faces, diamond faces, and triangular faces. This color can help you add shine to your hair by using blonde highlights within the roots and overgrowth of the crown area. In addition to the overall length that you choose, we recommend cutting your ends closely but not too short so that they aren't fraying around the face area or neckline.

This trendy light blonde bob haircut is great for those with straight hair. With regular trims after 4 to 6 weeks, you can maintain this hairstyle with ease and style it for many more years. This hairstyle is perfect for showing off your natural beauty and confidence. It's easy to maintain and makes you feel great. Use the straightening iron to give your hair a dead straight finish.


Visual Story

Long Straight   Light Blonde Bob  Haircut- Visual Story


Hairstyle Suitability Rating: ★★★★★
Hairstyle Popularity Rating: ★★★★★

Hairstyle Type

Category
Formal
Length
Long
Elasticity
Straight
Hair Color
Light Blonde

Haircut Technique

Type

Suitability

Gender
Women
Face Shape
oval,oblong,diamond,triangular
Hair Density
Thin/Medium
Hair Texture
Fine/Medium

Age
Under 21, 21 - 30, 31 - 40, and 41 - 50
Height
Any
Weight
Thin/Average/Large

Forehead Height
Short/Average
Neck Length
Short/Average
Ears
Small/Average
Nose
Small/Average
Glasses
No

Styling

Time
30+ minutes
Tip
Use the straightening iron to give your hair a dead straight finish.
Products
mousse, wax, smoothing shine, hair spray
Tools
blow dry, straightening iron


Similar hairstyles you may be interested in...


step 1

Apply styling mousse to damp hair, using your palm as a measuring guide, and evenly distribute it along the hair shaft. Styling mousse will add hold and can help achieve better results.


step 2

Using the corner of your comb and standing in front of a mirror find the middle of your left eye and then drag the comb straight up slowly until you reach your hairline and then continue back in a straight manner to achieve an even left part. A side part is great for longer face shapes because it creates the illusion of width.


step 3

A medium radial brush is used on medium to long hair types to smooth out wavy or curly hair textures or to add body to straight hair. When selecting a radial brush, always use one with a pure bristle as this will not tear or damage the hair.


step 4

Using your brush, blow-dry in small sections starting from the nape/back. Tilting your head forward, place the brush an inch below the roots to hold them taut and aim the dryer above the brush for a few seconds before continuing to the ends.


step 5

Using your brush, blow-dry in small sections starting from the sides. Tilting your head forward, place the brush an inch below the roots to hold them taut and aim the dryer above the brush for a few seconds before continuing to the ends. Repeat this step on a new section directly above the dry one.


step 6

When blow-drying your bangs forward, clip your hair back leaving only your bangs out. Position your bangs evenly in your brush, taking the hair in a forward direction. Blow-dry from roots to ends, keeping the tension consistent, and evenly distribute heat over the whole section of hair that you are working on. Repeat until the hair is dry. This will stop any frizz that may occur.


step 7

Take a section of your hair no wider than the diameter of your brush. Place your brush under and at the roots of your section. Then with your blow-dryer above, drag the brush up through the mid-lengths and ends of the hair following with your blow-dryer and pulling the hair to the right. Repeat until your hair is completely dry.


step 8

Take a section of your hair no wider than the diameter of your brush. Place your brush under and at the roots of your section. Then with your blow-dryer above, drag the brush up through the mid-lengths and ends of the hair following with your blow-dryer and pulling the hair to the left. Repeat until your hair is completely dry.


step 9

When straightening your hair, first make sure that your hair is completely dry. Then, section your hair off starting from the back/nape using a comb. Straighten your hair starting from the roots and working your way down to the ends using your comb as your guide. Make sure not to leave the straightening iron in one spot for more than 3 seconds. For more information about straightening techniques click here.


step 10

Apply some wax to your fingertips and then pull through the ends of your hair in a downward motion to achieve a sculptured look. Pinch clumps of hair in different directions for a messier result.


step 11

Using a small amount of wax, work it through the mid-lengths and ends in a downward, pinching motion. For added texture, apply more pinching and more wax.


step 12

Apply a small amount of wax to your fingertips, and then using your fingers, rake through your bangs pinching the ends as you go to create a feathered, textured effect.


step 13

Apply some hard wax to your fingertips and then rub it into your roots while lifting your strands for soft volume.


step 14

Apply a very small amount of smoothing shine to the palms of your hands and then run it through the mid-lengths and ends of your hair. Be careful not to add any to the roots or a large amount to any section of the hair as smoothing shine can be very heavy on the hair, weighing it down and making it appear oily.


step 15

To finish, apply a minimal amount of hairspray from an arms length distance to the top, sides and back. Take care not to use too much or you will end up with a white, flaky residue which looks like dandruff.


Recommended Hairstyles...