Stylish And Wispy Light Honey Blonde Pixie Haircut


Added: 06 Nov 2017
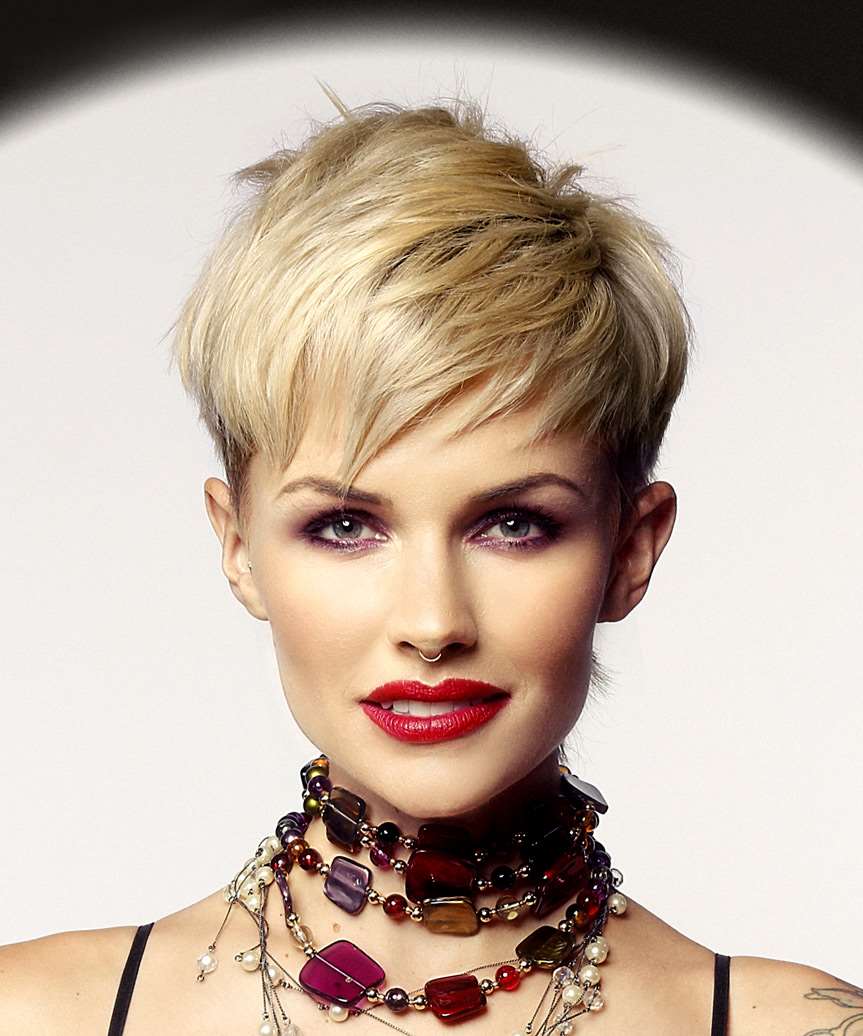
The back and sides of this blonde Pixie haircut is tapered close to the head blending into the top length that is left long and jagged cut, while being worn swept to the side to create this low-fuss hairstyle that is best suited for those with fine to medium hair. Only a small amount of product is needed to pinch through the ends and regular trims will help maintain shape.

Our model looks youthful and modern here in a chic, wispy Pixie cut. This hairstyle is ideal for women who want a short 'do but also want something stylish and trendy, not to mention quick and easy to style. The longer layers on the top and sides create a nice frame for our model's face and allows her natural texture to come through and give this 'do some body and volume. She has an oval face with a high, broad forehead, which this 'do remedies with a jagged side-swept fringe. The tapered ends sculpt around her eyes nicely and softens up her face. Ladies with a fine to medium hair texture are best suited to this short, voluminous 'do.

As for her color, our model is flaunting a gorgeous light blonde tone here that works well with her peaches and cream complexion and blue-grey eyes. Her coloring makes her suited to warm shades of golden blonde and beige blonde the best. Here, she opts for a light honey blonde tone that gives her a warm glow all over while bring out her eye color nicely. No highlights are needed here as her pixie cut looks great in this monochromatic light blonde tone.

Hairstyle Suitability Rating: ★★★★★
Hairstyle Popularity Rating: ★★★★★

Hairstyle Type

Category
Casual
Length
Short
Elasticity
Straight
Hair Color
Light Blonde

Haircut Technique

Type
Clipper Cut

Suitability

Gender
Women
Face Shape
oval,oblong,diamond,triangular
Hair Density
Medium
Hair Texture
Medium

Age
21 - 30, 31 - 40, 41 - 50, 51 - 60, and Over 60
Height
Any
Weight
Thin/Average/Large

Forehead Height
Short/Average
Glasses
Yes

Styling

Time
10 minutes
Tip
Twist the ends with wax for extra lift and style.
Products
mousse, gel
Tools
finger dry, blow dry


Similar hairstyles you may be interested in...


step 1

Apply styling mousse to damp hair, using your palm as a measuring guide, and evenly distribute it along the hair shaft. Styling mousse will add hold and can help achieve better results.


step 2

Using your blow-dryer, flip your head upside down and dry your hair using your fingers until your hair is completely dry. Remember, the messier, the better.


step 3

Use your blow-dryer and your fingers to dry the back of your hair by moving your hair around to allow the heat to pass through it.


step 4

Using the corner of your comb and standing in front of a mirror find the middle of your left eye and then drag the comb straight up slowly until you reach your hairline and then continue back in a straight manner to achieve an even left part. A side part is great for longer face shapes because it creates the illusion of width.


step 5

A small radial brush is used on shorter hair types to add more body or in longer hair types to create curl. When selecting a radial brush, always use one with a pure bristle as this will not tear or damage the hair.


step 6

Take a section of your hair no wider than the diameter of your brush. Place your brush under and at the roots of your section. Then with your blow-dryer above, drag the brush up through the mid-lengths and ends of the hair following with your blow-dryer and pulling the hair to the right. Repeat until your hair is completely dry.


step 7

When blow-drying your bangs to the side, section your hair up and clip your hair back to leave only your bangs out. Remember to make sure that your bangs are damp to make blow-drying more effective. Next, take your brush and place it underneath the hair and then blow-dry starting from the roots, adding tension to the hair as you go. Slowly pull your section down to the ends and continue until dry.


step 8

Apply gel to your fingertips and then pinch small clumps of hair in an up and forward motion. For a messier look, pinch the clumps in different directions.


step 9

Apply gel to your fingertips then gently rake through your bangs, sweeping the hair to the right as you go.


Recommended Hairstyles...