Annette Bening Short Straight Blonde Hairstyle


Added: 10 Nov 2010
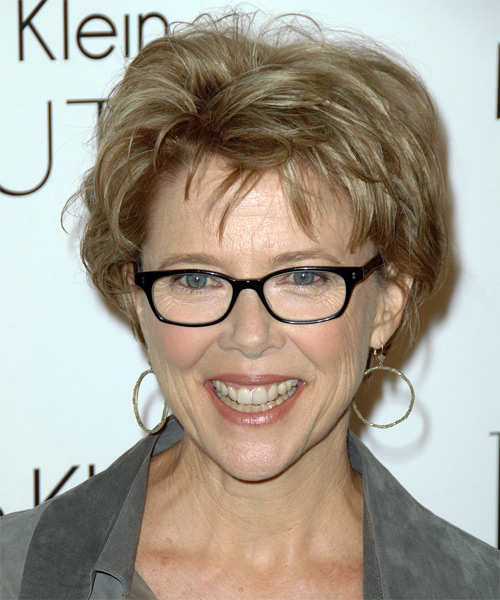
Uniform layers cut all through this short hairstyle allows height and texture through the top which makes it best suited for those with round face shapes. This well balanced hairstyle is easy to maintain with regular trims every 4-6 weeks.

Hairstyle Suitability Rating: ★★★★★
Hairstyle Popularity Rating: ★★★★★

Hairstyle Type

Category
Casual
Length
Short
Elasticity
Straight
Hair Color
Blonde

Haircut Technique

Type

Suitability

Gender
Women
Face Shape
round,oval,heart,triangular
Hair Density
Thin/Medium
Hair Texture
Fine/Medium

Age
21 - 30, 31 - 40, 41 - 50, 51 - 60, and Over 60
Height
Any
Weight
Thin/Average/Large

Forehead Height
Short/Average
Neck Length
Short/Average
Ears
Small/Average
Nose
Small/Average
Glasses
Yes

Styling

Time
30 minutes
Tip
Spray your hairspray at the roots to create more body and hold.
Products
mousse, wax, hair spray
Tools
blow dry, hot rollers


Similar hairstyles you may be interested in...


step 1

Apply styling mousse to damp hair, using your palm as a measuring guide, and evenly distribute it along the hair shaft. Styling mousse will add hold and can help achieve better results.


step 2

A small radial brush is used on shorter hair types to add more body or in longer hair types to create curl. When selecting a radial brush, always use one with a pure bristle as this will not tear or damage the hair.


step 3

To blow-dry under, start at the nape/back and place your brush under the section of hair close to the nape. With the dryer held up over the hair, pull the brush from the roots and continue to the mid length's, keeping the blow-dryer following over the top. Once you reach the ends, curve them under. Repeat this step until the section is completely dry.


step 4

Take a section of your hair from your ear to your temple that is the same diameter as the brush. Place your brush on top of the hair starting at the roots and pull the hair slowly in an outwards direction with your blow-dryer following in front. Repeat this step and then once the roots are dry, drag the brush to the mid-lengths and then slowly turn the brush in an inwards direction, flicking it through the ends.


step 5

Take a section of your hair from your ear to your temple that is the same diameter as the brush. Place your brush on top of the hair starting at the roots and pull the hair slowly in a backward direction with your blow-dryer following in front. Be sure the section is dry and then repeat the step on a new section of hair directly behind.


step 6

To blow-dry the crown/top sections, take a section of hair no bigger than the diameter of the brush and blow-dry the hair placing the brush under the section of hair. With your blow-dryer in front of the brush, follow the brush in an upwards direction at the roots and an outwards position at the ends for volume and softness. Continue until the section is dry.


step 7

Starting just above the crown take a section of your hair that is the same diameter as the brush. Place your brush underneath and at the roots of your section and then with your blow-dryer in front, drag the brush up and then turn it under when you reach the ends.


step 8

A medium hot roller is used to give your hair looser curls and can also be used for body.


step 9

Take the entire back section of your hair, and then starting from the crown, take a smaller section of hair no wider than the diameter of the hot roller and comb it through to ensure there are no knots. Place the roller at the ends of the section of hair, being sure to smooth the ends under, and then twist the roller down the hair shaft until it meets your head and then secure it in place with a pin or clip. Repeat this step until you have reached the nape of your neck and the entire back section of your hair is completed. Keep the rollers in your hair until they cool.


step 10

Take a section of hair no wider than the diameter of the hot roller and comb it through to ensure there are no knots. Place the roller at the ends of the section of hair, being sure to smooth the ends under, and then twist the roller vertically, making sure to roll it backwards, along the hair shaft to the roots and secure it with a pin or clip. Keep the rollers in your hair until they cool.


step 11

Pick up a small selection of hair from your mid section no bigger than your tail comb. Place your comb at the roots and then comb up and down until the hair is standing up by itself. Continue to the crown and finish at the sides. Repeat this step if you require more volume.


step 12

Apply some wax to your fingertips and then pull through the ends of your hair in a downward motion to achieve a sculptured look. Pinch clumps of hair in different directions for a messier result.


step 13

Using a small amount of wax, work it through the mid-lengths and ends in a downward, pinching motion. For added texture, apply more pinching and more wax.


step 14

To finish the look, apply wax to your fingertips, making sure to smooth the wax over all of your fingers, then simply pinch the wax onto the ends of your hair, applying as much or as little as needed.


step 15

Apply some hard wax to your fingertips and then rub it into your roots while lifting your strands for soft volume.


step 16

To finish, apply a minimal amount of hairspray from an arms length distance to the top, sides and back. Take care not to use too much or you will end up with a white, flaky residue which looks like dandruff.


Recommended Hairstyles...