Added:
14 Jul 2015
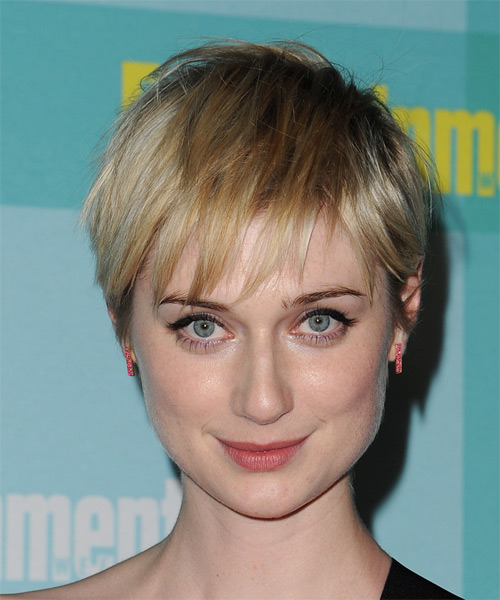
The back and sides of this short sassy 'do are tapered into the head while the top is left longer and jagged cut to create this low-fuss style. The crown is pinched to create lift while the bangs are pinched with product to frame the top of the face. This look is best suited for those with fine to medium hair and needs only a small amount of product for shine and hold.
Elizabeth Debicki is working a sexy pixie cut here with fabulous results. This ‘do is an ideal cut for her square face shape and delicate facial features. Elizabeth, like most squares, has a high broad forehead that benefits from the choppy fringe in this hairstyle. The longer layers at the sides create a more oval shape to her face and compliments her jaw line. This cut is also great for highlighting her strong cheekbones. This wash-and-go ‘do enhances her fine hair texture and gives it body and volume all over.
Elizabeth has a fair, cool complexion with pink undertones, and cool blue eyes. This makes her suited to lighter shades of blonde that have beige undertones to them. Elizabeth’s shade here has a combination of gold and beige tones that give her a natural finish while complimenting her complexion and bringing out her natural glow.
Elizabeth Debicki is an Australian stage and film actress.
Elizabeth Debicki Layered Light Blonde Pixie Haircut with Layered Bangs
Hairstyle Suitability Rating:
Hairstyle Popularity Rating: ★★★★★
Hairstyle Popularity Rating: ★★★★★
Hairstyle Type
Category
Casual
Length
Short
Elasticity
Straight
Hair Color
Light Blonde
Haircut Technique
Type
Razor Cut
Suitability
Gender
Women
Face Shape
round,oval,heart,triangular
Hair Density
Thin/Medium
Hair Texture
Fine/Medium
Age
Under 21, 21 - 30, 31 - 40, 41 - 50, 51 - 60, and Over 60
Height
Any
Weight
Thin/Average/Large
Forehead Height
Short/Average
Neck Length
Short/Average
Ears
Small/Average
Nose
Small/Average
Glasses
No
Styling
Time
10 minutes
Tip
A small amount of finishing products is all that is needed to complete this style.
Products
mousse, wax, hair spray
Tools
finger dry


