Long Straight Dark Mocha Brunette Hairstyle with Layered Bangs


Added: 10 Nov 2010
This layered brunette hairstyle is perfect for everyday wear, going out on the weekends, and even date night! If you have naturally straight hair that is slightly wavy, try this look by using your fingers to scrunch up each section into the shape you want. Then, pull it all down into a messy ponytail on top of your head to create that voluminous faux-bun look.

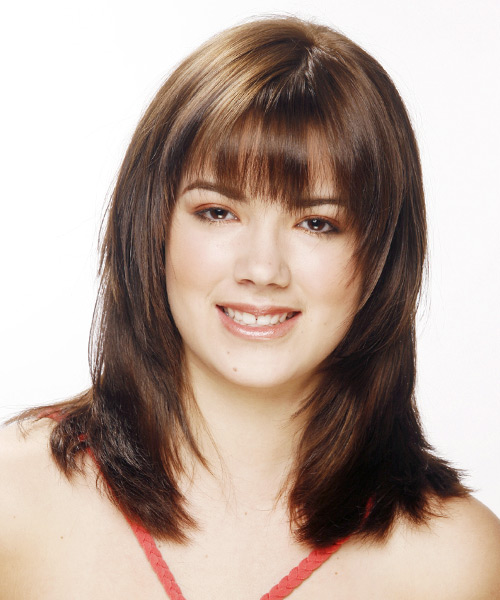
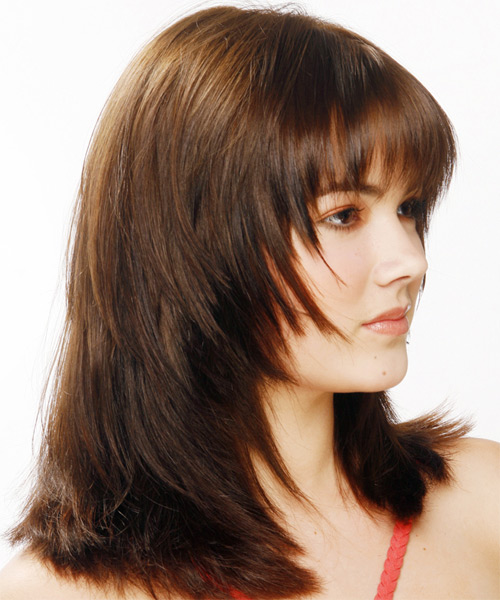
Our striking model is flaunting this long straight dark mocha brunette hairstyle with layered bangs. The model is wearing an alluring red tunic, but she's not looking too wild about it--the layered bangs soften the look and give her an easygoing appearance. This hairstyle is a softer look with wispy edges throughout to create a beautiful frame for the face. The back has been left sitting at one length for easy maintenance. The sides have been cut wispy and tapered down from the wispy bangs to the length. This long straight dark mocha brunette hairstyle is ideal for those with thin or medium hair density. The layered bangs add volume and shape, while the side cut gives a contemporary look to this hairstyle. This long straight dark mocha brunette hairstyle is gorgeous and layered. A perfect choice for every occasion, it's great when you're looking to keep things simple and chic.

If your hair is naturally straight, it's going to take a little bit of work to get it curly. If you have long, thick hair, then this hairstyle will be a breeze since it requires minimal manipulation and maintenance. Use your finishing products to smooth down the ends and direct your hair into place.


Visual Story

Long Straight   Dark Mocha Brunette   Hairstyle with Layered Bangs- Visual Story


Hairstyle Suitability Rating: ★★★★★
Hairstyle Popularity Rating: ★★★★★

Hairstyle Type

Category
Casual
Length
Long
Elasticity
Straight
Hair Color
Dark Mocha Brunette

Haircut Technique

Type
Scissor Cut

Suitability

Gender
Women
Face Shape
round,oval,heart,triangular
Hair Density
Thin/Medium
Hair Texture
Fine/Medium

Age
Under 21, 21 - 30, 31 - 40, and 41 - 50
Height
Any
Weight
Thin/Average/Large

Forehead Height
Short/Average
Neck Length
Short/Average
Ears
Small/Average
Nose
Small/Average
Glasses
No

Styling

Time
30+ minutes
Tip
Use your finishing products to smooth down the ends and direct your hair into place.
Products
mousse, wax, smoothing shine, hair spray
Tools
blow dry, straightening iron


Similar hairstyles you may be interested in...


step 1

Apply styling mousse to damp hair, using your palm as a measuring guide, and evenly distribute it along the hair shaft. Styling mousse will add hold and can help achieve better results.


step 2

Using the corner of your comb and standing in front of a mirror find the middle of your nose and then drag the comb straight up slowly until you reach your hairline and then continue back in a straight manner to achieve an even middle part. A middle part is a great way to make small, round face shapes appear longer and thinner.


step 3

A medium radial brush is used on medium to long hair types to smooth out wavy or curly hair textures or to add body to straight hair. When selecting a radial brush, always use one with a pure bristle as this will not tear or damage the hair.


step 4

Using your brush, blow-dry in small sections starting from the nape/back. Tilting your head forward, place the brush an inch below the roots to hold them taut and aim the dryer above the brush for a few seconds before continuing to the ends.


step 5

To blow-dry the sides, take out a small section of hair from the front and clip the rest of the hair away. Next, place the brush under the section and then pull the brush and hair forward around your face (this curving motion creates body). Place the hair-dryer on top of the brush until you reach the ends and then turn the ends under. Repeat until dry.


step 6

When blow-drying your bangs forward, clip your hair back leaving only your bangs out. Position your bangs evenly in your brush, taking the hair in a forward direction. Blow-dry from roots to ends, keeping the tension consistent, and evenly distribute heat over the whole section of hair that you are working on. Repeat until the hair is dry. This will stop any frizz that may occur.


step 7

When straightening your hair, first make sure that your hair is completely dry. Then, section your hair off starting from the back/nape using a comb. Straighten your hair starting from the roots and working your way down to the ends using your comb as your guide. Make sure not to leave the straightening iron in one spot for more than 3 seconds. For more information about straightening techniques click here.


step 8

Apply some wax to your fingertips and then pull through the ends of your hair in a downward motion to achieve a sculptured look. Pinch clumps of hair in different directions for a messier result.


step 9

Using a small amount of wax, work it through the mid-lengths and ends in a downward, pinching motion. For added texture, apply more pinching and more wax.


step 10

Apply a small amount of wax to your fingertips, and then using your fingers, rake through your bangs pinching the ends as you go to create a feathered, textured effect.


step 11

Apply a very small amount of smoothing shine to the palms of your hands and then run it through the mid-lengths and ends of your hair. Be careful not to add any to the roots or a large amount to any section of the hair as smoothing shine can be very heavy on the hair, weighing it down and making it appear oily.


step 12

To finish, apply a minimal amount of hairspray from an arms length distance to the top, sides and back. Take care not to use too much or you will end up with a white, flaky residue which looks like dandruff.


Recommended Hairstyles...