Short Messy Two-Tone Hairstyle For Straight Hair


Added: 10 Nov 2010
This short, straight hairstyle is simple and easy to create for you to try. With this hairstyle, you can choose your hair color and wear it in the morning or at night. It is a simple yet stylish cut that many celebrities like Kim Kardashian have experimented with. This look creates a tousled, undone finish that flaunts your natural texture.

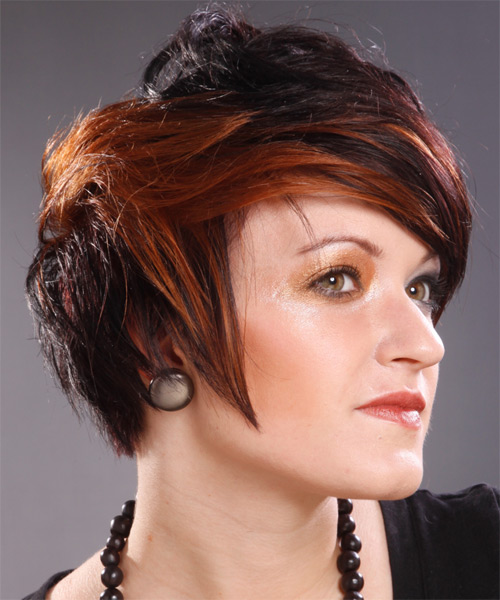
Our model is perfectly flaunting this short straight hairstyle with shiny eyes. The model wears a black top, necklace, and black eyeliner for an upscale look. Fun and fancy is what this hairstyle is all about. For the hair styling, the style is tapered into the back of the head with graduating layers cut through the top and sides to create this magnificent shape. Teasing at the roots adds height for control and style. This short haircut will look great if you have thin or medium hair density. It's a flattering style for oval, heart, and triangular face shapes. This classic hairstyle is a versatile look worn by all ages and hair textures. With its short length, you can wear this hairstyle with most outfit combinations, including formal occasions.

This short hairstyle is perfect for women who prefer a simple yet stylish look. The length and thickness of your hair can allow for various styling techniques, so this hairstyle can be worn in many ways. To prevent split ends, you should maintain this hairstyle with regular trims after 4 to 6 weeks. Using products with a strong hold will help to keep this style in place.


Visual Story

Short Messy Two-Tone Hairstyle For Straight Hair- Visual Story


Hairstyle Suitability Rating: ★★★★★
Hairstyle Popularity Rating: ★★★★★

Hairstyle Type

Category
Alternative
Length
Short
Elasticity
Straight

Haircut Technique

Type

Suitability

Gender
Women
Face Shape
round,oval,heart,triangular
Hair Density
Thin/Medium
Hair Texture
Fine/Medium

Age
Under 21, 21 - 30, and 31 - 40
Height
Any
Weight
Thin/Average/Large

Forehead Height
Short/Average
Neck Length
Short/Average
Ears
Small/Average
Nose
Small/Average
Glasses
No

Styling

Time
20 minutes
Tip
Using products with strong hold will help to keep this style in place.
Products
sculpture lotion, moulding cream, lacquer
Tools
finger dry


Similar hairstyles you may be interested in...


step 1

Apply sculpture lotion to the palm of the hand and then place it evenly throughout the hair. Sculpture lotion can be used as an alternative to mousse for messy hair, as a styling aid when blow-drying for volume, and for a stronger hold.


step 2

Using the corner of your comb and standing in front of a mirror find the middle of your right eye and then drag the comb straight up slowly until you reach your hairline and then continue back in a straight manner to achieve an even right part. A side part is great for longer face shapes because it creates the illusion of width.


step 3

Using your blow-dryer, flip your head upside down and dry your hair using your fingers until your hair is completely dry. Remember, the messier, the better.


step 4

Pick up a small selection of hair from your mid section no bigger than your tail comb. Place your comb at the roots and then comb up and down until the hair is standing up by itself. Continue to the crown and finish at the sides. Repeat this step if you require more volume.


step 5

Using moulding cream and your fingers grab the mid-lengths of your hair and then drag it out and upwards for a full and messy result.


step 6

Using a small amount of moulding cream, work it through the mid-lengths and ends in a downward motion. For added texture, pinch the ends as you go sparingly.


step 7

Apply moulding cream to your fingertips then gently rake through your bangs, sweeping the hair to the left as you go. Be careful not to use too much product as it can become sticky and clumpy.


step 8

Apply moulding cream to your fingertips and then pinch small clumps of hair in an up and forward motion. Pinch the clumps in different directions for a messier look.


step 9

Apply some moulding cream to your fingertips and then rub it into your roots while lifting your strands for added body. Be sure not to use too much moulding cream at the roots as this can result in a glugy and thick uncomfortable feel.


step 10

Lacquer is great for strong hold. A small amount is all that is required to finish and should be applied from an arms length distance to the entire style.


Recommended Hairstyles...