Sharon Lawrence Short Straight Hairstyle


Added: 10 Nov 2010
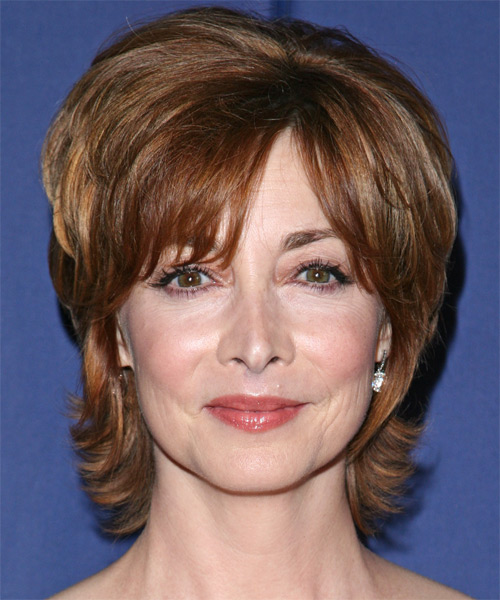
This classic look has a modern touch added to it with textured layers through the back for a wispy look and feel. The top layers are jagged cut to add height and shape. Gold and copper highlights are added through the top and sides for a sun-kissed finish.

Hairstyle Suitability Rating: ★★★★★
Hairstyle Popularity Rating: ★★★★★

Hairstyle Type

Category
Formal
Length
Short
Elasticity
Straight

Haircut Technique

Type

Suitability

Gender
Women
Face Shape
oval,oblong,square,diamond
Hair Density
Medium/Thick
Hair Texture
Fine/Medium

Age
31 - 40, 41 - 50, 51 - 60, and Over 60
Height
Any
Weight
Thin/Average/Large

Forehead Height
Short/Average
Neck Length
Short/Average
Ears
Small/Average
Nose
Small/Average
Glasses
No

Styling

Time
20 minutes
Tip
Tease your hair at the roots for height and control.
Products
mousse, wax, hair spray
Tools
blow dry


Similar hairstyles you may be interested in...


step 1

Apply styling mousse to damp hair, using your palm as a measuring guide, and evenly distribute it along the hair shaft. Styling mousse will add hold and can help achieve better results.


step 2

A medium radial brush is used on medium to long hair types to smooth out wavy or curly hair textures or to add body to straight hair. When selecting a radial brush, always use one with a pure bristle as this will not tear or damage the hair.


step 3

Starting at the nape/back of the hair, place your brush on top of the section and blow-dryer down starting from the roots and using tension as you go. Next, place the blow-dryer underneath the hair and continue to blow-dry the ends out. Make sure to follow the brush with the blow-dryer in an outwards direction. If you like fuller flicks, hold the ends out and roll them up into the brush and apply the heat for longer.


step 4

To blow-dry the sides, take out a small section of hair from the front and clip the rest of the hair away. Next, place the brush under the section and then pull the brush and hair forward around your face (this curving motion creates body). Place the hair-dryer on top of the brush until you reach the ends and then turn the ends under. Repeat until dry.


step 5

To blow-dry the crown/top sections, take a section of hair no bigger than the diameter of the brush and blow-dry the hair placing the brush under the section of hair. With your blow-dryer in front of the brush, follow the brush in an upwards direction at the roots and an outwards position at the ends for volume and softness. Continue until the section is dry.


step 6

When blow-drying your bangs forward, clip your hair back leaving only your bangs out. Position your bangs evenly in your brush, taking the hair in a forward direction. Blow-dry from roots to ends, keeping the tension consistent, and evenly distribute heat over the whole section of hair that you are working on. Repeat until the hair is dry. This will stop any frizz that may occur.


step 7

Pick up a small selection of hair from your mid section no bigger than your tail comb. Place your comb at the roots and then comb up and down until the hair is standing up by itself. Continue to the crown and finish at the sides. Repeat this step if you require more volume.


step 8

Using wax and your fingers grab the mid-lengths of your hair and then drag it out and upwards for a full and messy result. Remember not to overdo the wax or your result will be a flat and greasy style.


step 9

Using a small amount of wax, work it through the mid-lengths and ends in a downward, pinching motion. For added texture, apply more pinching and more wax.


step 10

Apply some hard wax to your fingertips and then rub it into your roots while lifting your strands for soft volume.


step 11

To finish, apply a minimal amount of hairspray from an arms length distance to the top, sides and back. Take care not to use too much or you will end up with a white, flaky residue which looks like dandruff.


Recommended Hairstyles...