Short Full-Bodied Chocolate Hairstyle With Bangs


Added: 04 Apr 2013
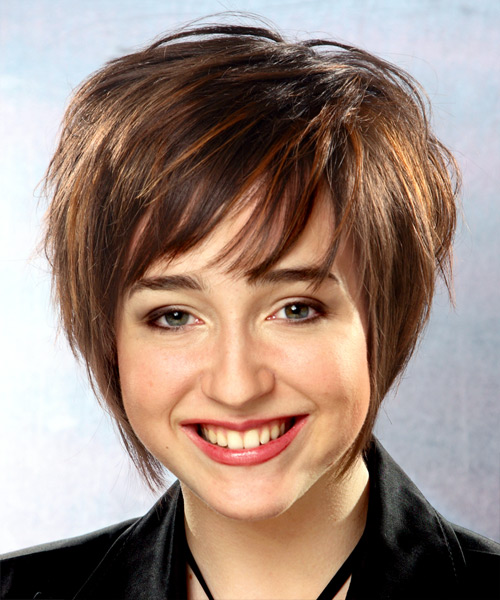
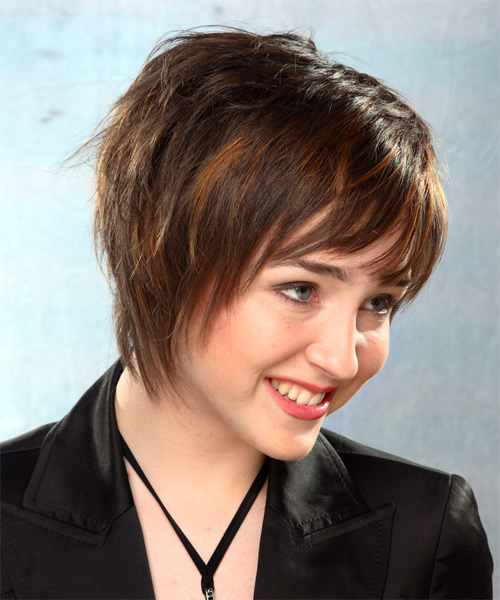
Show off your beautiful hair with this short straight chocolate hairstyle. Set it up with side-swept bangs and free-flowing movement with a pop of color, or wear simple and elegant for more of a classy look. Our model has a lovely and friendly smile. Her rapturous eyes, cute complexion, and glossy pink lips made her overall look stunning. Her shiny diamond face, bold pink glossy lips, and honey-hue eyes perfectly match her chocolate hair color. This exquisite hairstyle features heavy bangs, side-swept and tapered ends, and a deep chocolate brown tone.

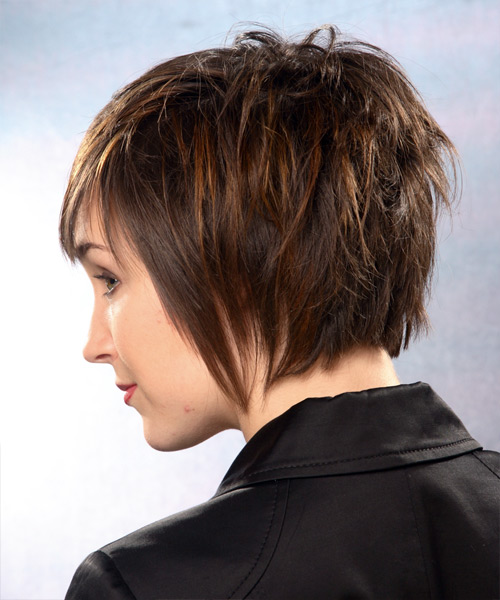
For the hair styling technique, the back is graduated to create shape and to contour the head, and the sides are angled and wispy. It is a full-bodied look that is great for those with fine hair wanting more fullness and volume. This straight chocolate hairstyle will help you to achieve the desired look of an attractive and classy woman who knows how to rock her hair. It is also among the most versatile hairstyles for women, as it works perfectly on all face shapes and hairstyles at home. Features of this short hairstyle include short side swept bangs, which add an extra dimension to your face shape and enhance its overall beauty. This sleek, straight hairdo is an excellent choice for busy days. The hair is short and pulled back at the crown to create the ultimate clean-cut hairstyle. It comes with side-swept bangs that add instant drama but don't take away from the simplicity of this style. This is a perfect style for any occasion.

Maintain this hairstyle with regular trims after 4 to 6 weeks. To maximize the look, use hair products that moisturize, protect and make your hair shiny. Spray a small amount of hairspray into your roots for extra volume and hold.


Visual Story

Short Full-Bodied Chocolate Hairstyle With Bangs- Visual Story


Hairstyle Suitability Rating: ★★★★★
Hairstyle Popularity Rating: ★★★★★

Hairstyle Type

Category
Formal
Length
Short
Elasticity
Straight
Hair Color
Chocolate

Haircut Technique

Type
Scissor Cut

Suitability

Gender
Women
Face Shape
oval,oblong,square,diamond,triangular
Hair Density
Thin/Medium
Hair Texture
Fine/Medium

Age
Under 21, 21 - 30, 31 - 40, 41 - 50, and 51 - 60
Height
Any
Weight
Thin/Average/Large

Forehead Height
Short/Average
Neck Length
Short/Average
Ears
Small/Average
Nose
Small/Average
Glasses
No

Styling

Time
30+ minutes
Tip
Spray a small amount of hairspray into your roots for extra volume and hold.
Products
mousse, wax, smoothing shine, hair spray
Tools
blow dry


Similar hairstyles you may be interested in...


step 1

Apply styling mousse to damp hair, using your palm as a measuring guide, and evenly distribute it along the hair shaft. Styling mousse will add hold and can help achieve better results.


step 2

Using the corner of your comb and standing in front of a mirror find the middle of your left eye and then drag the comb straight up slowly until you reach your hairline and then continue back in a straight manner to achieve an even left part. A side part is great for longer face shapes because it creates the illusion of width.


step 3

A medium radial brush is used on medium to long hair types to smooth out wavy or curly hair textures or to add body to straight hair. When selecting a radial brush, always use one with a pure bristle as this will not tear or damage the hair.


step 4

Using your brush, blow-dry in small sections starting from the nape/back. Tilting your head forward, place the brush an inch below the roots to hold them taut and aim the dryer above the brush for a few seconds before continuing to the ends.


step 5

To blow-dry the sides, take out a small section of hair from the front and clip the rest of the hair away. Next, place the brush under the section and then pull the brush and hair forward around your face (this curving motion creates body). Place the hair-dryer on top of the brush until you reach the ends and then turn the ends under. Repeat until dry.


step 6

Take a section of your hair no wider than the diameter of your brush. Place your brush under and at the roots of your section. Then with your blow-dryer above, drag the brush up through the mid-lengths and ends of the hair following with your blow-dryer and pulling the hair to the right. Repeat until your hair is completely dry.


step 7

Take a section of your hair no wider than the diameter of your brush. Place your brush under and at the roots of your section. Then with your blow-dryer above, drag the brush up through the mid-lengths and ends of the hair following with your blow-dryer and pulling the hair to the left. Repeat until your hair is completely dry.


step 8

To blow-dry the crown/top sections, take a section of hair no bigger than the diameter of the brush and blow-dry the hair placing the brush under the section of hair. With your blow-dryer in front of the brush, follow the brush in an upwards direction at the roots and an outwards position at the ends for volume and softness. Continue until the section is dry.


step 9

When blow-drying your bangs to the side, section your hair up and clip your hair back to leave only your bangs out. Remember to make sure that your bangs are damp to make blow-drying more effective. Next, take your brush and place it underneath the hair and then blow-dry starting from the roots, adding tension to the hair as you go. Slowly pull your section down to the ends and continue until dry.


step 10

Pick up a small selection of hair from your mid section no bigger than your tail comb. Place your comb at the roots and then comb up and down until the hair is standing up by itself. Continue to the crown and finish at the sides. Repeat this step if you require more volume.


step 11

Apply some wax to your fingertips and then pull through the ends of your hair in a downward motion to achieve a sculptured look. Pinch clumps of hair in different directions for a messier result.


step 12

Using a small amount of wax, work it through the mid-lengths and ends in a downward, pinching motion. For added texture, apply more pinching and more wax.


step 13

Apply some hard wax to your fingertips and then rub it into your roots while lifting your strands for soft volume.


step 14

Apply wax to your fingertips then drag through your bangs, sweeping the hair to the right as you go. Pinching the ends will create soft texture.


step 15

Apply a very small amount of smoothing shine to the palms of your hands and then run it through the mid-lengths and ends of your hair. Be careful not to add any to the roots or a large amount to any section of the hair as smoothing shine can be very heavy on the hair, weighing it down and making it appear oily.


step 16

To finish, apply a minimal amount of hairspray from an arms length distance to the top, sides and back. Take care not to use too much or you will end up with a white, flaky residue which looks like dandruff.


Recommended Hairstyles...