Short Low-Fuss Hairstyle For Women Over 50


Added: 06 Oct 2009
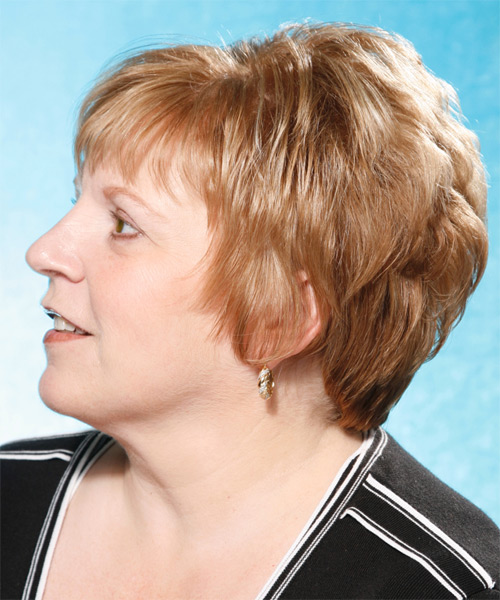
This short straight hairstyle is a great way to style your hair while keeping it naturally healthy. You can do this by using heat on the ends to soften it or pulling at the roots with a comb or barrettes. Our elegant model in her 50s has a golden blonde hairdo with jagged bangs. She looks younger and more vibrant thanks to her hairstyle, which complements her well! It is a simple yet magnificent style perfect for those wanting an easy-to-manage 'do. For the hair styling technique, the back and sides are jagged cut and layered to blend in with the top layers. The bangs are jagged cut to frame the top of the face and finish off this look beautifully. The hairstyle looks great on all face shapes and hair thicknesses, and is suitable for straight, wavy, or curly hair types. This hairstyle can also be used in shades of blonde to suit skin tone and eye color. It is designed with a full face shape and a natural orange-hued blonde color that ends at the neck, giving it a more youthful look.

The straight and cut-free hairstyle looks more natural than a traditional short 'do. The hair can be cut to the desired length, but it is important to maintain your haircut. Keep your hairstyle in place with regular trimming. You can support the length of your hair by trimming off any split ends after 4 to 6 weeks. A small amount of finishing product is needed to complete this style.


Visual Story

Short Low-Fuss Hairstyle For Women Over 50- Visual Story


Hairstyle Suitability Rating: ★★★★★
Hairstyle Popularity Rating: ★★★★★

Hairstyle Type

Category
Formal
Length
Short
Elasticity
Straight
Hair Color
Golden Blonde

Haircut Technique

Type

Suitability

Gender
Women
Face Shape
oval,oblong,square,diamond
Hair Density
Thin/Medium
Hair Texture
Fine/Medium

Age
Under 21, 21 - 30, 31 - 40, 41 - 50, 51 - 60, and Over 60
Height
Any
Weight
Thin/Average

Forehead Height
Short/Average
Neck Length
Short/Average
Ears
Small/Average
Nose
Small/Average
Glasses
No

Styling

Time
30+ minutes
Tip
A small amount of finishing products is all that is needed to complete this style.
Products
mousse, moulding cream, hair spray
Tools
blow dry


Similar hairstyles you may be interested in...


step 1

Apply styling mousse to damp hair, using your palm as a measuring guide, and evenly distribute it along the hair shaft. Styling mousse will add hold and can help achieve better results.


step 2

A small radial brush is used on shorter hair types to add more body or in longer hair types to create curl. When selecting a radial brush, always use one with a pure bristle as this will not tear or damage the hair.


step 3

To blow-dry under, start at the nape/back and place your brush under the section of hair close to the nape. With the dryer held up over the hair, pull the brush from the roots and continue to the mid length's, keeping the blow-dryer following over the top. Once you reach the ends, curve them under. Repeat this step until the section is completely dry.


step 4

To blow-dry the sides, take out a small section of hair from the front and clip the rest of the hair away. Next, place the brush under the section and then pull the brush and hair forward around your face (this curving motion creates body). Place the hair-dryer on top of the brush until you reach the ends and then turn the ends under. Repeat until dry.


step 5

Take a section of your hair no wider than the diameter of your brush. Place your brush under and at the roots of your section. Then with your blow-dryer above, drag the brush up through the mid-lengths and ends of the hair following with your blow-dryer and pulling the hair to the right. Repeat until your hair is completely dry.


step 6

Take a section of your hair no wider than the diameter of your brush. Place your brush under and at the roots of your section. Then with your blow-dryer above, drag the brush up through the mid-lengths and ends of the hair following with your blow-dryer and pulling the hair to the left. Repeat until your hair is completely dry.


step 7

When blow-drying your bangs forward, clip your hair back leaving only your bangs out. Position your bangs evenly in your brush, taking the hair in a forward direction. Blow-dry from roots to ends, keeping the tension consistent, and evenly distribute heat over the whole section of hair that you are working on. Repeat until the hair is dry. This will stop any frizz that may occur.


step 8

Apply some moulding cream to your fingertips and then pull it through the ends of your hair in a downward motion to achieve a textured look.


step 9

Using a small amount of moulding cream, work it through the mid-lengths and ends in a downward motion. For added texture, pinch the ends as you go sparingly.


step 10

Apply a small amount of moulding cream to your fingertips and then using your fingers, rake through your bangs to the ends for hold and texture.


step 11

Apply some moulding cream to your fingertips and then rub it into your roots while lifting your strands for added body. Be sure not to use too much moulding cream at the roots as this can result in a glugy and thick uncomfortable feel.


step 12

Apply moulding cream to your fingertips and then pinch small clumps of hair in an up and forward motion. Pinch the clumps in different directions for a messier look.


step 13

To finish, apply a minimal amount of hairspray from an arms length distance to the top, sides and back. Take care not to use too much or you will end up with a white, flaky residue which looks like dandruff.


Recommended Hairstyles...