Zendaya Coleman Medium Wavy Dark Chocolate Brunette Bob Haircut with Side Swept Bangs


Added: 20 Mar 2016
These stunning chocolate brown tresses were set in hot rollers to be easily managed and pinned to the head to create this elegant updo, best suited to frame a heart shaped face. This hairstyle will turn heads at any occasion and needs strong hold product to keep it in place. Finish this ‘do with a shine spray for a gorgeous finish.

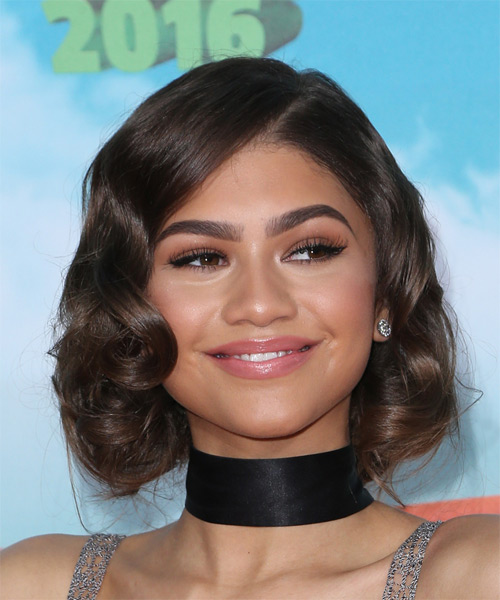
Zendaya Coleman looks ravishing here in a vintage-inspired curled bob. Her hair has been set in hot rollers to create this perfectly coiffed ‘do that frames her face and shows off her best features. Having a low forehead and heart shaped face, Zendaya looks best in shorter hairstyles that have a grown out fringe. Her bob hugs her face nicely here and the deep zig-zag part adds some extra pizzazz to this ‘do. The smooth, polished finish gives her tresses a healthy, glossy finish for this formal look. This is an ideal way for ladies with a bob to jazz up their hairstyle for a night out.

Zendaya has a gorgeous, glowing complexion that looks best with her natural dark brunette hair. Here she is flaunting subtle highlights throughout the ends as well for a soft, sun-kissed finish. Overall, this rich chocolate brown tone gives her locks a glossy finish, and brings out her brown eyes and thick, arched eyebrows.

Zendaya Coleman is an American actress, singer, dancer, and model.

Hairstyle Suitability Rating: ★★★★★
Hairstyle Popularity Rating: ★★★★★

Hairstyle Type

Category
Formal
Length
Medium
Elasticity
Wavy
Hair Color
Dark Chocolate Brunette

Haircut Technique

Type
Scissor Cut

Suitability

Gender
Women
Face Shape
oval,square,heart,diamond,triangular
Hair Density
Medium
Hair Texture
Medium

Age
Under 21, 21 - 30, and 31 - 40
Height
Any
Weight
Thin/Average/Large

Forehead Height
Short/Average
Glasses
No

Styling

Time
30+ minutes
Tip
Using products with strong hold will help to keep this style in place.
Products
sculpture lotion, moulding cream, lacquer
Tools
blow dry, hot rollers


Similar hairstyles you may be interested in...


step 1

Apply sculpture lotion to the palm of the hand and then place it evenly throughout the hair. Sculpture lotion can be used as an alternative to mousse for messy hair, as a styling aid when blow-drying for volume, and for a stronger hold.


step 2

Using the corner of your comb and standing in front of a mirror find the middle of your left eye and then drag the comb straight up slowly until you reach your hairline and then continue back in a straight manner to achieve an even left part. A side part is great for longer face shapes because it creates the illusion of width.


step 3

To blow-dry under, start at the nape/back and place your brush under the section of hair close to the nape. With the dryer held up over the hair, pull the brush from the roots and continue to the mid length's, keeping the blow-dryer following over the top. Once you reach the ends, curve them under. Repeat this step until the section is completely dry.


step 4

To blow-dry the sides, take out a small section of hair from the front and clip the rest of the hair away. Next, place the brush under the section and then pull the brush and hair forward around your face (this curving motion creates body). Place the hair-dryer on top of the brush until you reach the ends and then turn the ends under. Repeat until dry.


step 5

To blow-dry the crown/top sections, take a section of hair no bigger than the diameter of the brush and blow-dry the hair placing the brush under the section of hair. With your blow-dryer in front of the brush, follow the brush in an upwards direction at the roots and an outwards position at the ends for volume and softness. Continue until the section is dry.


step 6

To blow-dry your bangs you will need to take your brush and firstly make sure the section is no wider than the diameter of the brush. Next, place your brush on top of your head and under your section. Using your blow-dryer on a medium setting, blow-dry your hair from the roots, slowly working your way to the ends. Make sure to keep the blow-dryer in front of the brush at all times. Continue this step until the bangs are completely dry.


step 7

It is always a good idea to work in sections. This will help to make your hair styling quicker, easier to follow and more orderly. Comb your hair out and place your hair up into four equal sections, two in front and two in back, starting from ear to ear.


step 8

Take a section of hair no wider than the diameter of the hot roller and comb it through to ensure there are no knots. Place the roller at the ends of the section of hair, being sure to smooth the ends under, and then twist the roller vertically, making sure to roll it backwards, along the hair shaft to the roots and secure it with a pin or clip. Keep the rollers in your hair until they cool.


step 9

Take a section of hair from the nape no wider than the diameter of the hot roller and comb it through to ensure there are no knots. Place the roller at the ends of the section of hair, being sure to smooth the ends under, and then twist the roller vertically down the hair shaft to the roots and secure it with a pin or clip. Continue this step until the entire back section of your hair is completed. Keep the rollers in your hair until they cool.


step 10

Take your front bang section and roll it up into your hot roller in a forward direction so that the hair curls under. Continue applying hot rollers along the top of your head in the opposite direction, going backwards. Keep the rollers in your hair until they cool.


step 11

Take a section of hair from the front of your head no wider than the diameter of the hot roller and comb it through to ensure there are no knots. Place the roller at the ends of the section of hair, being sure to smooth the ends under, and then twist the roller down the hair shaft until it meets the top of your head and then secure it in place with a pin or clip. Continue this step until a row of hot rollers has been applied along the very top of your head. Keep the rollers in your hair until they cool.


step 12

Apply moulding cream to your fingertips and then tilt your head forward and scrunch your hair.


step 13

Lacquer is great for strong hold. A small amount is all that is required to finish and should be applied from an arms length distance to the entire style.


Recommended Hairstyles...