Kat Graham Medium Wavy Black and Light Brunette Two-Tone Hairstyle


Added: 11 Apr 2016
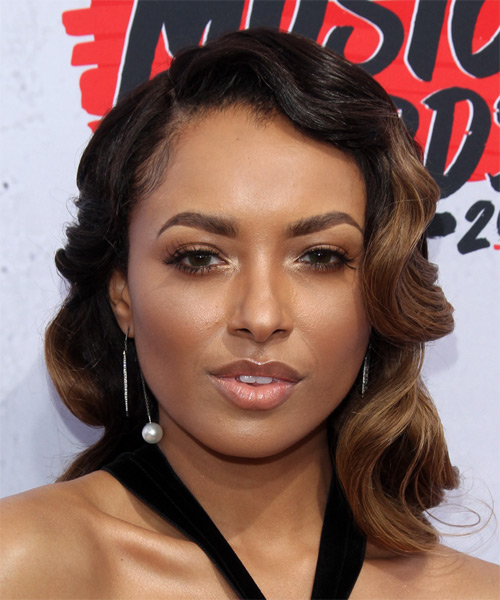
This two-tone mane is dressed in waves all through the back and sides to achieve a classic look and feel. The body and volume makes this formal style perfect to complement an oval or long face for any occasion. Product is needed for hold and shine.

Kat Graham goes all out glamorous here with this vintage inspired curly ‘do. Kat has strong cheekbones and a round face shape, making a longer bob ideal for her. She also has a low forehead which means she is better suited to a grown out fringe. This cut ticks all of those boxes and provides Kat with a gorgeous face-framing ‘do that brings out all of her best features. To style it up, large waves and curls were added to her side-parted locks to create an old Hollywood-style finish. This is a great way to jazz up a plain bob or layered 'do and add volume to the locks.

Kat loves to experiment with her look but tends to stick with dark brown and black hair colors. Here, she jazzes it up a bit with light brunette highlights through the ends that looks fabulous with her warm, golden-based skin tone and dark eyes. Multidimensional highlights and lowlights keep her color looking natural.

Kat Graham is a Swiss-born American actress, model, singer and dancer. She is known for her role of Bonnie Bennett on The CW supernatural drama The Vampire Diaries.

Hairstyle Suitability Rating: ★★★★★
Hairstyle Popularity Rating: ★★★★★

Hairstyle Type

Category
Formal
Length
Medium
Elasticity
Wavy
Hair Color
Black and Light Brunette Two-Tone

Haircut Technique

Type
Scissor Cut

Suitability

Gender
Women
Face Shape
round,oval,oblong,square,heart,diamond
Hair Density
Medium
Hair Texture
Medium

Age
21 - 30, 31 - 40, 41 - 50, 51 - 60, and Over 60
Height
Tall
Weight
Thin/Average/Large

Forehead Height
Short/Average
Glasses
No

Styling

Time
30 minutes
Tip
Spray a small amount of hairspray at the roots and ends to keep this style full and shaped for longer.
Products
sculpture lotion, smoothing shine, lacquer
Tools
blow dry, hot rollers


Similar hairstyles you may be interested in...


step 1

Apply sculpture lotion to the palm of the hand and then place it evenly throughout the hair. Sculpture lotion can be used as an alternative to mousse for messy hair, as a styling aid when blow-drying for volume, and for a stronger hold.


step 2

Using the corner of your comb and standing in front of a mirror find the middle of your right eye and then drag the comb straight up slowly until you reach your hairline and then continue back in a straight manner to achieve an even right part. A side part is great for longer face shapes because it creates the illusion of width.


step 3

To blow-dry under, start at the nape/back and place your brush under the section of hair close to the nape. With the dryer held up over the hair, pull the brush from the roots and continue to the mid length's, keeping the blow-dryer following over the top. Once you reach the ends, curve them under. Repeat this step until the section is completely dry.


step 4

To blow-dry the sides, take out a small section of hair from the front and clip the rest of the hair away. Next, place the brush under the section and then pull the brush and hair forward around your face (this curving motion creates body). Place the hair-dryer on top of the brush until you reach the ends and then turn the ends under. Repeat until dry.


step 5

To blow-dry the crown/top sections, take a section of hair no bigger than the diameter of the brush and blow-dry the hair placing the brush under the section of hair. With your blow-dryer in front of the brush, follow the brush in an upwards direction at the roots and an outwards position at the ends for volume and softness. Continue until the section is dry.


step 6

A large hot roller is used to give your hair a larger curl and to add lots of body.


step 7

Take a section of hair from the nape no wider than the diameter of the hot roller and comb it through to ensure there are no knots. Place the roller at the ends of the section of hair, being sure to smooth the ends under, and then twist the roller vertically down the hair shaft to the roots and secure it with a pin or clip. Continue this step until the entire back section of your hair is completed. Keep the rollers in your hair until they cool.


step 8

Take a section of hair no wider than the diameter of the hot roller and comb it through to ensure there are no knots. Place the roller at the ends of the section of hair, being sure to smooth the ends under, and then twist the roller vertically, making sure to roll it backwards, along the hair shaft to the roots and secure it with a pin or clip. Keep the rollers in your hair until they cool.


step 9

Take a section of hair from the front of your head no wider than the diameter of the hot roller and comb it through to ensure there are no knots. Place the roller at the ends of the section of hair, being sure to smooth the ends under, and then twist the roller down the hair shaft until it meets the top of your head and then secure it in place with a pin or clip. Continue this step until a row of hot rollers has been applied along the very top of your head. Keep the rollers in your hair until they cool.


step 10

Take your front bang section and roll it up into your hot roller in a forward direction so that the hair curls under. Continue applying hot rollers along the top of your head in the opposite direction, going backwards. Keep the rollers in your hair until they cool.


step 11

Apply a very small amount of smoothing shine to the palms of your hands and then run it through the mid-lengths and ends of your hair. Be careful not to add any to the roots or a large amount to any section of the hair as smoothing shine can be very heavy on the hair, weighing it down and making it appear oily.


step 12

Pulling your hair back and placing it behind your ear will help to keep the strands off your face and change the look of your style.


step 13

Lacquer is great for strong hold. A small amount is all that is required to finish and should be applied from an arms length distance to the entire style.


Recommended Hairstyles...