Medium Curly Chocolate Hairstyle


Added: 06 Aug 2009
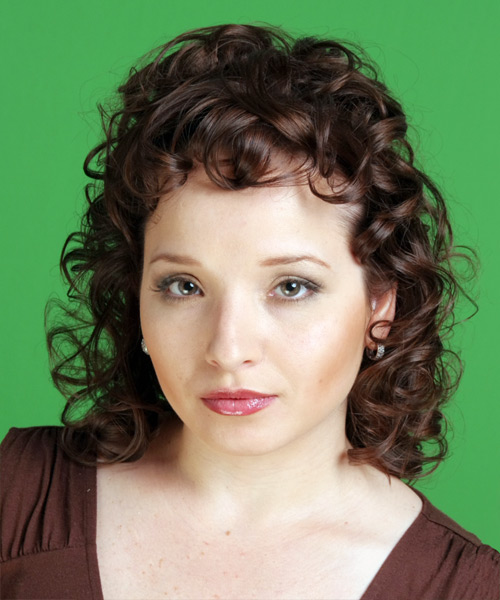
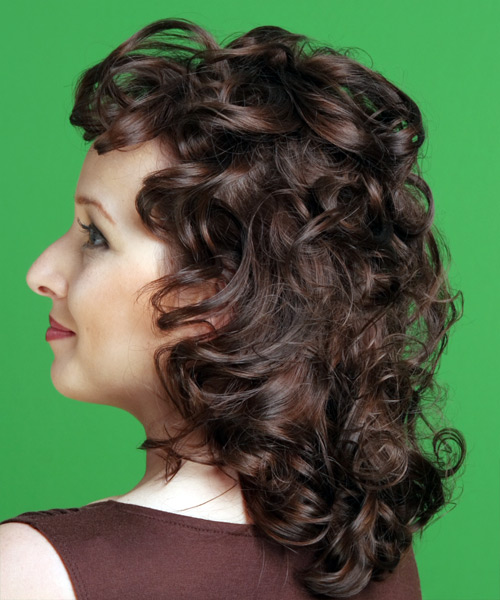
The medium curly chocolate hairstyle is a great option for those who want an everyday hairstyle that is easy and versatile. The natural curls around the face will help add dimension to your overall look while making it more interesting. A medium curly chocolate style has lots of wavy hair, allowing you to curl or straighten the pieces that suit your face shape best.

Our model is bringing attention to this medium-curly chocolate hairstyle, a bold look that will make you stand out in a crowd. The model wears a dark brown hue top with glossy pink lips, giving her the perfect touch of elegance when paired with this elegant hairstyle. For this hair styling, the back has been cut to one length and features layers that have graduated up to the shorter layers at the crown. The sides have been cut shorter than the back and blended up to the shorter layers through the top. For versatility, the shorter layers through the top of this hairstyle can also be worn as bangs. This chic, curly chocolate hairstyle is suitable for all skin tones. Leave a small amount of hair out at the crown and sides to keep it curly and bouncy. If you prefer a more polished v shape, create more layers at the top and sides. This hairstyle is perfect for women with thin to medium straight hair, rounded face shape and oval, heart or diamond-shaped eyes. The wavy ends can be styled with your favourite curling irons or curling rods to create bouncy ringlets that are touched up with a round brush or flat iron to add hold.

You can maintain this hairstyle with regular trimming after 4 to 6 weeks to maintain the hairstyle in shape and avoid split ends. Keep in mind that it's best not to wash your hair every day, but do wash it every 2 or 3 days. Direct your hair into position while applying the finishing products.


Visual Story

Medium Curly   Chocolate   Hairstyle- Visual Story


Hairstyle Suitability Rating: ★★★★★
Hairstyle Popularity Rating: ★★★★★

Hairstyle Type

Category
Formal
Length
Medium
Elasticity
Curly
Hair Color
Chocolate

Haircut Technique

Type
Scissor Cut

Suitability

Gender
Women
Face Shape
round,oval,heart,diamond,triangular
Hair Density
Thin/Medium
Hair Texture
Fine/Medium

Age
Under 21, 21 - 30, 31 - 40, and 41 - 50
Height
Any
Weight
Thin/Average/Large

Forehead Height
Short/Average
Neck Length
Short/Average
Ears
Small/Average
Nose
Small/Average
Glasses
Yes

Styling

Time
30+ minutes
Tip
Direct your hair into position while applying the finishing products.
Products
moisturizer, mousse, moulding cream, smoothing shine, lacquer
Tools
blow dry, hot rollers


Similar hairstyles you may be interested in...


step 1

Apply a small amount of hair moisturizer to the palm of your hand and distribute it evenly through the mid-lengths and the ends. Moisturizer will help your hair to maintain good condition and protect your strands from heat as you style.


step 2

Apply styling mousse to damp hair, using your palm as a measuring guide, and evenly distribute it along the hair shaft. Styling mousse will add hold and can help achieve better results.


step 3

A small radial brush is used on shorter hair types to add more body or in longer hair types to create curl. When selecting a radial brush, always use one with a pure bristle as this will not tear or damage the hair.


step 4

Starting at the nape/back of the hair, place your brush on top of the section and blow-dryer down starting from the roots and using tension as you go. Next, place the blow-dryer underneath the hair and continue to blow-dry the ends out. Make sure to follow the brush with the blow-dryer in an outwards direction. If you like fuller flicks, hold the ends out and roll them up into the brush and apply the heat for longer.


step 5

To blow-dry the sides, take out your first sections from the front and clip the rest of the hair up. Place your brush on top of the section, and starting from the roots, blow-dry down using tension as you go. Next, place the blow-dryer underneath the hair and continue to blow-dry the ends out. Continue this step until the hair is dry.


step 6

To blow-dry the crown/top sections, take a section of hair no bigger than the diameter of the brush and blow-dry the hair placing the brush under the section of hair. With your blow-dryer in front of the brush, follow the brush in an upwards direction at the roots and an outwards position at the ends for volume and softness. Continue until the section is dry.


step 7

When blow-drying your bangs forward, clip your hair back leaving only your bangs out. Position your bangs evenly in your brush, taking the hair in a forward direction. Blow-dry from roots to ends, keeping the tension consistent, and evenly distribute heat over the whole section of hair that you are working on. Repeat until the hair is dry. This will stop any frizz that may occur.


step 8

A medium hot roller is used to give your hair looser curls and can also be used for body.


step 9

Take the entire back section of your hair, and then starting from the crown, take a smaller section of hair no wider than the diameter of the hot roller and comb it through to ensure there are no knots. Place the roller at the ends of the section of hair, being sure to smooth the ends under, and then twist the roller down the hair shaft until it meets your head and then secure it in place with a pin or clip. Repeat this step until you have reached the nape of your neck and the entire back section of your hair is completed. Keep the rollers in your hair until they cool.


step 10

Take a section of hair from the nape no wider than the diameter of the hot roller and comb it through to ensure there are no knots. Place the roller at the ends of the section of hair, being sure to smooth the ends under, and then twist the roller vertically down the hair shaft to the roots and secure it with a pin or clip. Continue this step until the entire back section of your hair is completed. Keep the rollers in your hair until they cool.


step 11

Take a section of hair no wider than the diameter of the hot roller and comb it through to ensure there are no knots. Place the roller at the ends of the section of hair, being sure to smooth the ends under, and then twist the roller vertically down the hair shaft to the roots and secure it with a pin or clip. Continue applying the rollers throughout your sides until they meet up with the other rollers applied to your head to complete this style. Keep the rollers in your hair until they cool.


step 12

Take your front bang section and roll it up into your hot roller in a forward direction so that the hair curls under. Continue applying hot rollers along the top of your head in the opposite direction, going backwards. Keep the rollers in your hair until they cool.


step 13

Apply your moulding cream to the ends of your hair and then lightly pinch and scrunch the hair before allowing your moulding cream to set.


step 14

Apply some moulding cream to your fingertips and then rub it into your roots while lifting your strands for added body. Be sure not to use too much moulding cream at the roots as this can result in a glugy and thick uncomfortable feel.


step 15

Apply a very small amount of smoothing shine to the palms of your hands and then run it through the mid-lengths and ends of your hair. Be careful not to add any to the roots or a large amount to any section of the hair as smoothing shine can be very heavy on the hair, weighing it down and making it appear oily.


step 16

Lacquer is great for strong hold. A small amount is all that is required to finish and should be applied from an arms length distance to the entire style.


Recommended Hairstyles...