Medium Curly Chestnut Brunette Hairstyle


Added: 10 Nov 2010
A medium-curly chestnut brunette hairstyle is a great option for those who want something on the longer side of curls. This style is easy to maintain and will look gorgeous when you have it blow-dried or cut at an angle.

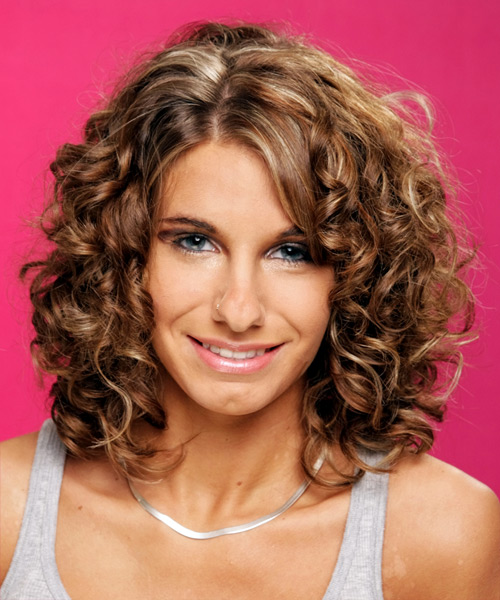
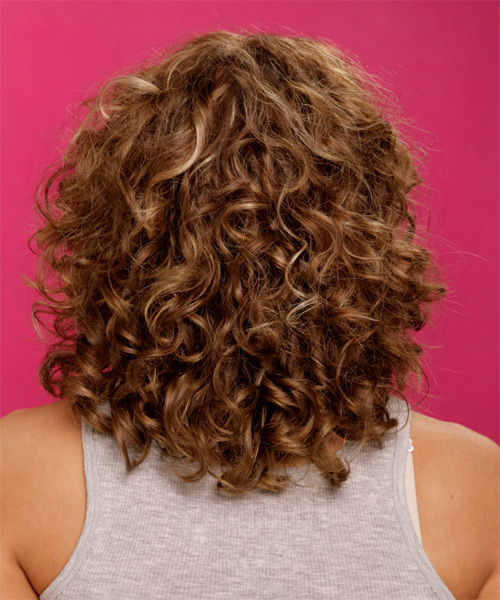
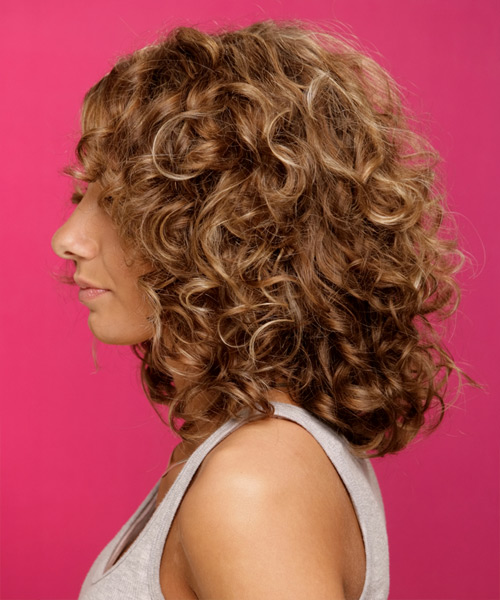
Our model's medium curly chestnut brunette hairstyle perfectly flaunts this hairstylist's expertise. The model wears a sports shirt with a silver chain. Her medium brunette curls are alluring in this hairstyle, which complements her personality perfectly! For this hair styling this full-bodied hairstyle has plenty of short to long layers through the back and sides to balance out the volume and bounce. The width of this 'do makes it suitable for those with longer face shapes who want more air and flair in their overall look. This medium-curly hair is perfect for women with face shapes oval, oblong and square. The medium-curly brunette hairstyle is suitable for those who have medium-heavy hair texture and density. This easy-to-maintain hairstyle can be worn on weekdays or weekends, depending on how you want to style your hair. This hairstyle will make you stand out in a crowd.

This medium-curly chestnut brunette hairstyle is a great choice for you. It has a beautiful, smooth look and is easy to maintain. This hairstyle can be maintained with regular trimming after 4 to 6 weeks in order to keep the style intact. Use your smoothing shine to add a small amount of gloss and to reduce flyaways.


Visual Story

Medium Curly    Chestnut Brunette   Hairstyle- Visual Story


Hairstyle Suitability Rating: ★★★★★
Hairstyle Popularity Rating: ★★★★★

Hairstyle Type

Category
Formal
Length
Medium
Elasticity
Curly
Hair Color
Chestnut Brunette

Haircut Technique

Type

Suitability

Gender
Women
Face Shape
oval,oblong,square,diamond
Hair Density
Medium/Thick
Hair Texture
Fine/Medium

Age
Under 21, 21 - 30, 31 - 40, and 41 - 50
Height
Any
Weight
Thin/Average

Forehead Height
Short/Average
Neck Length
Short/Average
Ears
Small/Average
Nose
Small/Average
Glasses
No

Styling

Time
30+ minutes
Tip
Use your smoothing shine to add a small amount of gloss and to reduce fly-aways.
Products
moisturizer, mousse, wax, smoothing shine, lacquer
Tools
blow dry, hot rollers


Similar hairstyles you may be interested in...


step 1

Apply a small amount of hair moisturizer to the palm of your hand and distribute it evenly through the mid-lengths and the ends. Moisturizer will help your hair to maintain good condition and protect your strands from heat as you style.


step 2

Apply styling mousse to damp hair, using your palm as a measuring guide, and evenly distribute it along the hair shaft. Styling mousse will add hold and can help achieve better results.


step 3

A large radial brush is usually used on long straight hair types or to smooth out wavy or curly hair textures. When selecting a radial brush, always use one with a pure bristle as this will not tear or damage the hair.


step 4

To blow-dry under, start at the nape/back and place your brush under the section of hair close to the nape. With the dryer held up over the hair, pull the brush from the roots and continue to the mid length's, keeping the blow-dryer following over the top. Once you reach the ends, curve them under. Repeat this step until the section is completely dry.


step 5

To blow-dry the sides, take out a small section of hair from the front and clip the rest of the hair away. Next, place the brush under the section and then pull the brush and hair forward around your face (this curving motion creates body). Place the hair-dryer on top of the brush until you reach the ends and then turn the ends under. Repeat until dry.


step 6

Take a section of your hair no wider than the diameter of your brush. Place your brush under and at the roots of your section. Then with your blow-dryer above, drag the brush up through the mid-lengths and ends of the hair following with your blow-dryer and pulling the hair to the left. Repeat until your hair is completely dry.


step 7

Take a section of your hair no wider than the diameter of your brush. Place your brush under and at the roots of your section. Then with your blow-dryer above, drag the brush up through the mid-lengths and ends of the hair following with your blow-dryer and pulling the hair to the right. Repeat until your hair is completely dry.


step 8

To blow-dry the crown/top sections, take a section of hair no bigger than the diameter of the brush and blow-dry the hair placing the brush under the section of hair. With your blow-dryer in front of the brush, follow the brush in an upwards direction at the roots and an outwards position at the ends for volume and softness. Continue until the section is dry.


step 9

A small hot roller is used to give your hair tighter curls.


step 10

Take the entire back section of your hair, and then starting from the crown, take a smaller section of hair no wider than the diameter of the hot roller and comb it through to ensure there are no knots. Place the roller at the ends of the section of hair, being sure to smooth the ends under, and then twist the roller down the hair shaft until it meets your head and then secure it in place with a pin or clip. Repeat this step until you have reached the nape of your neck and the entire back section of your hair is completed. Keep the rollers in your hair until they cool.


step 11

Take a section of hair no wider than the diameter of the hot roller and comb it through to ensure there are no knots. Place the roller at the ends of the section of hair, being sure to smooth the ends under, and then twist the roller down the hair shaft towards the roots and secure it with a pin or clip. Continue applying the rollers through your front section down to your ears. Keep the rollers in your hair until they cool.


step 12

Pick up a small selection of hair from your mid section no bigger than your tail comb. Place your comb at the roots and then comb up and down until the hair is standing up by itself. Continue to the crown and finish at the sides. Repeat this step if you require more volume.


step 13

Apply a small amount of wax to your fingertips and then lightly piece and pinch the ends of your hair.


step 14

Apply some hard wax to your fingertips and then rub it into your roots while lifting your strands for soft volume.


step 15

Apply a very small amount of smoothing shine to the palms of your hands and then run it through the mid-lengths and ends of your hair. Be careful not to add any to the roots or a large amount to any section of the hair as smoothing shine can be very heavy on the hair, weighing it down and making it appear oily.


step 16

Lacquer is great for strong hold. A small amount is all that is required to finish and should be applied from an arms length distance to the entire style.


Recommended Hairstyles...