Abby Brammell Long Curly Dark Blonde Hairstyle


Added: 06 Oct 2009
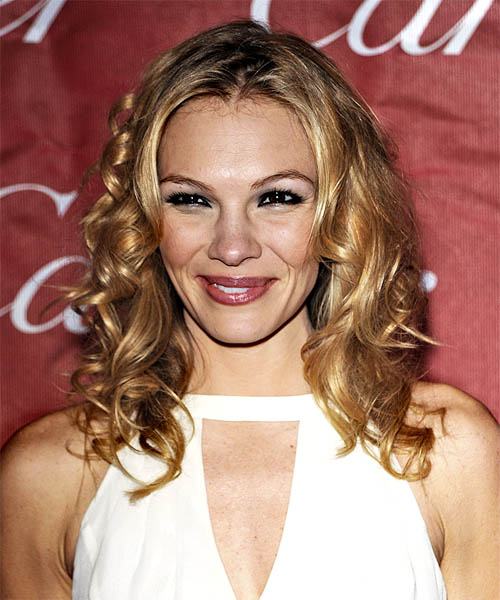
Abby Brammell looked fantastic at the 20th Annual Palm Springs International Film Festival Awards with her bouncy 'do. Her jagged-cut length was complemented by jagged-cut layers from the mid-lengths to the ends (which also enhanced her waves and created plenty of body and volume). This hairstyle is perfect for those with longer face shapes looking to add width to their style.

Hairstyle Suitability Rating: ★★★★★
Hairstyle Popularity Rating: ★★★★★

Hairstyle Type

Category
Formal
Length
Long
Elasticity
Curly
Hair Color
Dark Blonde

Haircut Technique

Type

Suitability

Gender
Women
Face Shape
oval,oblong,square,diamond
Hair Density
Thin/Medium
Hair Texture
Fine/Medium

Age
Under 21, 21 - 30, 31 - 40, and 41 - 50
Height
Any
Weight
Thin/Average

Forehead Height
Short/Average
Neck Length
Short/Average
Ears
Small/Average
Nose
Small/Average
Glasses
Yes

Styling

Time
30+ minutes
Tip
Use the curling iron on the very ends of your hair to add extra curl where needed.
Products
mousse, wax, smoothing shine, lacquer
Tools
blow dry, curling iron


Similar hairstyles you may be interested in...


step 1

Apply styling mousse to damp hair, using your palm as a measuring guide, and evenly distribute it along the hair shaft. Styling mousse will add hold and can help achieve better results.


step 2

A medium radial brush is used on medium to long hair types to smooth out wavy or curly hair textures or to add body to straight hair. When selecting a radial brush, always use one with a pure bristle as this will not tear or damage the hair.


step 3

To blow-dry under, start at the nape/back and place your brush under the section of hair close to the nape. With the dryer held up over the hair, pull the brush from the roots and continue to the mid length's, keeping the blow-dryer following over the top. Once you reach the ends, curve them under. Repeat this step until the section is completely dry.


step 4

To blow-dry the sides, take out a small section of hair from the front and clip the rest of the hair away. Next, place the brush under the section and then pull the brush and hair forward around your face (this curving motion creates body). Place the hair-dryer on top of the brush until you reach the ends and then turn the ends under. Repeat until dry.


step 5

To blow-dry the crown/top sections, take a section of hair no bigger than the diameter of the brush and blow-dry the hair placing the brush under the section of hair. With your blow-dryer in front of the brush, follow the brush in an upwards direction at the roots and an outwards position at the ends for volume and softness. Continue until the section is dry.


step 6

Take a section of your hair no wider than the diameter of your brush. Place your brush under and at the roots of your section. Then with your blow-dryer above, drag the brush up through the mid-lengths and ends of the hair following with your blow-dryer and pulling the hair to the right. Repeat until your hair is completely dry.


step 7

Take a section of your hair no wider than the diameter of your brush. Place your brush under and at the roots of your section. Then with your blow-dryer above, drag the brush up through the mid-lengths and ends of the hair following with your blow-dryer and pulling the hair to the left. Repeat until your hair is completely dry.


step 8

A medium curling iron is used to create medium sized curls.


step 9

Starting from the back, take a small section of hair and place the ends at the base of your curling iron barrel and then wrap the hair up around the barrel until you reach your roots. Hold the hair for 5 to 10 seconds and then release the hair by unwinding the strands backwards. Continue this step until the entire back section of your hair is completed.


step 10

Take a small section of hair and place the ends at the base of your curling iron barrel and then wrap the hair up around the barrel until you reach your mid-lengths. Hold the hair for 5 to 10 seconds and then release the hair by unwinding the strands backwards.


step 11

Apply some wax to your fingertips and then pull through the ends of your hair in a downward motion to achieve a sculptured look. Pinch clumps of hair in different directions for a messier result.


step 12

Apply a small amount of wax to your fingertips and then lightly piece and pinch the ends of your hair.


step 13

Apply some hard wax to your fingertips and then rub it into your roots while lifting your strands for soft volume.


step 14

Apply a very small amount of smoothing shine to the palms of your hands and then run it through the mid-lengths and ends of your hair. Be careful not to add any to the roots or a large amount to any section of the hair as smoothing shine can be very heavy on the hair, weighing it down and making it appear oily.


step 15

Lacquer is great for strong hold. A small amount is all that is required to finish and should be applied from an arms length distance to the entire style.


Recommended Hairstyles...