Short Brunette And Light Blonde Two-Tone Hairstyle With Layered Bangs


Added: 04 Apr 2013
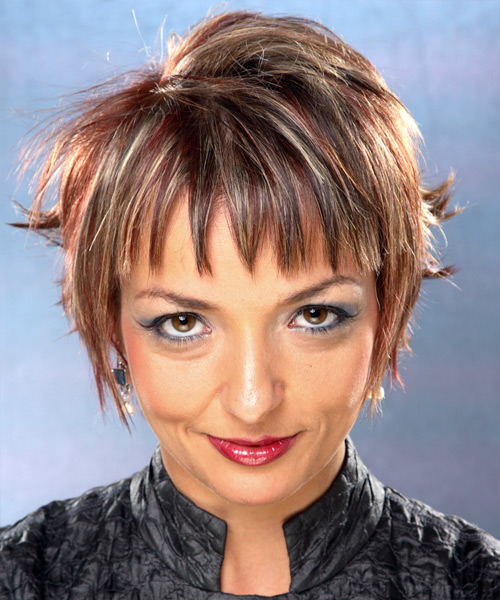
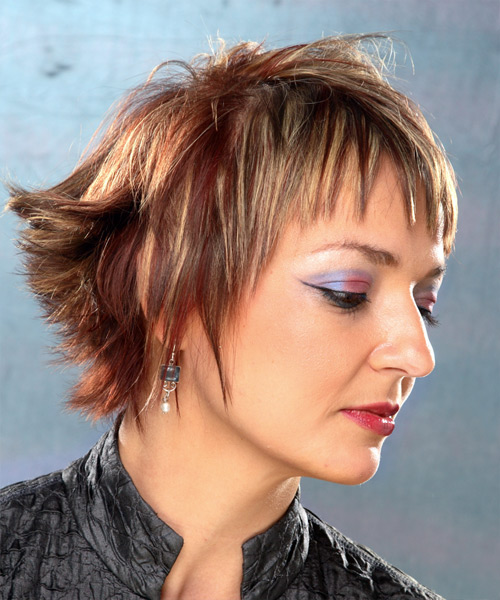
The short brunette hairstyle with layered bangs is a chic yet simple way to add volume and color to your look. This style is perfect for those who want to wear hair up or down but want something edgy.

Our model in this hairdo perfectly ravishes this brunette hair color with bold lips and smoky eye makeup. Her sharp facial features are perfectly complimenting to this hairstyle. Creative edges make this hairstyle stand out, and the jagged-cut edges give this look a defined and textured finish. Another great feature is the combination of colors that perfectly completes this style. For the hair styling technique, the back is layered to create shape and show definition, and the sides blend in with the jagged-cut bangs. This hairstyle suits women with thin to medium hair density and fine to medium texture. It is excellent for women with round or oval face shapes. It will help elongate your face and make it appear slimmer. The long layer in the front gives this look a dramatic dimension while still being easy to wear. The bangs add a subtle touch of interest to your look and are short enough that they won't make your eyes stand out.

You can keep this short hairstyle looking fresh and new with regular trims after 4 to 6 weeks. Make sure your bangs are long enough to grow out naturally but short enough to maintain when you go in for a trim. With layered bangs and a short length, this cut makes it easy for you to create many different looks.


Visual Story

Short Brunette And Light Blonde Two-Tone Hairstyle With Layered Bangs- Visual Story


Hairstyle Suitability Rating: ★★★★★
Hairstyle Popularity Rating: ★★★★★

Hairstyle Type

Category
Casual
Length
Short
Elasticity
Straight
Hair Color
Brunette and Light Blonde Two-Tone

Haircut Technique

Type
Razor Cut

Suitability

Gender
Women
Face Shape
round,oval,square,heart,triangular
Hair Density
Thin/Medium
Hair Texture
Fine/Medium

Age
Under 21, 21 - 30, 31 - 40, and 41 - 50
Height
Any
Weight
Thin/Average/Large

Forehead Height
Short/Average
Neck Length
Short/Average
Ears
Small/Average
Nose
Small/Average
Glasses
No

Styling

Time
30+ minutes
Tip
Direct your hair into position while applying the finishing products.
Products
mousse, wax, lacquer
Tools
blow dry


Similar hairstyles you may be interested in...


step 1

Apply styling mousse to damp hair, using your palm as a measuring guide, and evenly distribute it along the hair shaft. Styling mousse will add hold and can help achieve better results.


step 2

Using the corner of your comb and standing in front of a mirror find the middle of your right eye and then drag the comb straight up slowly until you reach your hairline and then continue back in a straight manner to achieve an even right part. A side part is great for longer face shapes because it creates the illusion of width.


step 3

A medium radial brush is used on medium to long hair types to smooth out wavy or curly hair textures or to add body to straight hair. When selecting a radial brush, always use one with a pure bristle as this will not tear or damage the hair.


step 4

Starting at the nape/back of the hair, place your brush on top of the section and blow-dryer down starting from the roots and using tension as you go. Next, place the blow-dryer underneath the hair and continue to blow-dry the ends out. Make sure to follow the brush with the blow-dryer in an outwards direction. If you like fuller flicks, hold the ends out and roll them up into the brush and apply the heat for longer.


step 5

Take a section of your hair no wider than the diameter of your brush. Place your brush under and at the roots of your section. Then with your blow-dryer above, drag the brush up through the mid-lengths and ends of the hair following with your blow-dryer and pulling the hair to the left. Repeat until your hair is completely dry.


step 6

Take a section of your hair no wider than the diameter of your brush. Place your brush under and at the roots of your section. Then with your blow-dryer above, drag the brush up through the mid-lengths and ends of the hair following with your blow-dryer and pulling the hair to the right. Repeat until your hair is completely dry.


step 7

When blow-drying your bangs forward, clip your hair back leaving only your bangs out. Position your bangs evenly in your brush, taking the hair in a forward direction. Blow-dry from roots to ends, keeping the tension consistent, and evenly distribute heat over the whole section of hair that you are working on. Repeat until the hair is dry. This will stop any frizz that may occur.


step 8

Pick up a small selection of hair from your mid section no bigger than your tail comb. Place your comb at the roots and then comb up and down until the hair is standing up by itself. Continue to the crown and finish at the sides. Repeat this step if you require more volume.


step 9

Using wax and your fingers grab the mid-lengths of your hair and then drag it out and upwards for a full and messy result. Remember not to overdo the wax or your result will be a flat and greasy style.


step 10

Using a small amount of wax, work it through the mid-lengths and ends in a downward, pinching motion. For added texture, apply more pinching and more wax.


step 11

Apply a small amount of wax to your fingertips, and then using your fingers, rake through your bangs pinching the ends as you go to create a feathered, textured effect.


step 12

Apply some hard wax to your fingertips and then rub it into your roots while lifting your strands for soft volume.


step 13

Lacquer is great for strong hold. A small amount is all that is required to finish and should be applied from an arms length distance to the entire style.


Recommended Hairstyles...