Lady Gaga Long Wavy Light Champagne Blonde Hairstyle with Blunt Cut Bangs


Added: 16 Oct 2017
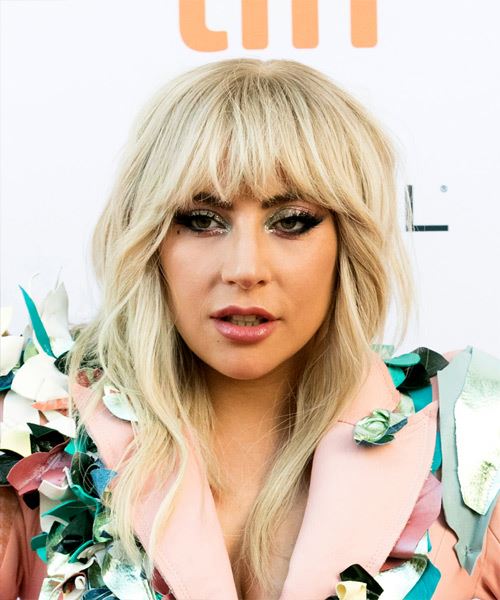
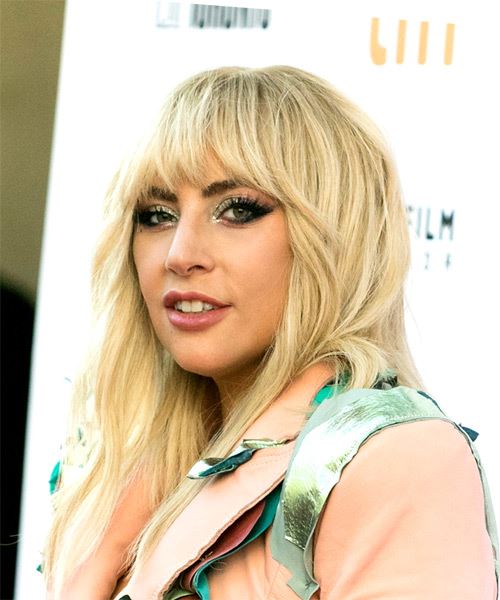
Seventies chic is the main idea for this hairstyle. These blonde locks are blow-dried with some soft waves to achieve a soft and simple look and feel. The bangs are blunt cut to frame the eyes and completes the over-all look magnificently.

Lady Gaga looks fabulous here in blunt cut long locks. This hairstyle is ideal for Lady Gaga's thick hair texture as well as her oval face shape. The blunt fringe hides her high forehead while creating a sexy frame for her eyes. The rest of the hair is left long and softly waved which shows off her high cheekbones and large eyes, while softening up her jaw line. Gaga's natural hair texture shines through this hairstyle and adds body and volume. This versatile 'do channels a Seventies rock chick vibe which is perfect for this songstress.

As for the color, Lady Gaga is flaunting a lovely shade of light champagne blonde here. This shows off her warm skin tone nicely and harmonizes well with her green eyes. Lady Gaga has naturally dark brown hair but as you can see, this hair color can work well for both natural blondes and brunettes with golden complexions.

Stefani Joanne Angelina Germanotta, known professionally as Lady Gaga, is an American singer, songwriter, and actress. Her net worth in 2016 was estimated at $275 million.

Hairstyle Suitability Rating: ★★★★★
Hairstyle Popularity Rating: ★★★★★

Hairstyle Type

Category
Casual
Length
Long
Elasticity
Wavy
Hair Color
Light Champagne Blonde

Haircut Technique

Type
Scissor Cut

Suitability

Gender
Women
Face Shape
round,oval,oblong,heart,diamond,triangular
Hair Density
Medium
Hair Texture
Medium

Age
Under 21, 21 - 30, 31 - 40, and 41 - 50
Height
Any
Weight
Thin/Average/Large

Forehead Height
Long
Glasses
No

Styling

Time
20 minutes
Tip
Piece the ends out with wax for shape and texture.
Products
mousse, wax
Tools
blow dry


Similar hairstyles you may be interested in...


step 1

Apply styling mousse to damp hair, using your palm as a measuring guide, and evenly distribute it along the hair shaft. Styling mousse will add hold and can help achieve better results.


step 2

Using the corner of your comb and standing in front of a mirror find the middle of your nose and then drag the comb straight up slowly until you reach your hairline and then continue back in a straight manner to achieve an even middle part. A middle part is a great way to make small, round face shapes appear longer and thinner.


step 3

A medium radial brush is used on medium to long hair types to smooth out wavy or curly hair textures or to add body to straight hair. When selecting a radial brush, always use one with a pure bristle as this will not tear or damage the hair.


step 4

Using your brush, blow-dry in small sections starting from the nape/back. Tilting your head forward, place the brush an inch below the roots to hold them taut and aim the dryer above the brush for a few seconds before continuing to the ends.


step 5

To blow-dry the crown/top sections, take a section of hair no bigger than the diameter of the brush and blow-dry the hair placing the brush under the section of hair. With your blow-dryer in front of the brush, follow the brush in an upwards direction at the roots and an outwards position at the ends for volume and softness. Continue until the section is dry.


step 6

Using your brush, blow-dry in small sections starting from the sides. Tilting your head forward, place the brush an inch below the roots to hold them taut and aim the dryer above the brush for a few seconds before continuing to the ends. Repeat this step on a new section directly above the dry one.


step 7

Take a section of your hair from your ear to your temple that is the same diameter as the brush. Place your brush on top of the hair starting at the roots and pull the hair slowly in an outwards direction with your blow-dryer following in front. Repeat this step and then once the roots are dry, drag the brush to the mid-lengths and then slowly turn the brush in an inwards direction, flicking it through the ends.


step 8

Take a section of your hair from your ear to your temple that is the same diameter as the brush. Place your brush on top of the hair starting at the roots and pull the hair slowly in an outwards direction with your blow-dryer following in front. Repeat this step and then once the roots are dry, drag the brush to the mid-lengths and then slowly turn the brush in an inwards direction, flicking it through the ends.


step 9

A small radial brush is used on shorter hair types to add more body or in longer hair types to create curl. When selecting a radial brush, always use one with a pure bristle as this will not tear or damage the hair.


step 10

When blow-drying your bangs forward, clip your hair back leaving only your bangs out. Position your bangs evenly in your brush, taking the hair in a forward direction. Blow-dry from roots to ends, keeping the tension consistent, and evenly distribute heat over the whole section of hair that you are working on. Repeat until the hair is dry. This will stop any frizz that may occur.


step 11

Apply a small amount of wax to your fingertips, and then using your fingers, rake through your bangs pinching the ends as you go to create a feathered, textured effect.


step 12

To finish the look, apply wax to your fingertips, making sure to smooth the wax over all of your fingers, then simply pinch the wax onto the ends of your hair, applying as much or as little as needed.


step 13

To get your sides to sit out, apply a small amount of wax to your fingertips and then working mainly on the ends, pinch them while dragging the hair in an out and upwards motion. Be careful not to overdo that wax or your result will be a flat and limp style.


Recommended Hairstyles...