Jessica Alba Long Wavy Ash Brunette Hairstyle with Layered Bangs


Added: 10 Nov 2010
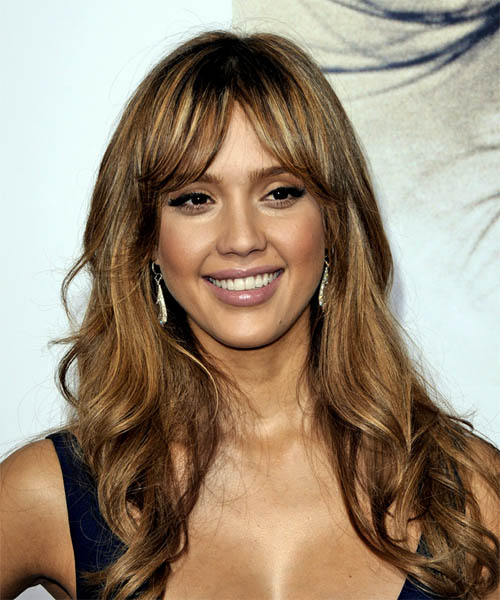
Jessica Alba arrived at the premiere of the new film The Eye looking drop-dead gorgeous. Flowing locks caressed her shoulders, and long layers enhanced her hair's wicked waves. Completing the picture perfectly were here bangs, delightfully framing her face

Hairstyle Suitability Rating: ★★★★★
Hairstyle Popularity Rating: ★★★★★

Hairstyle Type

Category
Casual
Length
Long
Elasticity
Wavy
Hair Color
Ash Brunette

Haircut Technique

Type
Scissor Cut

Suitability

Gender
Women
Face Shape
oval,oblong,diamond,triangular
Hair Density
Thin/Medium
Hair Texture
Fine/Medium

Age
Under 21, 21 - 30, and 31 - 40
Height
Any
Weight
Thin/Average/Large

Forehead Height
Short/Average
Neck Length
Short/Average
Ears
Small/Average
Nose
Small/Average
Glasses
No

Styling

Time
30+ minutes
Tip
Use the large curling iron in large sections of your hair to add this slight wave.
Products
mousse, wax, smoothing shine, hair spray
Tools
blow dry, curling iron


Similar hairstyles you may be interested in...


step 1

Apply styling mousse to damp hair, using your palm as a measuring guide, and evenly distribute it along the hair shaft. Styling mousse will add hold and can help achieve better results.


step 2

Using the corner of your comb and standing in front of a mirror find the middle of your nose and then drag the comb straight up slowly until you reach your hairline and then continue back in a straight manner to achieve an even middle part. A middle part is a great way to make small, round face shapes appear longer and thinner.


step 3

A large radial brush is usually used on long straight hair types or to smooth out wavy or curly hair textures. When selecting a radial brush, always use one with a pure bristle as this will not tear or damage the hair.


step 4

Starting at the nape/back of the hair, place your brush on top of the section and blow-dryer down starting from the roots and using tension as you go. Next, place the blow-dryer underneath the hair and continue to blow-dry the ends out. Make sure to follow the brush with the blow-dryer in an outwards direction. If you like fuller flicks, hold the ends out and roll them up into the brush and apply the heat for longer.


step 5

To blow-dry the sides, take out a small section of hair from the front and clip the rest of the hair away. Next, place the brush under the section and then pull the brush and hair forward around your face (this curving motion creates body). Place the hair-dryer on top of the brush until you reach the ends and then turn the ends under. Repeat until dry.


step 6

When blow-drying your bangs forward, clip your hair back leaving only your bangs out. Position your bangs evenly in your brush, taking the hair in a forward direction. Blow-dry from roots to ends, keeping the tension consistent, and evenly distribute heat over the whole section of hair that you are working on. Repeat until the hair is dry. This will stop any frizz that may occur.


step 7

A large curling iron is used to create large soft curls and can be used to add body.


step 8

Starting from the back, take a small section of hair and place the ends at the base of your curling iron barrel and then wrap the hair up around the barrel until you reach your roots. Hold the hair for 5 to 10 seconds and then release the hair by unwinding the strands backwards. Continue this step until the entire back section of your hair is completed.


step 9

Take a small section of hair and place the ends at the base of your curling iron barrel and then wrap the hair up around the barrel until you reach your mid-lengths. Hold the hair for 5 to 10 seconds and then release the hair by unwinding the strands backwards.


step 10

Apply a small amount of wax to your fingertips and then lightly piece and pinch the ends of your hair.


step 11

Apply a small amount of wax to your fingertips, and then using your fingers, rake through your bangs pinching the ends as you go to create a feathered, textured effect.


step 12

Apply a very small amount of smoothing shine to the palms of your hands and then run it through the mid-lengths and ends of your hair. Be careful not to add any to the roots or a large amount to any section of the hair as smoothing shine can be very heavy on the hair, weighing it down and making it appear oily.


step 13

To finish, apply a minimal amount of hairspray from an arms length distance to the top, sides and back. Take care not to use too much or you will end up with a white, flaky residue which looks like dandruff.


Recommended Hairstyles...