Short Mahogany Asymmetrical Haircut With Side Swept Bangs


Added: 10 Nov 2010
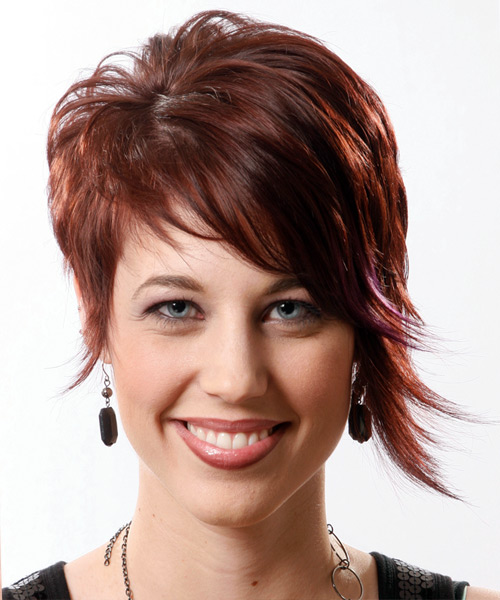
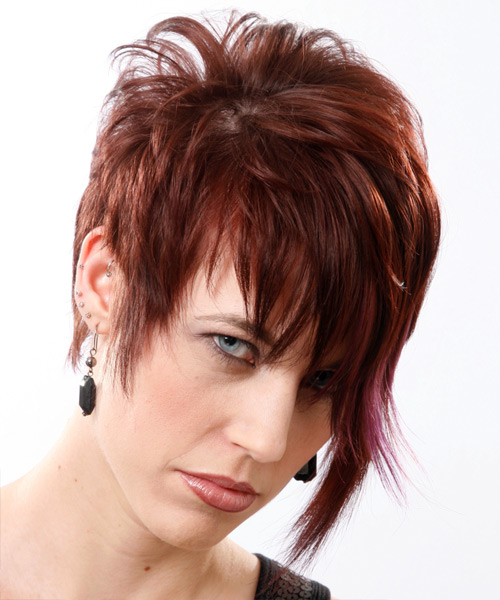
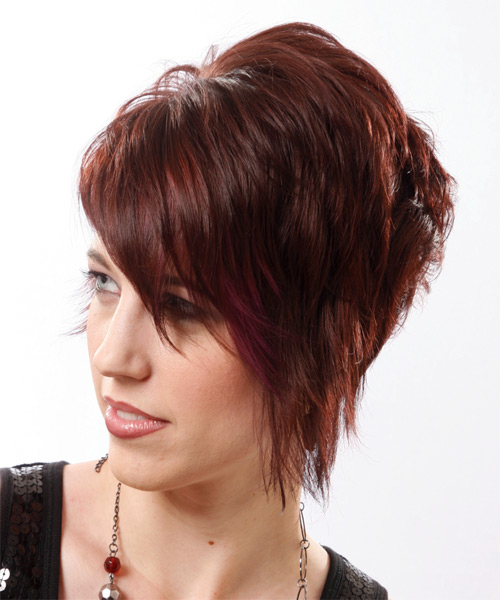
This short asymmetrical haircut is an excellent option for those who want to add volume and texture to their look. The side-swept bangs add texture to your face, while layering helps add volume at the roots. Our model in this mahogany-brunette hairstyle gives us wild and daring fashion trends. In this bold, glossy 'do, she is glowing from her minimalistic makeup and soft razor cut. Her bold lips complement her style perfectly. It is an eye-catching hairstyle for all the wild and brave people wanting a bit more edge in their looks. For the styling technique, the back is tapered short to the head, and the nape is left wispy. The sides are razor-cut, and one side has been left longer than the other to create a stunning finish at the front. The hairstyle is ideal for women with oval, oblong, and square face shapes, and it features side-swept bangs that suit all skin tones and hair textures well. Make a bold statement with this short asymmetrical haircut that will show off your classic bone structure. The side-swept bangs will enhance the natural beauty of your face, while the medium to thick density and fine to medium texture is perfect for everyday use.

This hairstyle is a great way to brighten your face and add some definition with swept bangs. It is excellent for any occasion. You can also maintain it with regular trims to avoid split ends after 4 to 6 weeks. Tease your hair at the roots for height and control.


Visual Story

Short Mahogany Asymmetrical Haircut With Side Swept Bangs- Visual Story


Hairstyle Suitability Rating: ★★★★★
Hairstyle Popularity Rating: ★★★★★

Hairstyle Type

Category
Alternative
Length
Short
Elasticity
Straight
Hair Color
Mahogany Brunette

Haircut Technique

Type
Razor Cut

Suitability

Gender
Women
Face Shape
oval,oblong,square
Hair Density
Medium/Thick
Hair Texture
Fine/Medium

Age
Under 21, 21 - 30, and 31 - 40
Height
Any
Weight
Thin/Average

Forehead Height
Short/Average
Neck Length
Short/Average
Ears
Small/Average
Nose
Small/Average
Glasses
No

Styling

Time
30+ minutes
Tip
Tease your hair at the roots for height and control.
Products
mousse, wax, smoothing shine, lacquer
Tools
blow dry


Similar hairstyles you may be interested in...


step 1

Apply styling mousse to damp hair, using your palm as a measuring guide, and evenly distribute it along the hair shaft. Styling mousse will add hold and can help achieve better results.


step 2

Using the corner of your comb and standing in front of a mirror find the middle of your right eye and then drag the comb straight up slowly until you reach your hairline and then continue back in a straight manner to achieve an even right part. A side part is great for longer face shapes because it creates the illusion of width.


step 3

A medium radial brush is used on medium to long hair types to smooth out wavy or curly hair textures or to add body to straight hair. When selecting a radial brush, always use one with a pure bristle as this will not tear or damage the hair.


step 4

Using your brush, blow-dry in small sections starting from the nape/back. Tilting your head forward, place the brush an inch below the roots to hold them taut and aim the dryer above the brush for a few seconds before continuing to the ends.


step 5

To blow-dry the sides, take out your first sections from the front and clip the rest of the hair up. Place your brush on top of the section, and starting from the roots, blow-dry down using tension as you go. Next, place the blow-dryer underneath the hair and continue to blow-dry the ends out. Continue this step until the hair is dry.


step 6

Take a section of your hair no wider than the diameter of your brush. Place your brush under and at the roots of your section. Then with your blow-dryer above, drag the brush up through the mid-lengths and ends of the hair following with your blow-dryer and pulling the hair to the left. Repeat until your hair is completely dry.


step 7

Take a section of your hair no wider than the diameter of your brush. Place your brush under and at the roots of your section. Then with your blow-dryer above, drag the brush up through the mid-lengths and ends of the hair following with your blow-dryer and pulling the hair to the right. Repeat until your hair is completely dry.


step 8

To blow-dry the crown/top sections, take a section of hair no bigger than the diameter of the brush and blow-dry the hair placing the brush under the section of hair. With your blow-dryer in front of the brush, follow the brush in an upwards direction at the roots and an outwards position at the ends for volume and softness. Continue until the section is dry.


step 9

Pick up a small selection of hair from your mid section no bigger than your tail comb. Place your comb at the roots and then comb up and down until the hair is standing up by itself. Continue to the crown and finish at the sides. Repeat this step if you require more volume.


step 10

Apply some wax to your fingertips and then pull through the ends of your hair in a downward motion to achieve a sculptured look. Pinch clumps of hair in different directions for a messier result.


step 11

Apply a small amount of wax to your fingertips, and then starting about halfway down the hair shaft, pinch and drag the hair in a downward motion before flicking the ends out. Remember not to apply too much wax as it will weigh your hair down.


step 12

Apply some hard wax to your fingertips and then rub it into your roots while lifting your strands for soft volume.


step 13

Apply wax to your fingertips then drag through your bangs, sweeping the hair to the left as you go. Pinching the ends will create soft texture.


step 14

Apply a very small amount of smoothing shine to the palms of your hands and then run it through the mid-lengths and ends of your hair. Be careful not to add any to the roots or a large amount to any section of the hair as smoothing shine can be very heavy on the hair, weighing it down and making it appear oily.


step 15

Lacquer is great for strong hold. A small amount is all that is required to finish and should be applied from an arms length distance to the entire style.


Recommended Hairstyles...